The 'Jobs List' is where information for released jobs is located. Standard Job, Team Job, Multi Job, Job Setup, and Machine transactions share most of the same functionality regarding the 'Jobs List'. If left open, the 'Job Operations List' will automatically refresh every minute to recalculate time information. The 'Jobs List' can be broken down into three main parts: the Top Menu, Jobs List, and Job Details List.
Jobs List

Top Menu
Top Menu

Jobs Count
The 'Jobs Count' is located at the far left side of the 'Top Menu'. This item displays the total count of jobs available. This count will change based on the filter criteria that have been set.
Jobs Count

Work Center List
The 'Work Center' drop-down is located in the center of the 'Top Menu'. The 'Work Center' drop-down is a list of all available 'Work Centers'. This information typically comes from the ERP system. When an employee has a default Work Center set in the employee setup, this drop-down selection will default to the employee’s default work center, and the 'Jobs List' and 'Job Details List' will be filtered by all jobs and operations that contain the default work center that has been set.
Work Centers other than what has been set for the employee may be selected from the drop-down or searched in the drop-down. Changing the Work Center will also change the jobs and operations that are available in the view.
The first option in the drop-down is the 'All Work Centers' option. This is the default when an employee does not have a default Work Center set. This option will show all jobs and operations that are available. It is recommended that employees are assigned default Work Centers, as the jobs list has the potential to be very large without a filter.
Work Centers Drop-Down

All Jobs
When viewing the 'Jobs List' when a job is in process, the 'All Jobs' checkbox should be visible. Clicking the 'All Jobs' checkbox will show all released jobs and will highlight the currently running jobs in yellow. After checking the All Jobs checkbox, all jobs will be filtered by the work center of the currently running job. To view all work centers, 'All Work Centers' or a desired work center will need to be selected.
All Jobs Checkbox

Control Points
If the Control Points checkbox is visible, then Control Points have been enabled in the Shop Floor Pro Settings. When the Control Points checkbox is checked, then the operations for each job will be filtered to only show operations that are control points that have not been completed. Unchecking Control points will show all operations for a job that have not been completed.
Control Points

Search Option
The 'Search Option' is located at the far right of the 'Top Menu'. Typing information into the 'Search Box' will start filtering matched text with every keystroke. This search will look at all fields in the 'Jobs List'. 'Job Operations' are not searched when input is done here.
Search

Jobs List
Display
The 'Jobs List' displays information related to the main job. All fields in the 'Jobs List' can be sorted by clicking on the field. The first click will change the sort to ascending order and the second click will sort the column in descending order. By default, the list is sorted in ascending order by Job and Suffix.
Sorted Field Indicator

By default, the 'Jobs List' will display 10 jobs per page. The list can be changed to show more jobs by clicking one of the options at the bottom left of the window. Pages can be changed by clicking the page number at the bottom right of the window.
Records Per Page

Page Indicator

Fields
Below is a description of the fields that are displayed:
-
Job: This is the job number for the Job.
-
Suffix: This is the suffix for the Job.
-
Item: This is the item that the job will produce when complete.
-
Description: This is the description for the item the job will produce when complete.
-
Qty Released: This is the quantity that was released for the job.
-
Qty Complete: This is the quantity that has been competed against the job and display in green.
-
Qty Scrapped: This is the quantity that has been scrapped against the job and display in red.
-
UOM: This is the UOM for the top-level item that the job will produce.
-
Release Date: This is the date the job was released.
-
Due Date: This is the date the job is due to be completed.
Jobs List Fields

Viewing and Hiding Job Operations
The 'Jobs List' is very interactive. To open a job and view the operations for the job, simply click on a job line. Clicking a job line will open a new area below that shows either the operations that relates to the default Work Center or it will show all operations for the job if the 'All Work Centers' option has been selected. Clicking the active row will hide the 'Job Operations' list and unselect the job.
Expanded Job

Note: Only one job at a time can display the operations unless it is a Multi Job, Machine Job, or Job Move transaction.
Jobs List Colors
The 'Jobs List' will display three different colors, depending on the action.
-
Green: A green row indicates that a job has been selected.
-
Yellow: A yellow row indicates that the selected job is currently in process but is not actively selected.
-
No Color: Indicates that a job selection has not been made.
Job Operations List
The 'Job Operations' list displays information related to the operations associated with a job. To view job operations, refer to the Viewing and Hiding Job Operations section of this page. Below is a description of the fields that are displayed for the job operations.
-
Op: This is the operation for the job.
-
Description: This is the work center description.
-
Work Center: This is the work center code.
-
Control Point: This indicates whether or not the operation is a Control Point operation.
-
Status: Please reference the Operation Statuses section of this page.
-
Expected: This is the expected time for the operation. This value typically comes from the ERP system and is calculated by dividing the pieces per hour by the quantity received. A value will only be displayed for this field when the status is 'Running'.
-
Actual: This is the actual time for the operation. This is an accumulative value, meaning that it sums all the transaction times against the operation. If the 'Actual' time is less than or equal to the 'Expected' time, then this value will be displayed in green. Otherwise, the value will display red. This value will only be shown when the status is 'Running'.
-
Received: This is the quantity that has been received against the operation. If the quantity received is 0 and is a non-control point operation, then the user will be presented with a notification asking whether or not to proceed with the action. If Yes is selected, then the previous quantity completed will be used. If there have not been any completions, then the most previous quantity received will be used.
***Note: The behavior for 0 received quantities is the same for control and non-control points. The only difference is that control point operations will not present the user with a notification, as it is assumed that operations occurring between control points will be automatically backflushed.
-
Complete: This is the quantity that has been completed for the operation.
-
Moved: This is the quantity moved for the operation.
-
Scrapped: This is the quantity scrapped against the operation.
-
Menu: Please reference the Job Operations Menu section of this page.
Job Operations Fields

Operation Statuses
There are two statues that will be displayed for an operation. 'Ready' and 'Running'.
-
Ready: A 'Ready' status indicates that the operation is ready to be started and is shown in blue text. Operations with a 'Ready' status can be started and moved.
-
Running: A 'Running' status will be displayed for any operation that is currently in process. Operations with a 'Running' status can be completed or moved. But can only be transacted by the operator that initiated the transaction or by any employee that is a supervisor.
Job Operations List Colors
Please reference the Jobs List Colors section of this page.
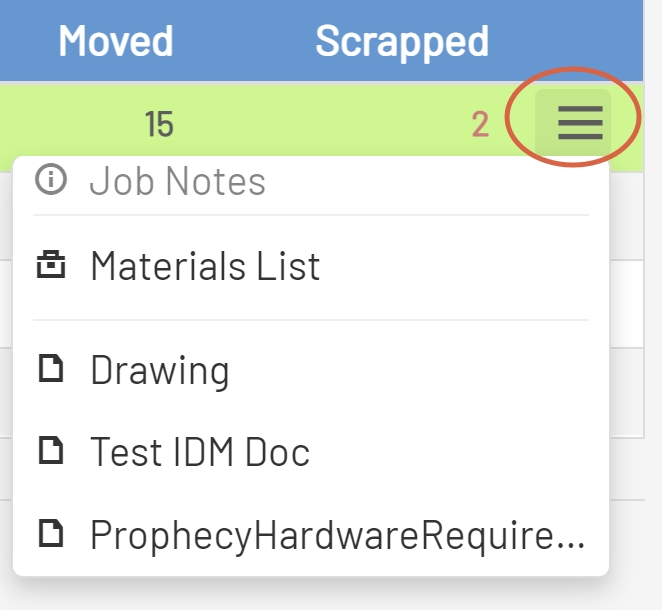
Job Operations Menu
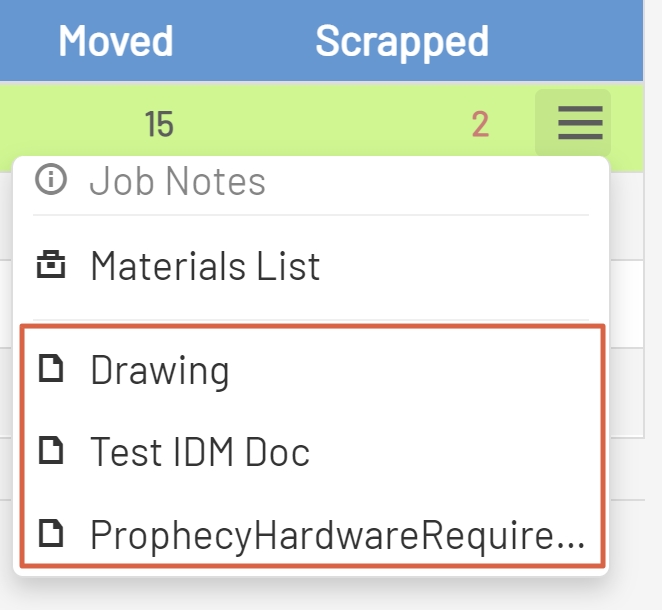
The 'Job Operation Menu' is the last field in the 'Job Operations' list, it contains information that aids the employee in performing work for the associated operation. The 'Job Operations Menu' contains the items listed below.
Job Operations Menu
-
Job Notes: The 'Job Notes' menu item displays any notes that have been added to the job route for the job and operation. This information typically comes from the ERP system.
-
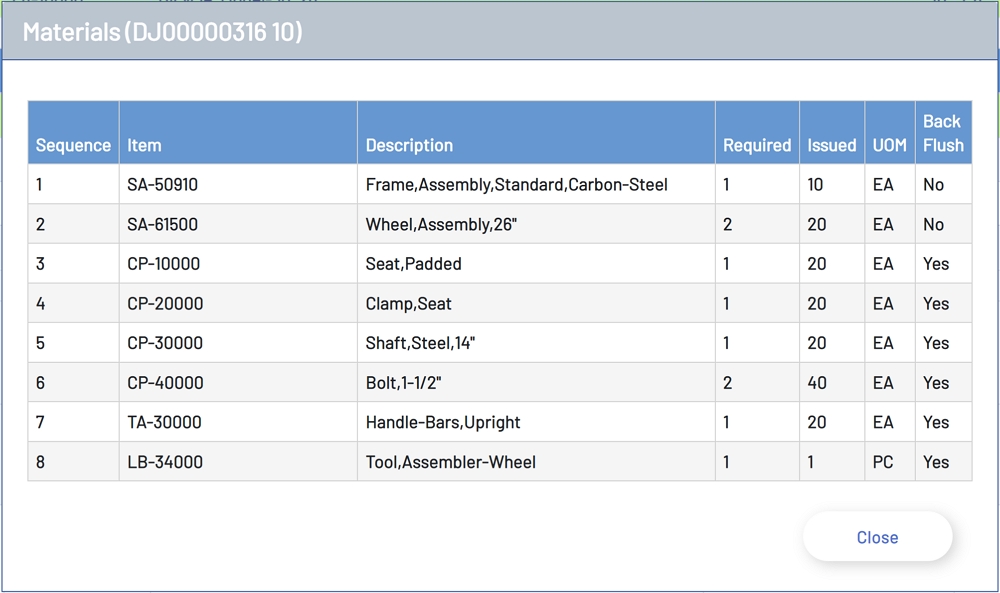
Materials List: This menu option will open a form that displays a list of all materials necessary to perform the operation. This information typically comes from the ERP system. The form contains the following pieces of information:
- Sequence: The position that item falls in the BOM.
- Item: The item from the BOM.
- Description: The description of the BOM item.
- Required: The quantity of the item that is required.
- Issued: The quantity of material that has been issued to the operation. This will be 0 if the item is back flushed.
- UOM: The unit of measure for the BOM item.
- Back Flush: Displays whether the BOM item is back flushed.
Job Operation Materials
-
Documents: The 'Job Operations Menu' will list documents associated with a job. Each document will be displayed by name in the menu. Documents are read in from the locations below:
- Item: Documents added for the top-level item through the Item Master in the ERP.
- Job: Documents added to the job from the Job Orders area of the ERP system for the selected job.
- Job Operation: Documents added through the Job Operations area in the ERP system for the operation.
- IDM: Documents added through the ERP and stored in Infor Document Management. These documents must be added to IDM using the ItemMasterContext in CSI.
Note: In order for documents to be read in from IDM an authorized app has to be setup through the ION API.
Note: Only certain types of documents will be displayed in the browser. Non-browser renderable documents will be automatically downloaded to the local computer.
Documents Example