The Tag Editor is where tag properties and Alarms are set and updated. The Tag Editor consists of two main tabs. The Values tab and the Alarms tab.
The Tag Editor Values tab contains the following editable tag properties:
Common Values
-
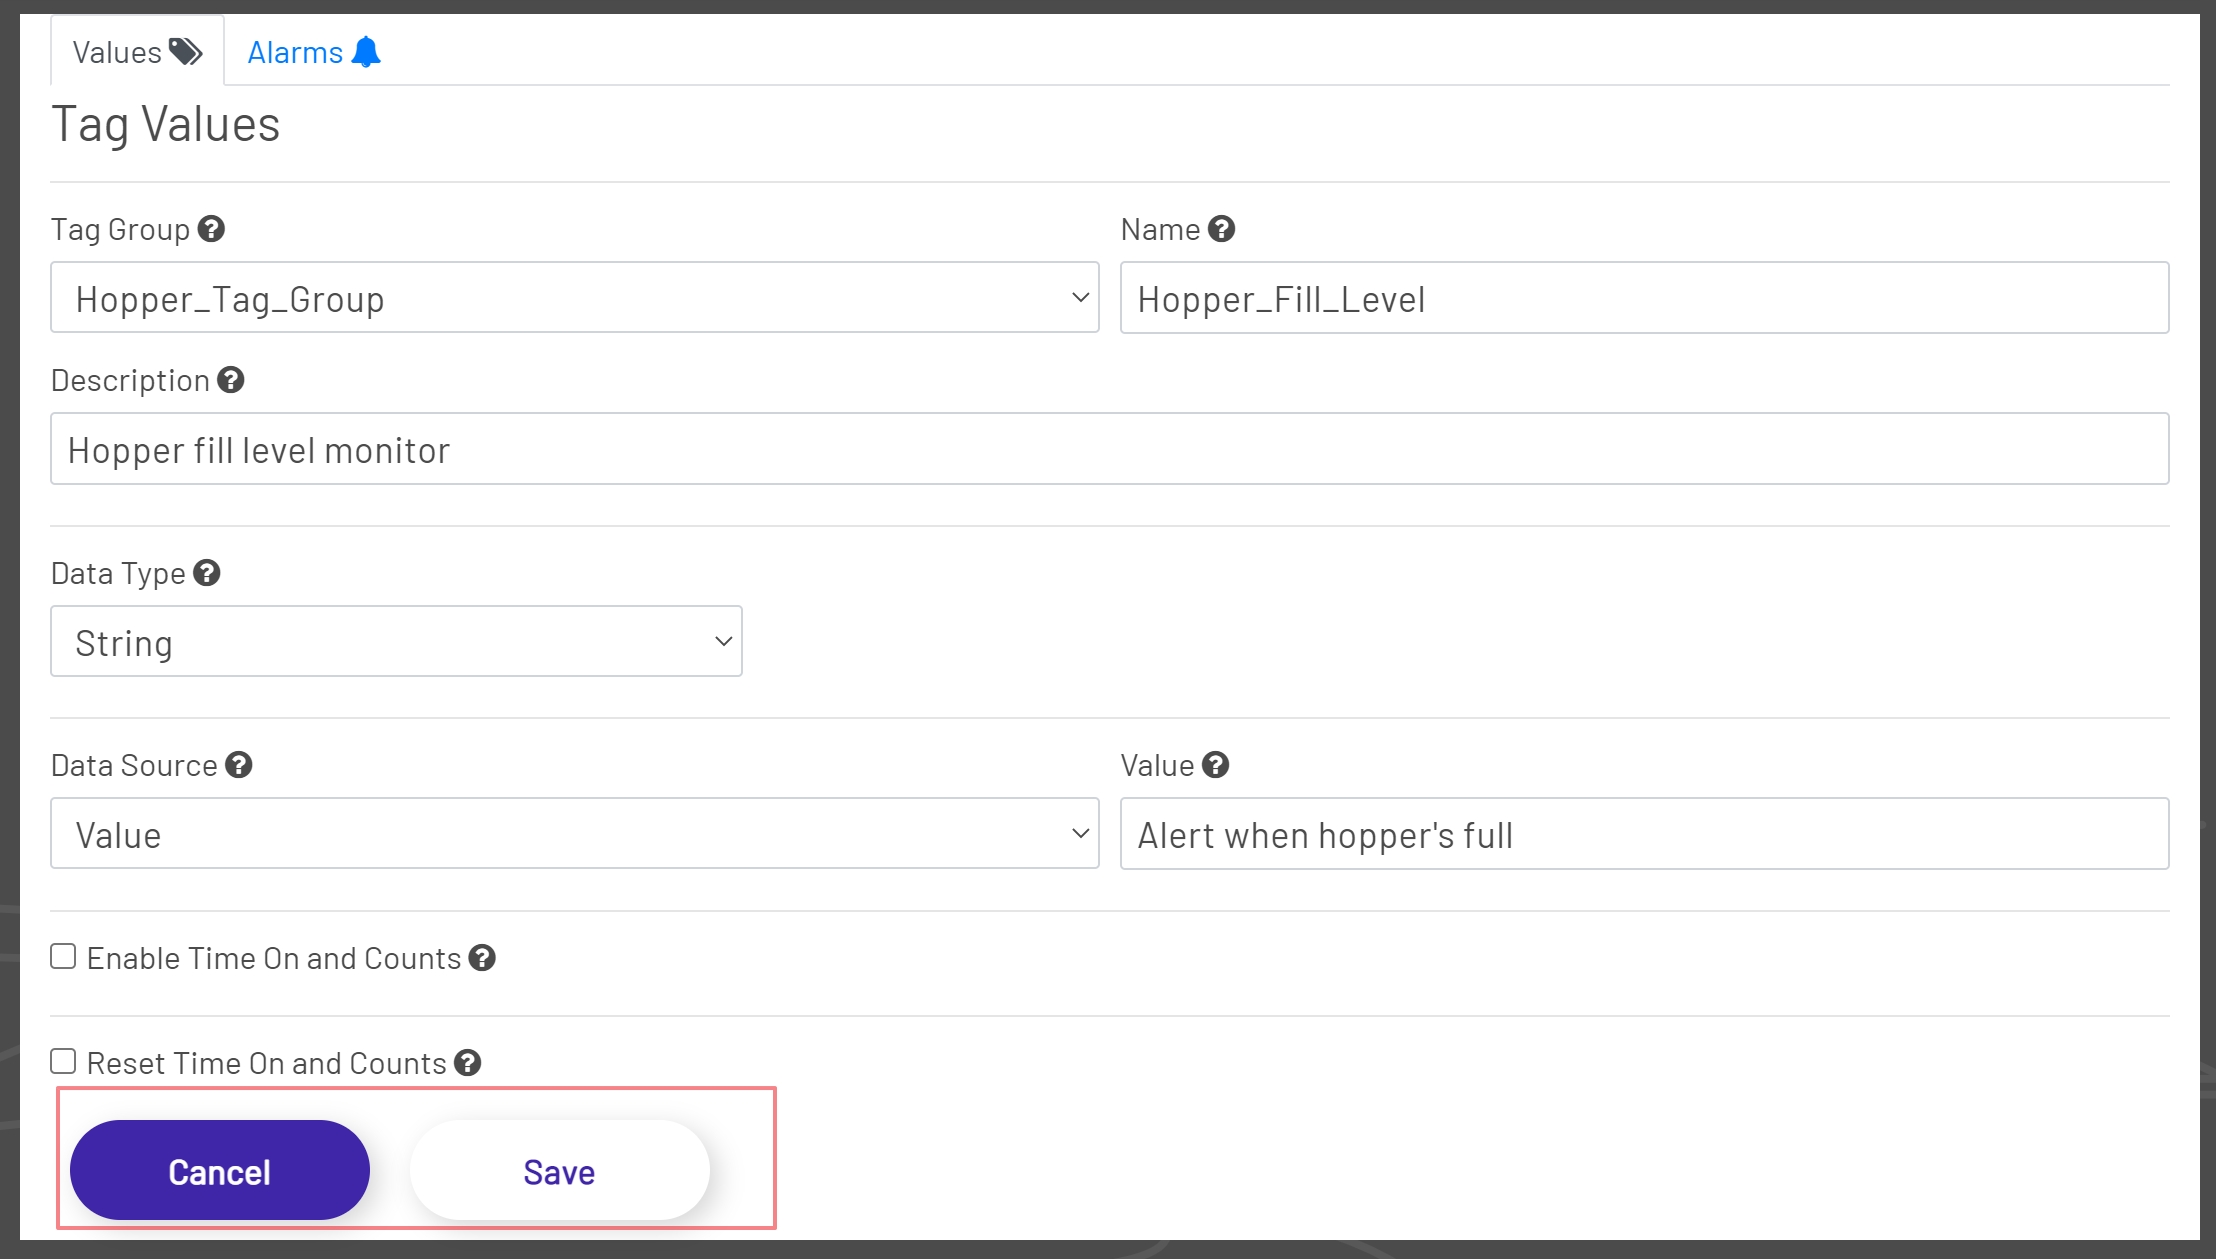
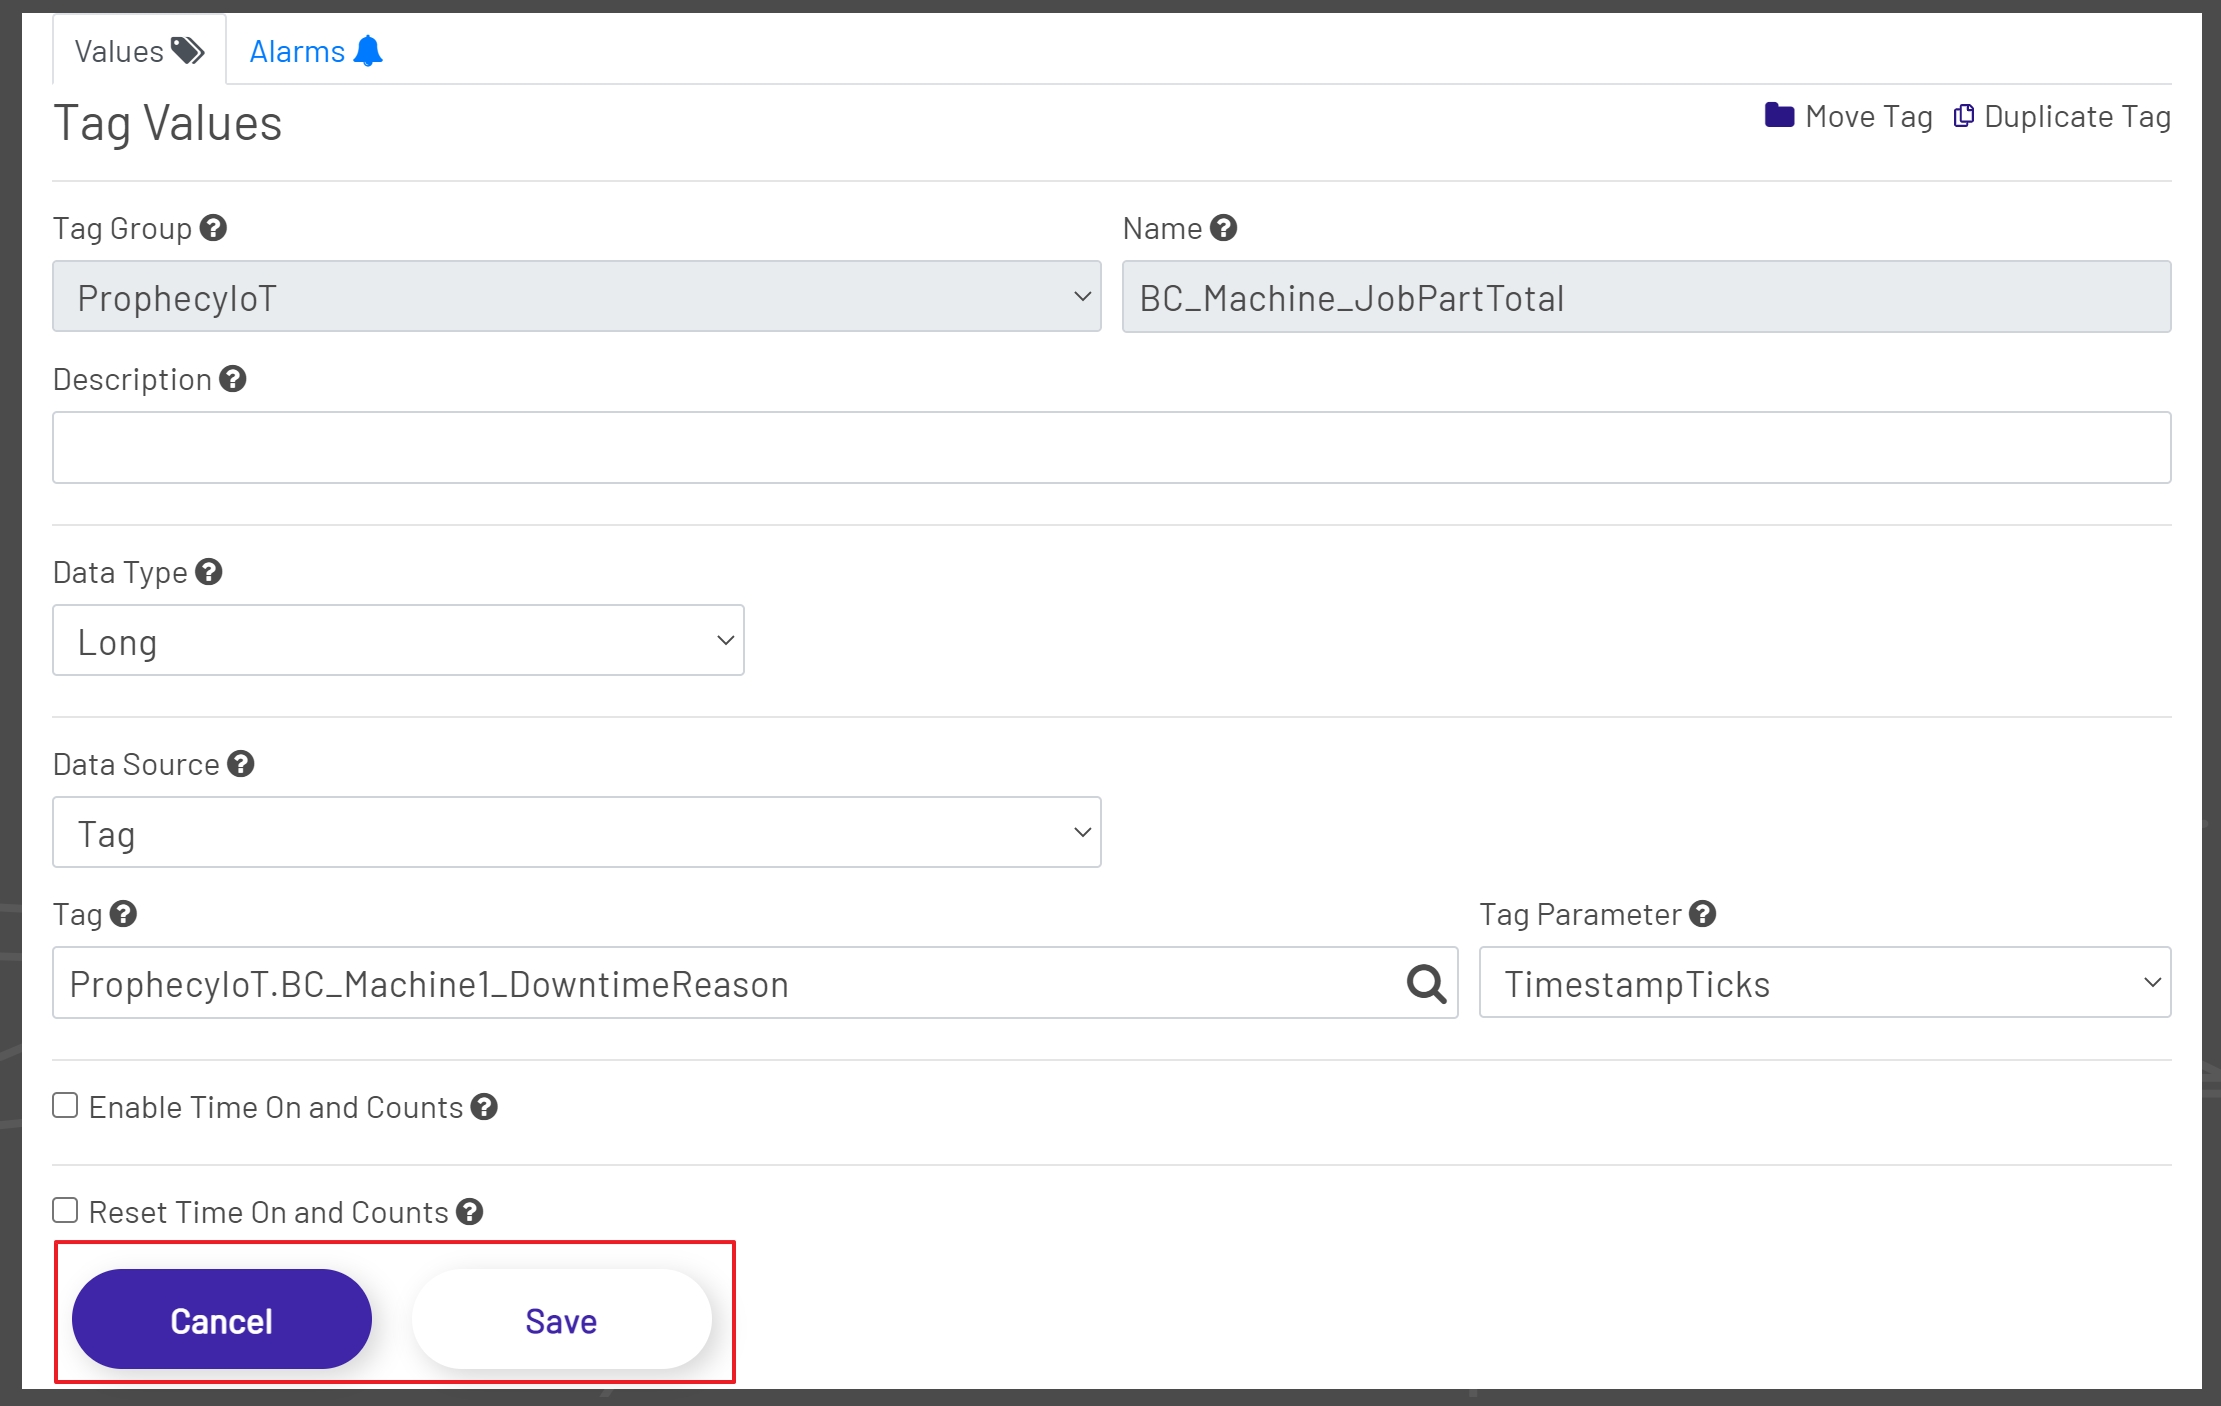
Tag Group: This is the Tag Group that the tag will be located in. All previously created groups will be available for selection in this dropdown. This dropdown is only selectable when Adding a Tag or Duplicating a Tag. This is a required field.
-
Name: This is the Name of the tag that is being created. This field is only editable when Adding a New Tag or Duplicating a Tag. This is a required field.
-
Description: This is the Description of the tag and the text used when an alarm is first enabled.
-
Refresh Frequency: All tags are polled for values at a given frequency. This option let's the user specify that value per tag. The options are Static, 1 Second, 5 Seconds, 10 Seconds, 30 Seconds, 1 Minute, 2 Minutes, 3 Minutes, 5 Minutes, and 10 Minutes. If the value is set to Static, the tag value is fetched just once when the Diagram loads up.
Get Value
The 'Get Value' button can be used to get the most current value for the tag being viewed. For Machine and storage tags, the current value will be displayed as soon as the tag is selected. For complex tag types, the 'Get Value' button will have to be pressed when a user would like to get the most current value for a tag by calling any queries\code that is in the read tab for the tag. Since there are no restrictions on placing writes in the read tabs, use the 'Get Value' button with caution, as this function has the potential to execute code or queries that can mutate data. When selecting a complex tag, a warning message is displayed to the user to indicate the potential danger of clicking this button.

Machine/IoT Tags
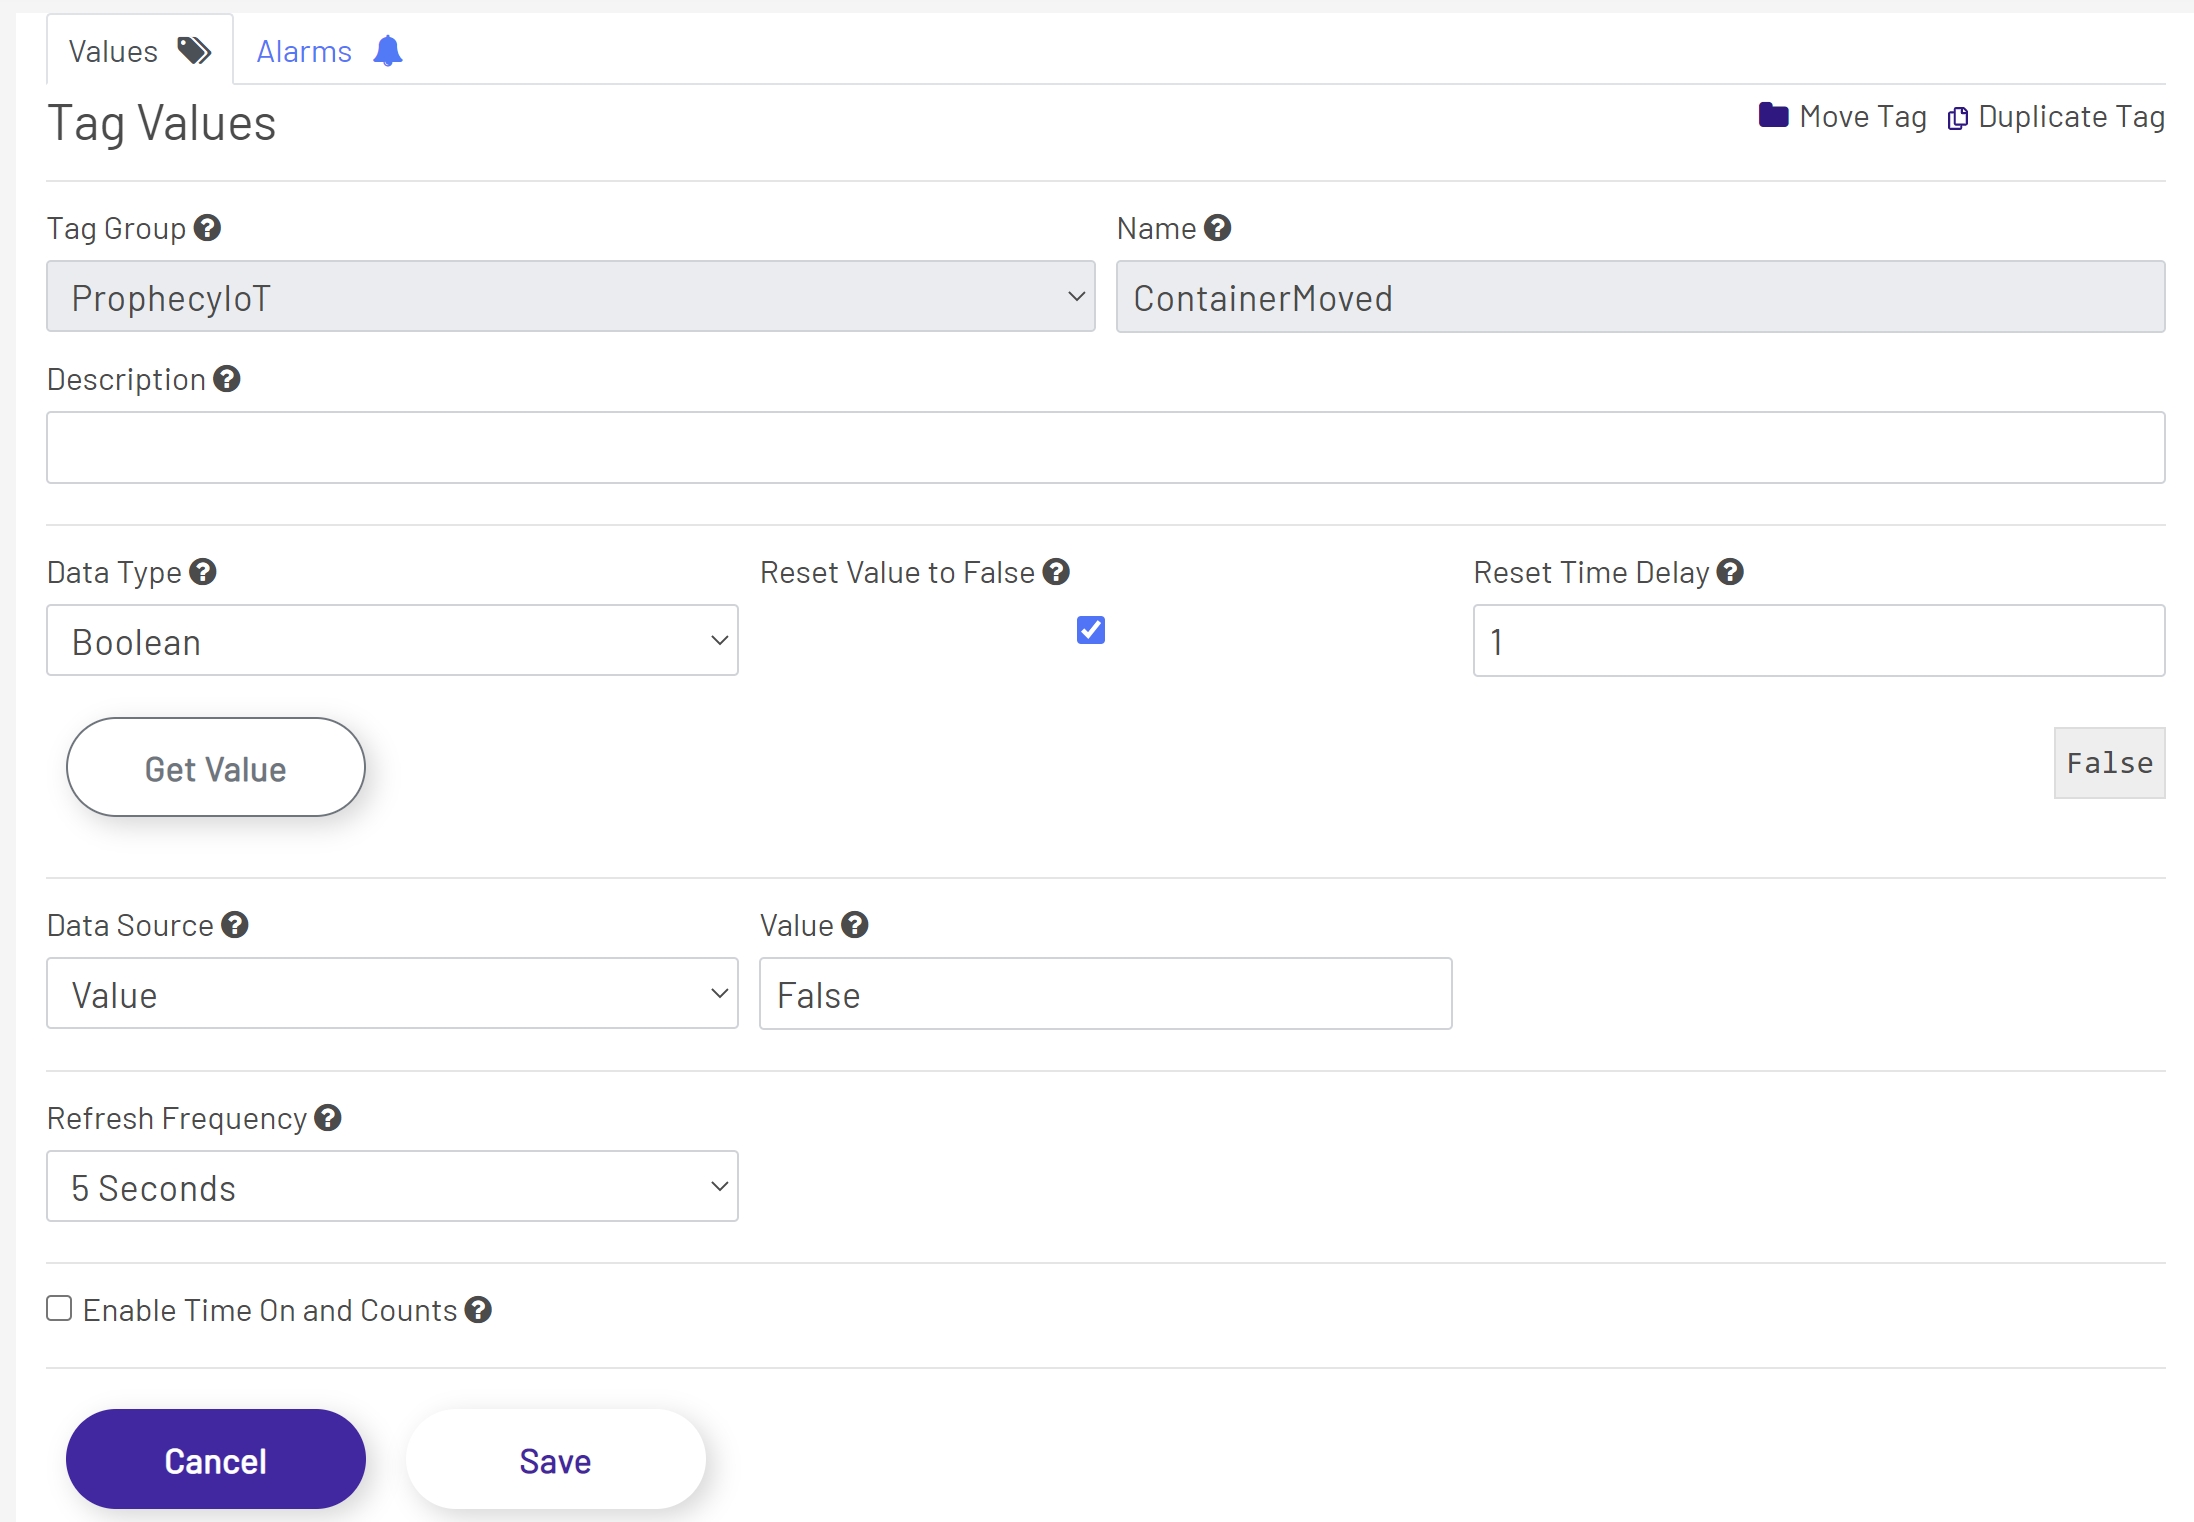
Machine/IoT Tag Values Tab
-
Data Type: This tells the Data Acquisition Engine what type of data it should expect to collect for this tag - Integer, Float, Boolean, String, etc. This field is required.
-
Reset Value to False: When this is checked (set to true), a write of false will be sent immediately when the value transitions from false to true. This is only available for Boolean data types.
-
Reset Time Delay: This is the amount of time in seconds to delay the reset of a Boolean value when Reset Value To False is enabled. This is only available for Boolean data types and only visible when the Reset Value to False property is set to true.
-
Data Source: This will usually - though not always - be set to 'Value'. Tags whose values come from calculations or 3rd-party services may require other choices here. Your Godlan service rep can help set the correct value. A selection for this field is required.
-
Tag: This is the tag used when the Data Source is set to Tag. This field is only available when the Data Source is set to Tag. This field is required when the Data Source is set to Tag.
-
Tag Parameter: This is the tag parameter for the tag selected as the Tag Data Source. This is almost always set to Value, but there can be occasions when this needs to be set to something else. This field is only available when the Data Source is set to Tag and only after a tag has been selected. This field is required when the Data Source is set to Tag.
-
Value: This is the initial value of the tag. This field is only available when the Data Source is set to Value.
-
Enable Time On and Counts: When enabled this will keep track of how long a Boolean value is true and how many times it transitions to true.
-
Daily Reset Hour: This is the hour of day that the Time On and Counts is reset for the time and counts for the current day. This field is only available when the Enable Time On and Counts is set to true.
-
Daily Reset Minute: This is the minute of day that the Time On and Counts is reset for the time and counts for the current day. This field is only available when the Enable Time On and Counts is set to true.
-
Period 1 Minutes: This is the total time in minutes to track for Period 1 of Time On and Counts. This field is only available when the Enable Time On and Counts is set to true.
-
Period 2 Minutes: This is the total time in minutes to track for Period 2 of Time On and Counts. This field is only available when the Enable Time On and Counts is set to true.
-
Reset Time On and Counts: When enabled the Time On and Counts totals are reset when the Boolean tag defined transitions from false to true.
-
Reset Time On and Counts Tag: This is the Boolean tag that will reset the Time On and Counts totals when its value transitions from false to true. This field is required when Reset Time On and Counts is set to true and is only available when Reset Time On and Counts is set to true.
-
Reset Tag Parameter: This is the parameter for the Reset Time on and Counts Tag. This field is required when Reset Time On and Counts is set to true and is only available when Reset Time On and Counts is set to true.
Storage Tags
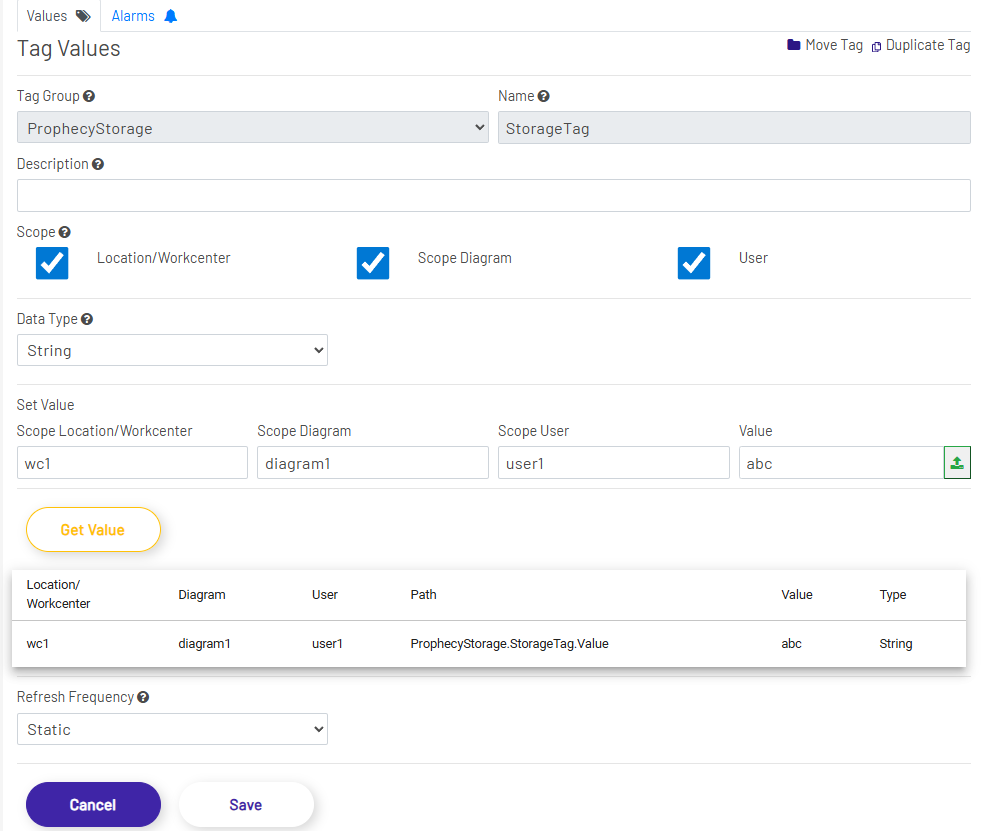
Storage Tag Values Tab
-
Scope: If 'ProphecyStorage' is chosen as the Tag Group for this tag, the user can define the accessibility scope of the tag value.
- No scope type is enabled (singleton): The tag has a single value that's shared amongst all Diagrams and Diagram instances, regardless of the location or user.
- Diagram scope is enabled: The tag has a copy for each unique Diagram.
- Location/Work center scope is enabled: The tag has a copy for each unique location.
- User scope is enabled: The tag has a copy for each unique user.
- All scope types are enabled: All Diagrams and Diagram instances at every location for every user will have their own copy of the Diagram.
-
Set Value: The user can enter scope values and a tag value to update the selected storage tag. Any scope type textbox will be enabled after the corresponding scope type is enabled and saved.
-
Get Value: The tag values section/grid displays all the persisted values for the selected storage tag. Depending on the saved scope, the storage tag could have multiple value instances. The grid lists the scopes, the full path of the tag, the data type, and the value of the tag instance(s). The user can click Get Value button to refresh the selected storage tag values.
- If no scope type is enabled, the tag will only have one value.
- If the Diagram scope is enabled, there will be a value instance for each unique diagram.
- If the Location/Work center scope is enabled, there will be a value instance for each unique location/work center.
- If the User scope is enabled, there will be a value instance for each unique user.
- If two or more scope types are enabled, there will be a unique value instance for each enabled scope type combination.
Calculation Tags
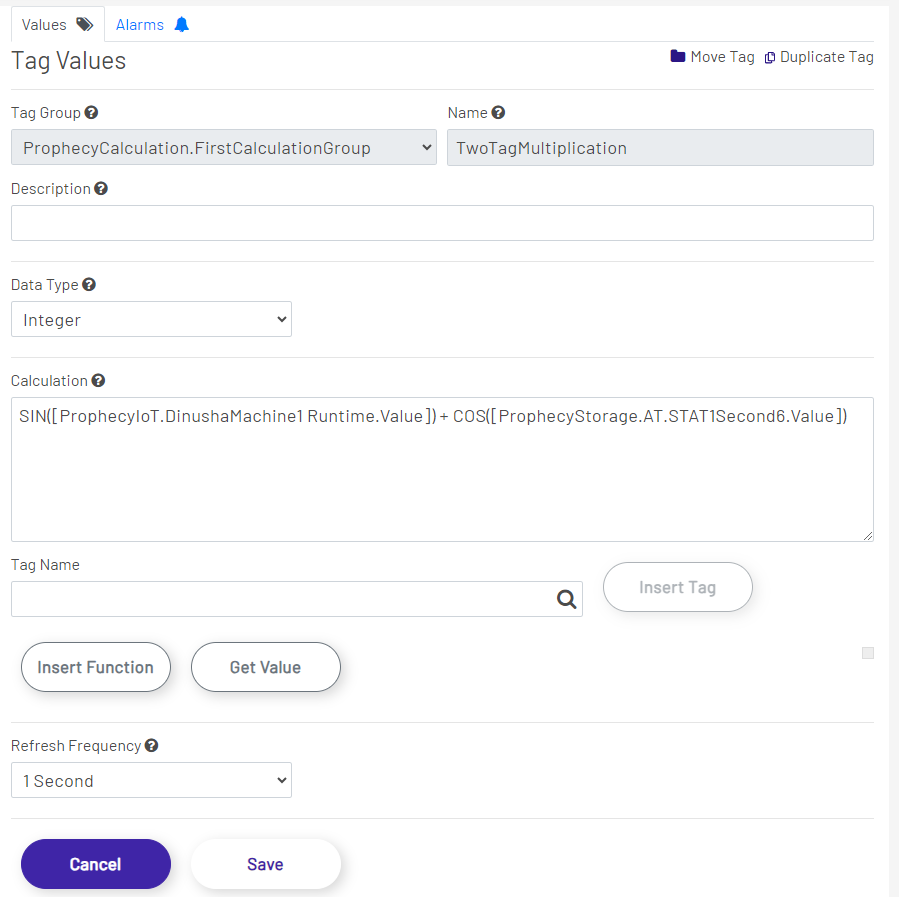
Calculation Tag Values Tab
-
Calculation: The calculation, specified as an expression. The expression syntax and grammar are that of Microsoft T-SQL, and allows the usage of all available T-SQL functions, including numerical, string, binary, date & time, XML, and JSON manipulation functions.
-
Tag Name: Select a tag to be inserted into the calculation expression by opening up the tag selection dialog. Calculation tags can use other tags in their calculations, and this tag selector aids in the selection and insertion of tags into the Calculation section.
-
Insert Tag: Inserts the selected tag (through the Tag Name) into the calculation. The syntax is to have the fully qualified tag name in square brackets ([TagGroup.TagName.TagProperty]).
-
Insert Function: Select a function to be inserted into the calculation expression. All functions are T-SQL-compatible.
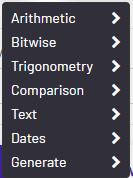
- Arithmetic: Unary and binary functions that operate on numerical values. These range from add and remove functions to ceiling and floor functions.
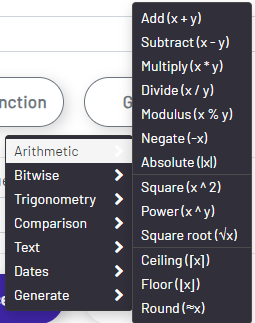
- Add (x + y): expression_1 + expression_2
- Subtract (x - y): expression_1 - expression_2
- Multiply (x * y): expression_1 * expression_2
- Divide (x / y): expression_1 / expression_2
- Modulus (x % y): expression_1 % expression_2
- Negate (-x): -expression
- Absolute (|x|): ABS(expression) - A mathematical function that returns the absolute (positive) value of the specified numeric expression (ABS changes negative values to positive values. ABS has no effect on zero or positive values).
- Square (x ^ 2): SQUARE(expression) - Returns the square of the specified float value.
- Power (x ^ y): POWER(expression) - Returns the value of the specified expression to the specified power.
- Square root (√x): SQRT(expression) - Returns the square root of the specified float value.
- Ceiling (⌈x⌉): CEILING(expression) - This function returns the smallest integer greater than, or equal to, the specified numeric expression.
- Floor (⌊x⌋): FLOOR(expression) - Returns the largest integer less than or equal to the specified numeric expression.
- Round (≈x): ROUND(expression, length [ , function ]) - Returns a numeric value, rounded to the specified length or precision.
- Bitwise: Dual operand functions that operate and calculate at the bit-level.
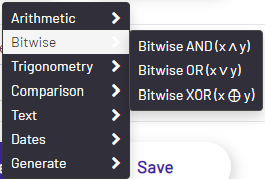
- Bitwise AND (x ∧ y): expression_1 & expression_2
- Bitwise OR (x ∨ y): expression_1 | expression_2
- Bitwise XOR (x ⊕ y): expression_1 ^ expression_2
- Trigonometry: Functions that deal with the relations of the sides and angles of triangles.
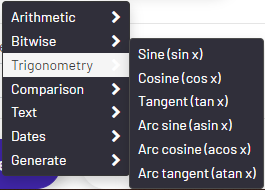
- Sine (sin x): SIN(expression) - Returns the trigonometric sine of the specified angle, in radians, and in an approximate numeric, float, expression.
- Cosine (cos x): COS(expression) - A mathematical function that returns the trigonometric cosine of the specified angle - measured in radians - in the specified expression.
- Tangent (tan x): TAN(expression) - Returns the tangent of the input expression.
- Arc sine (asin x): ASIN(expression) - A function that returns the angle, in radians, whose sine is the specified float expression. This is also called arcsine.
- Arc cosine (acos x): ACOS(expression) - A function that returns the angle, in radians, whose cosine is the specified float expression. This is also called arccosine.
- Arc tangent (atan x): ATAN(expression) - A function that returns the angle, in radians, whose tangent is a specified float expression. This is also called arctangent.
- Comparison: Functions that compare 2 or more values, picks one based on the operand, or executes different expressions based on the comparison result.
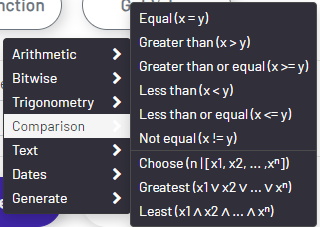
- Equal (x = y): IIF(expression_1 = expression_2, true_expression, false_expression) - Returns one of two values, depending on whether the Boolean expression evaluates to true or false.
- Greater than (x > y): IIF(expression_1 > expression_2, true_expression, false_expression) - Returns one of two values, depending on whether the Boolean expression evaluates to true or false.
- Greater than or equal (x >= y): IIF(expression_1 >= expression_2, true_expression, false_expression) - Returns one of two values, depending on whether the Boolean expression evaluates to true or false.
- Less than (x < y): IIF(expression_1 < expression_2, true_expression, false_expression) - Returns one of two values, depending on whether the Boolean expression evaluates to true or false.
- Less than or equal (x <= y): IIF(expression_1 <= expression_2, true_expression, false_expression) - Returns one of two values, depending on whether the Boolean expression evaluates to true or false.
- Not equal (x != y): IIF(expression_1 != expression_2, true_expression, false_expression) - Returns one of two values, depending on whether the Boolean expression evaluates to true or false.
- Choose (n | [x1, x2, ... ,xⁿ]): CHOOSE(index, value_1, value_2 [ , value_n ]) - Returns the item at the specified index from a list of values.
- Greatest (x1 ∨ x2 ∨ ... ∨ xⁿ): GREATEST(expression_1 [ , expression_n ]) - This function returns the maximum value from a list of one or more expressions.
- Least (x1 ∧ x2 ∧ ... ∧ xⁿ): LEAST(expression_1 [ , expression_n ]) - This function returns the minimum value from a list of one or more expressions.
- Text: Functions that operate on text values. These functions include calculating the length of the text, injecting text values into the original text, partitioning the text value, converting to upper case or lower case, joining a collection of text values, etc.
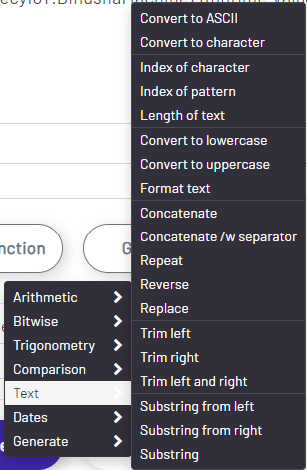
- Convert to ASCII: ASCII(expression) - Returns the ASCII code value of the leftmost character of a character expression.
- Convert to character: CHAR(expression) - Returns the single-byte character with the specified integer code, as defined by the character set and encoding of the default collation of the current database.
- Index of character: CHARINDEX(expression_to_find, expression_to_search [ , start_location ]) - This function searches for one character expression inside a second character expression, returning the starting position of the first expression if found.
- Index of pattern: PATINDEX('%pattern%', expression) - Returns the starting position of the first occurrence of a pattern in a specified expression, or zero if the pattern is not found, on all valid text and character data types.
- Length of text: LEN(expression) - Returns the number of characters of the specified string expression, excluding trailing spaces.
- Convert to lowercase: LOWER(expression) Returns a character expression after converting uppercase character data to lowercase.
- Convert to uppercase: UPPER(expression) Returns a character expression with lowercase character data converted to uppercase.
- Format text: FORMAT(value, format [ , culture ]) - Returns a value formatted with the specified format and optional culture. Use the FORMAT function for locale-aware formatting of date/time and number values as strings. For general data type conversions, use CAST or CONVERT.
- Concatenate: CONCAT(expression_1, expression_2 [ , expression_n ]) - This function returns a string resulting from the concatenation, or joining, of two or more string values in an end-to-end manner.
- Concatenate /w separator: CONCAT_WS(separator, expression_1, expression_2 [ , expression_n ]) - This function returns a string resulting from the concatenation, or joining, of two or more string values in an end-to-end manner. It separates those concatenated string values with the delimiter specified in the first function argument. (CONCAT_WS indicates concatenate with separator.)
- Repeat: REPLICATE(text_expression, count_expression) - Repeats a string value a specified number of times.
- Reverse: REVERSE(text_expression) - Returns the reverse order of a string value.
- Replace: REPLACE(text_expression, pattern, replacement) - Replaces all occurrences of a specified string value with another string value.
- Trim left: LTRIM(text_expression [ , characters ]) - Removes space character char(32) or other specified characters from the start of a string.
- Trim right: RTRIM(text_expression [ , characters ]) - Removes space character char(32) or other specified characters from the end of a string.
- Trim left and right: TRIM([ LEADING | TRAILING | BOTH ] [characters FROM ] text_expression) - Removes the space character char(32) or other specified characters from the start and end of a string.
- Substring from left: LEFT(text_expression, length_expression) - Returns the left part of a character string with the specified number of characters.
- Substring from right: RIGHT(text_expression, length_expression) - Returns the right part of a character string with the specified number of characters.
- Substring: SUBSTRING(text_expression, start, length) - Returns part of a character, binary, text, or image expression in SQL Server.
- Dates: Functions that either get the current date/time, or do manipulations to the provided date/time value. Some of these functions take a datepart as a parameter to specify the unit of measurement (e.g. when adding "10" to the current date/time, specifying what time measurement to use for "10", which might be 10 seconds, 10 minutes, 10 hours, ... 10 years, etc.). The options for datepart can be selected from the Dateparts menu and are listed below.
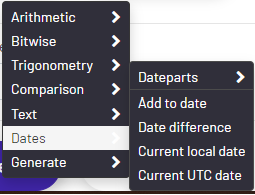
- Add to date: DATEADD(datepart, number, date) - This function adds a number (a signed integer) to a datepart of an input date, and returns a modified date/time value. For example, you can use this function to find the date that is 7,000 minutes from today: number = 7000, datepart = minute, date = today.
- Date difference: DATEDIFF(datepart, start_date, end_date) - This function returns the count (as a signed integer value) of the specified datepart boundaries crossed between the specified startdate and enddate.
- Current local date: GETDATE() - Returns the current database system timestamp as a datetime value without the database time zone offset. This value is derived from the operating system of the computer on which the instance of SQL Server is running.
- Current UTC date: GETUTCDATE() - Returns the current database system timestamp as a datetime value. The database time zone offset is not included. This value represents the current UTC time (Coordinated Universal Time). This value is derived from the operating system of the computer on which the instance of SQL Server is running.
- Dateparts: Specifies the unit of measurement for date and time manipulation functions.
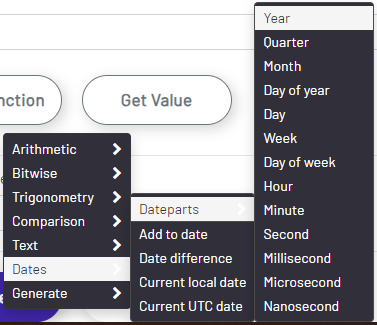
- Year: year, yy, yyyy
- Quarter: quarter, qq, q
- Month: month, mm, m
- Day of year: dayofyear, dy, y
- Day: day, dd, d
- Week: week, wk, ww
- Day of week: weekday, dw
- Hour: hour, hh
- Minute: minute, mi, n
- Second: second, ss, s
- Millisecond: millisecond, ms
- Microsecond: microsecond, mcs
- Nanosecond: nanosecond, ns
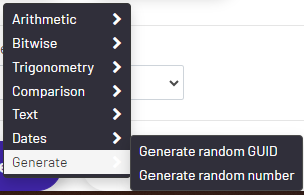
- Generate: Functions that can generate different types of random values.
- Arithmetic: Unary and binary functions that operate on numerical values. These range from add and remove functions to ceiling and floor functions.
-
Get Value: Executes the calculation and gets the resulting values. NOTE - Performing this operation will save any unsaved changes to this tag
Nested Calculation Tags
Calculation tags support the usage of other calculation tags inside the calculation. The calculation tags that are used can have their own calculation tags, and the system supports nested calculation tags without a depth limit, allowing the user to create a dependency tree without any depth concerns. When creating nested calculation tags, one might unintentionally create a cyclic dependency resulting in potential infinite loops, but this is handled internally to error out during execution when such a formation is detected.
The following is an example of a nested hierarchy of calculation tags where the root calculation ends up invoking a collection of other calculation tags as well as machine and storage tags:
Evaluate: ProphecyCalculation.Calc1
| Tag | Calculation |
|---|---|
| ProphecyCalculation.Calc1 | [ProphecyCalculation.Calc2.Value] + [ProphecyCalculation.Calc3.Value] |
| ProphecyCalculation.Calc2 | [ProphecyCalculation.Calc3.Value] + [ProphecyCalculation.Calc4.Value] |
| ProphecyCalculation.Calc3 | [ProphecyCalculation.Basic1.Value] + [ProphecyCalculation.Basic2.Value] |
| ProphecyCalculation.Basic1 | 17 + 5 + [ProphecyIoT.FirstMachine.Sensor17.Value] |
| ProphecyCalculation.Basic2 | SIN([ProphecyIoT.SecondMachine.Sensor3.Value]) |
| ProphecyCalculation.IoT1 | COS([ProphecyIoT.ThirdMachine.Sensor007.Value]) + 0.5 |
| ProphecyCalculation.Storage1 | [ProphecyStorage.ItemMax.Value] + 8 |
| ProphecyCalculation.Calc4 | [ProphecyCalculation.Basic2.Value] + 8 + [ProphecyCalculation.IoT1.Value] + [ProphecyCalculation.Storage1.Value] |
Calculation tags perform dependency discovery to determine all dependent tags and creates an execution order based on the dependency graph. For the example above, when fetching the value for tag ProphecyCalculation.Calc1, the system discovers all the tags listed as its dependencies, and executed them in the following order:
- ProphecyCalculation.Basic1
- ProphecyCalculation.Basic2
- ProphecyCalculation.IoT1
- ProphecyCalculation.Storage1
- ProphecyCalculation.Calc4
- ProphecyCalculation.Calc3
- ProphecyCalculation.Calc2
- ProphecyCalculation.Calc1
Database Tags
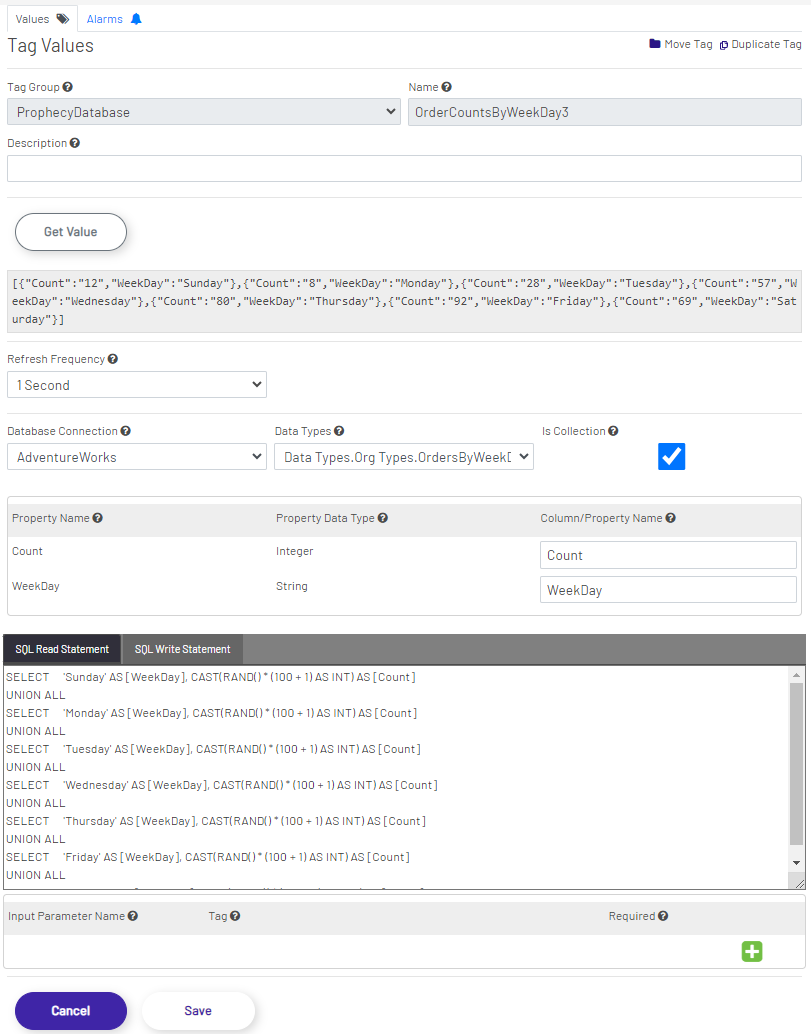
Database Tag Values Tab
-
Database Connection: Select the database this tag will be executed against. The available DB connections are defined under Admin --> SQL Connection.
-
Data Types: Specifies the data type for incoming and outgoing data. This could be a primitive/simple data type, such as an Integer or a String, or a user-defined complex data type. This is the form of the data going into and coming out of the database for the current tag, and is required.
-
Is Collection: Indicates whether the data type is a collection or not. For example, if this is not checked and String is selected as the data type, incoming and outgoing data are single Strings. If this option is checked and String is selected as the data type, incoming and outgoing data are arrays/collections of Strings. This applies to simple data types as well as complex data types.
-
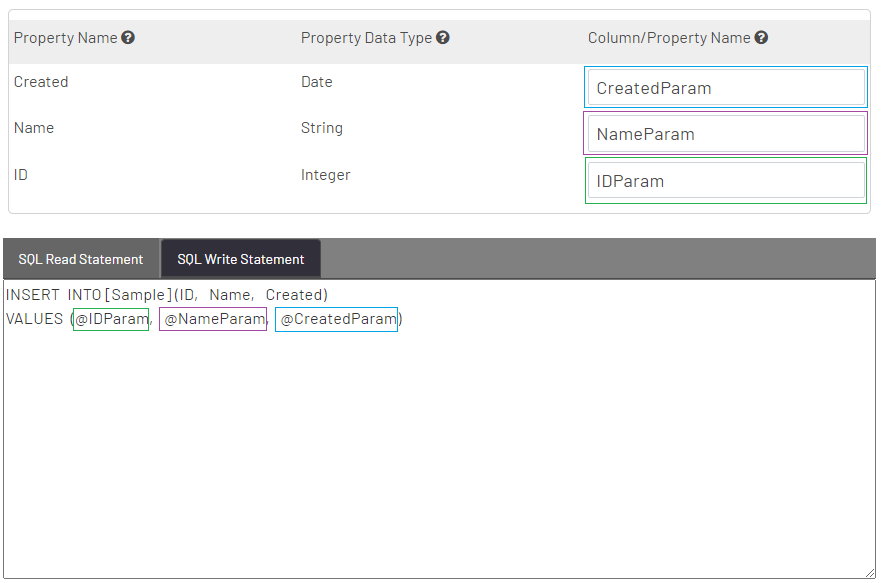
Property mapping section: This section is used to map the incoming database data to the data type of the tag. All tags have an underlying data type that specifies the type of data that is being transported using the tag. For example, the data type could be a text or numerical value, or a complex value that has multiple properties, where each property has its own data type. When transporting data that comes through a database query, the query columns have to be mapped to the properties of the data type of the tag. For example, let's assume that the data type is "Customer", and that the "Customer" data type has 2 properties named "First Name" and "Last Name". If this data type is used in a database tag and the database query returns data in column names "l_name" and "f_name", the "l_Name" query column needs to be mapped to the "Last Name" data type property and the "f_name" query column needs to be mapped to the "First Name" data type property. This section facilitates the mapping between the database fields and the data type properties.

-
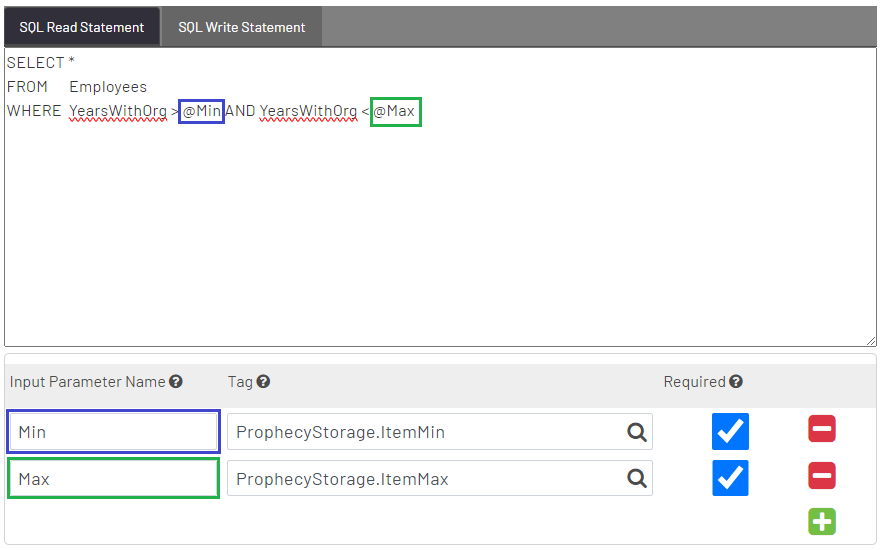
SQL Read Statement and SQL Write Statement: Specifies the SQL statements to be executed when reading from the tag or when writing to the tag. The syntax and grammar is Microsoft T-SQL, and all language features are supported. This includes being able to execute stored procedures, complex SQL scripts with multiple statements, common table expressions, the usage of temp tables, all available SQL functions, JSON and XML data manipulation, etc. NOTE - since these areas support arbitrarily complex scripts, one could include writing statements in the read statement section, reading statements in the write statement section, and a combination of both in either section, if required.
-
Parameter configuration section: Read and write SQL statements can be parameterized, and the parameter values are supplied using other tags. These parameters are defined and are configured using this section. The user can create any number of parameters and can name them as desired. These are used as regular SQL parameters inside the scripts. For example, if a tag is used to define a parameter with the name "x", it will be available inside the SQL script as SQL parameter "@x".
- Using parameters in read statements:
- Using columns as parameter in write statements:
- Using parameters in read statements:
ERP Tags
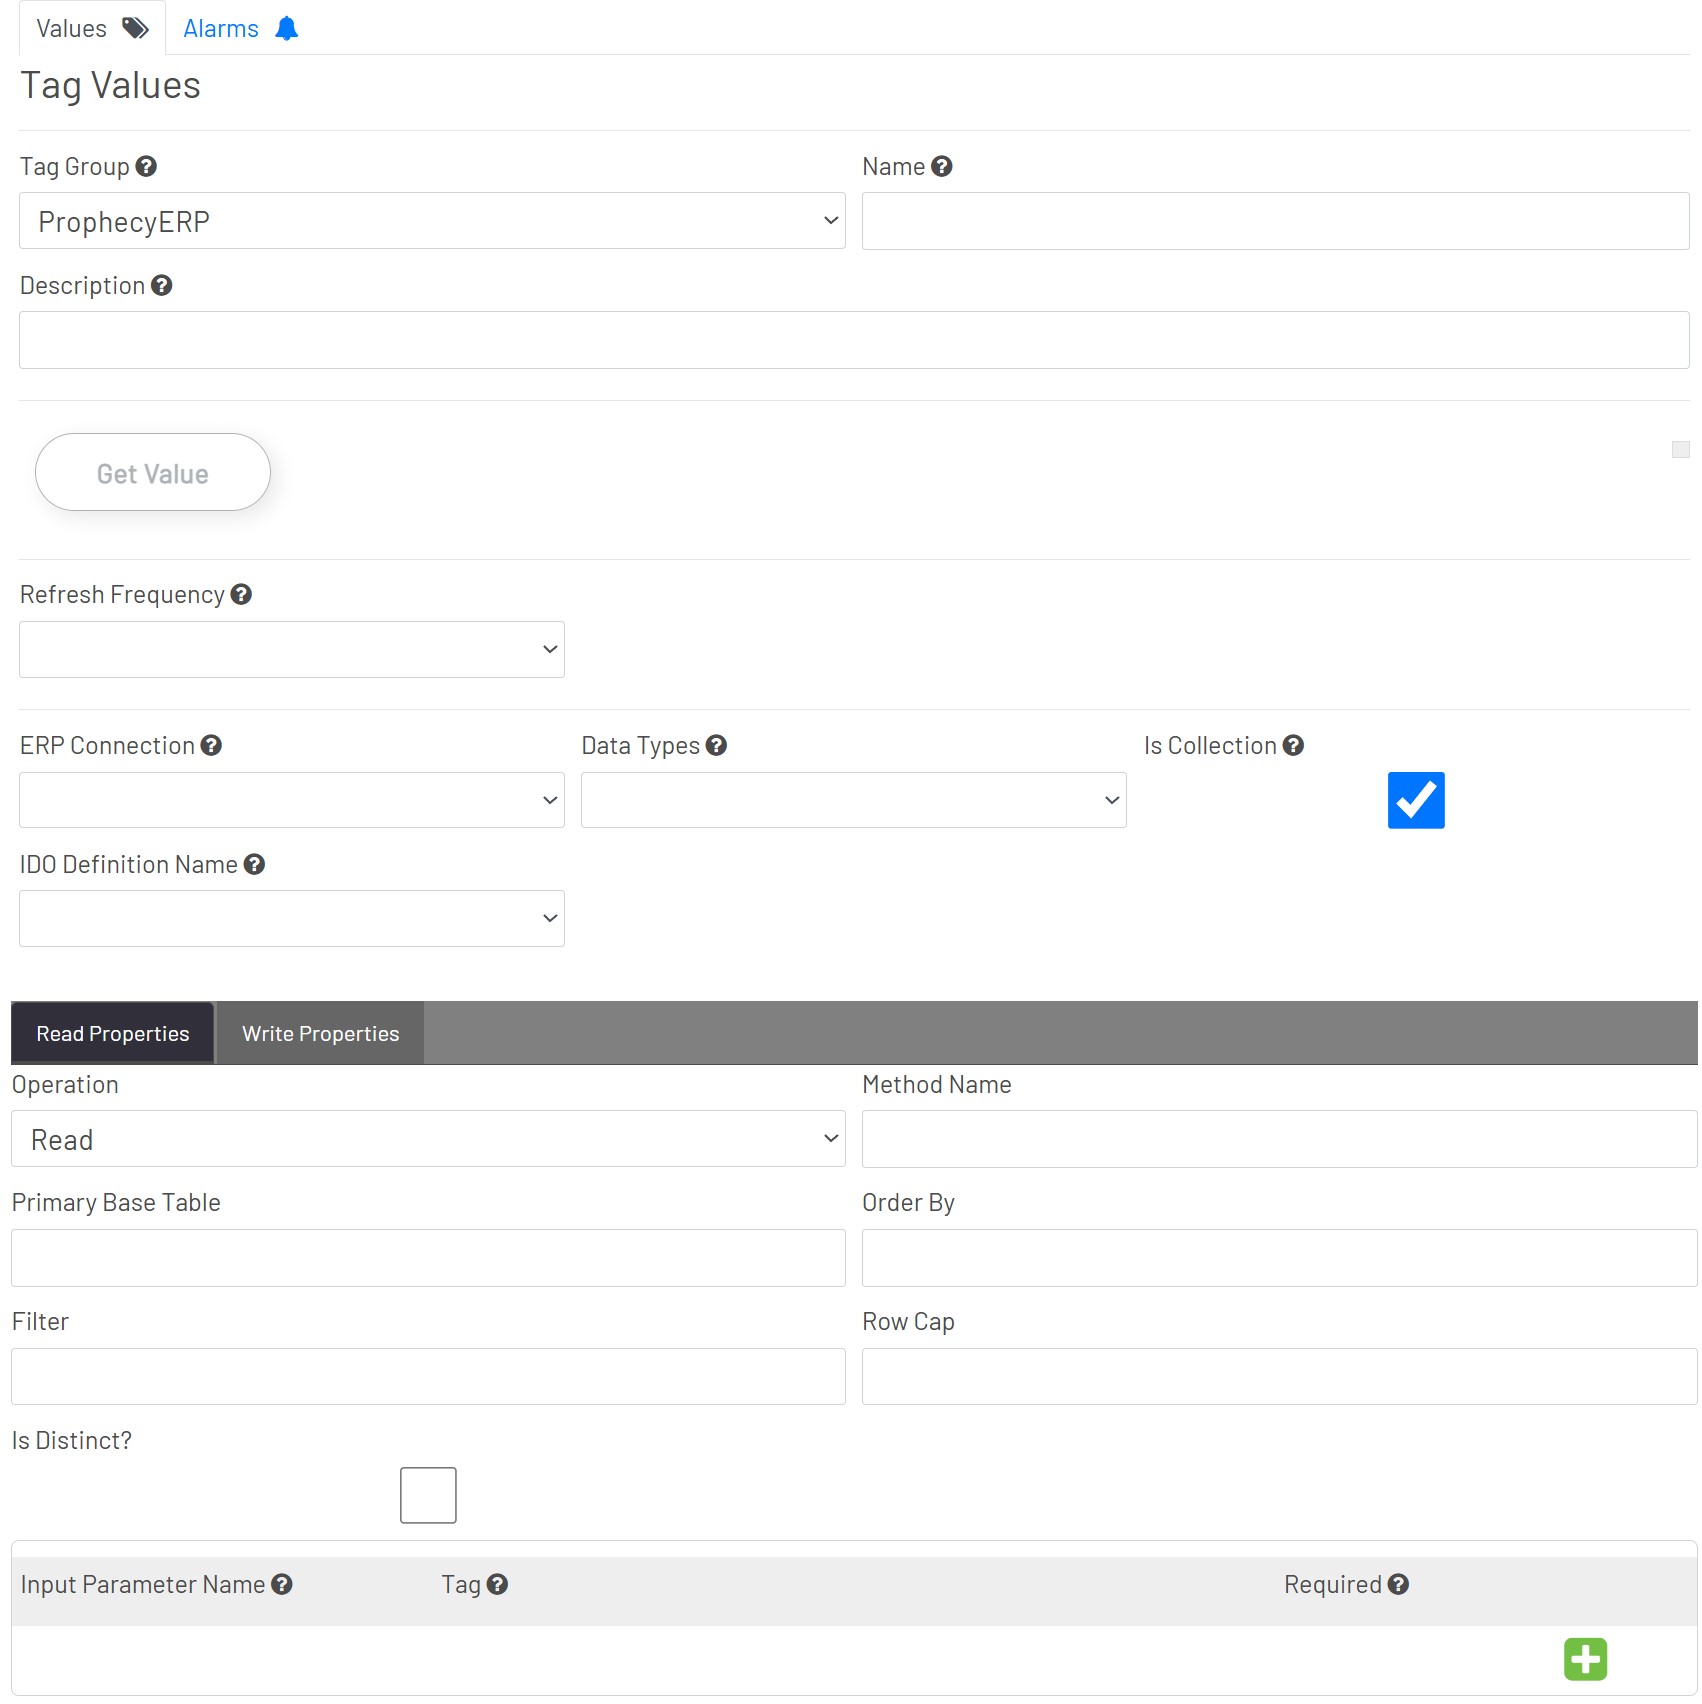
ERP Tag Values Tab
-
ERP Connection: The user can select an ERP source from this list.
-
Data Types: Specifies the data type for incoming and outgoing data. This could be a primitive/simple data type such as an Integer or a String, or a user defined complex data type. This is the form of the data going into and coming out of the ERP system (CSI) for the current tag, and is required.
-
Is Collection: Indicates whether the data type is a collection or not. For example, if this is not checked and String is selected as the data type, incoming and outgoing data are single Strings. If this option is checked and String is selected as the data type, incoming and outgoing data are arrays/collections of Strings. This applies to simple data types as well as complex data types.
-
IDO Definition Name: The user can choose the name of the IDO Definition.
-
Read Properties and Write Properties: Settings to be used when the tag is being read from and written to.
- Operation: This sets the type of operation the Mongoose integration will perform when calling the Mongoose IDO. Most Prophecy IDO Definitions will use Read or Upsert. Valid values are:
- Read
- Upsert
- Delete
- InvokeMethod
- FireEvent.
- Method Name: The name of the method that runs when the IDO call is an InvokeMethod or FireEvent operation.
- Primary Base Table: This field isn't required, because in most cases there is only one Primary Base Table per IDO, and Mongoose will use that. However, if there is more than one, the name of the Primary Base Table must be specified here in order for Upsert operations to work correctly.
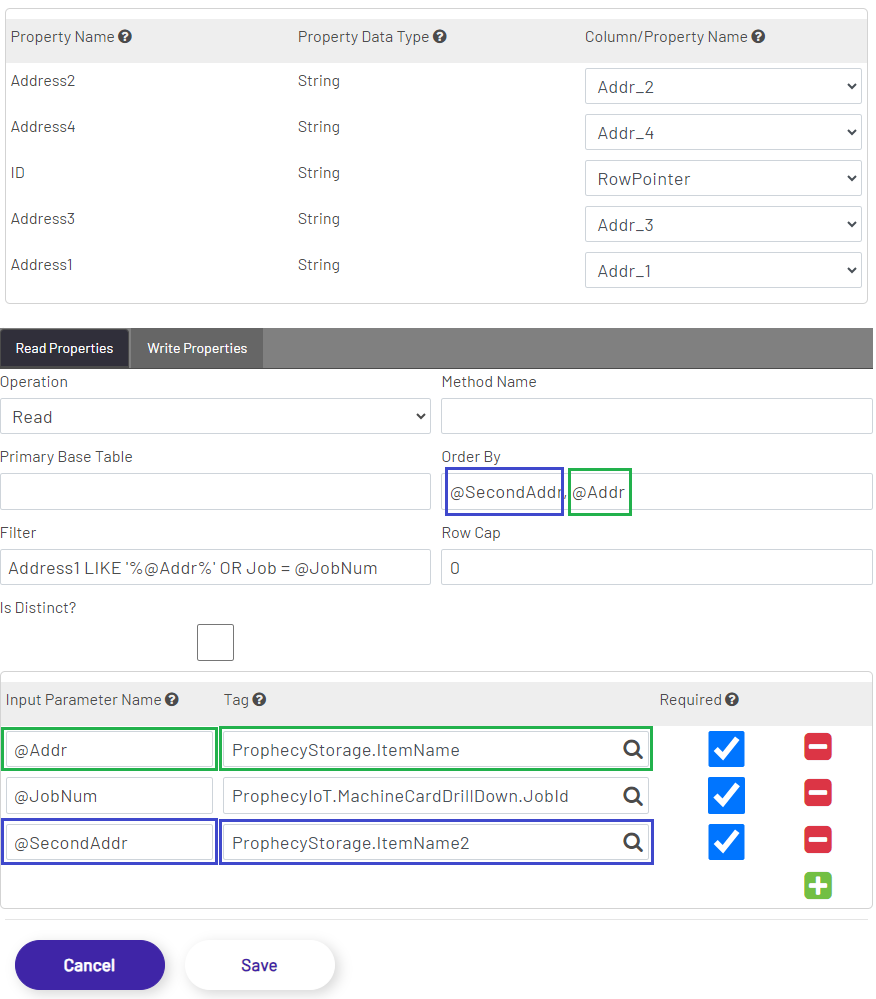
- Order By: This is used to set the sort order of results returned by Read operations. The Order By field can be driven using parameters defined in the parameter section to create dynamically ordered collections. This field is optional.
- Note: This order uses SQL syntax (what you would specify for an "order by" query clause).
- Note: This order uses SQL syntax (what you would specify for an "order by" query clause).
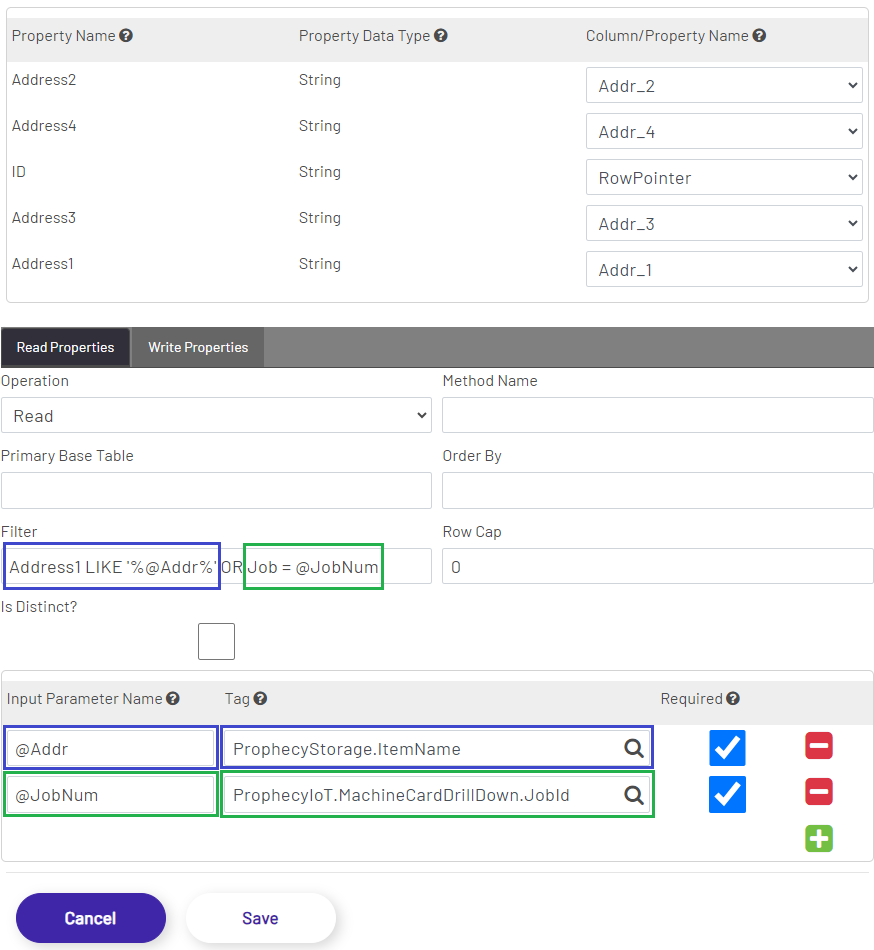
- Filter: The filter value is used to restrict the list of rows returned or affected by an IDO call. An IDO Definition can specify multiple filter conditions, separated by ' AND ' or ' OR '. Each filter will be replaced by an input parameter that's defined in the parameter section. If the value of the parameter is non-numeric, it should be wrapped in single quotes. An example filter might look like:
Username='@Name' AND Description='@Desc' AND Count=@Count. This field is optional.- Note: This filter uses SQL syntax (what you would specify for a "where" query clause).
- Note: This filter uses SQL syntax (what you would specify for a "where" query clause).
- Row Cap: This is an integer value restricting the number of rows to return from Read operations. If this is set to 0, the Mongoose default of unlimited will be used.
- Is Distinct?: If this is checked, Read operations will only return distinct (non-duplicate) rows from CSI.
- Parameters: These are used to defined parameters using other tag values in operation above.
- Operation: This sets the type of operation the Mongoose integration will perform when calling the Mongoose IDO. Most Prophecy IDO Definitions will use Read or Upsert. Valid values are:
Script Tags

Script Tag Values Tab
-
Data Type: Specifies the data type for incoming and outgoing data. This could be a primitive/simple data type such as an Integer or a String, or a user defined complex data type. This is the form of the data going into and coming out of the scripts for the current tag, and is required.
-
Is Collection: Indicates whether the data type is a collection or not. For example, if this is not checked and String is selected as the data type, incoming and outgoing data are single Strings. If this option is checked and String is selected as the data type, incoming and outgoing data are arrays/collections of Strings. This applies to simple data types as well as complex data types.
-
Read Settings: Settings to be used when the tag is being read from.
- Script Source: The source of the script, and has 2 options - Inline or Select. If Inline is selected, a code editor will appear below this selection allowing the user to define a custom script. If Select is selected, a drop down will appear below this selection allowing the user to select a pre-defined script that has been created through the Script Manager. This is the script that is executed when the script tag is being read from.
- Body: The inline code editor.
- Select: The script selector.
- Script Source: The source of the script, and has 2 options - Inline or Select. If Inline is selected, a code editor will appear below this selection allowing the user to define a custom script. If Select is selected, a drop down will appear below this selection allowing the user to select a pre-defined script that has been created through the Script Manager. This is the script that is executed when the script tag is being read from.
-
Write Settings: Settings to be used when the tag is being written to.
- Script Source: The source of the script, and has 2 options - Inline or Select. If Inline is selected, a code editor will appear below this selection allowing the user to define a custom script. If Select is selected, a drop down will appear below this selection allowing the user to select a pre-defined script that has been created through the Script Manager. This is the script that is executed when the script tag is being written to.
- Body: The inline code editor.
- Select: The script selector.
- Script Source: The source of the script, and has 2 options - Inline or Select. If Inline is selected, a code editor will appear below this selection allowing the user to define a custom script. If Select is selected, a drop down will appear below this selection allowing the user to select a pre-defined script that has been created through the Script Manager. This is the script that is executed when the script tag is being written to.
Script Tag Examples
Adding Tags
To add a tag, the Add Tag Button must be clicked to enable the fields in the Tag Editor. Once the fields are enabled, enter the values for all required fields and any optional fields. Once all fields have been populated, click the Save Button at the bottom of the Tag Editor to save the tag or click the Cancel Button to undo any changes. Upon a successful save the new tag will be automatically displayed in the Tag Tree.
Note: The Save Button will remain disabled until all required fields have been populated.
Editing Tags
To edit a tag, select a tag from the Tag Tree. Once a tag has been selected all current properties for that tag will be displayed in the Tag Editor. All fields except the Tag Group and Name can be edited. Change all desired tag properties and click the Save Button to save the changes or click the Cancel Button to cancel the editing process.
When editing the data type for a tag, a references check will be run for the tag being edited to help maintain data integrity. If the tag has references, a pop up window will be displayed with a warning that the tag is used in other places. It is recommended to Export References and review them before continuing. Tag data type changes will be logged and can be viewed in the Tag Modifications in the Admin section of the application.
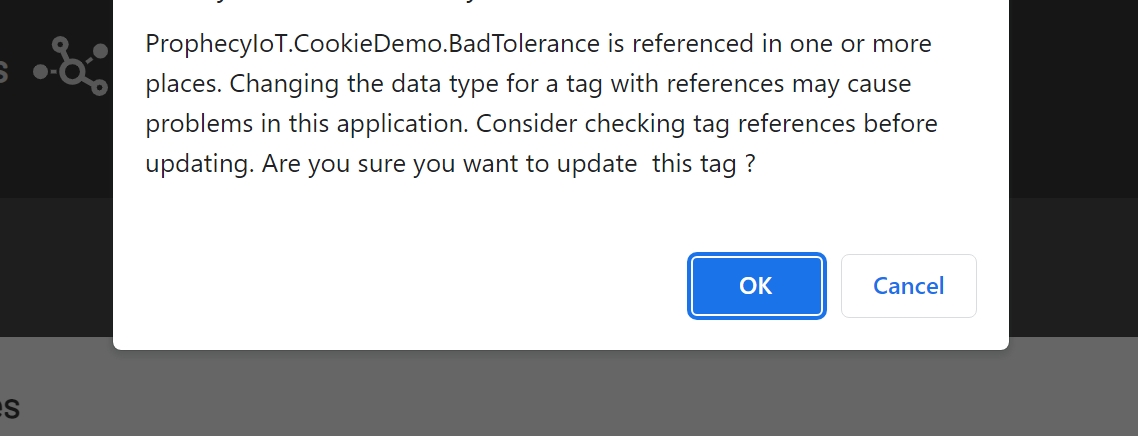
Warning: Changing a tags data type has the potential to cause problems in the Prophecy application.
Changing Tag Groups
There may be times when a tag needs to be moved to another group. This is where the Move Tag option comes in useful. Before a tag group can be changed a tag must first be selected from the Tag Tree. Once the tag selection is complete the Move Tag Button becomes available.
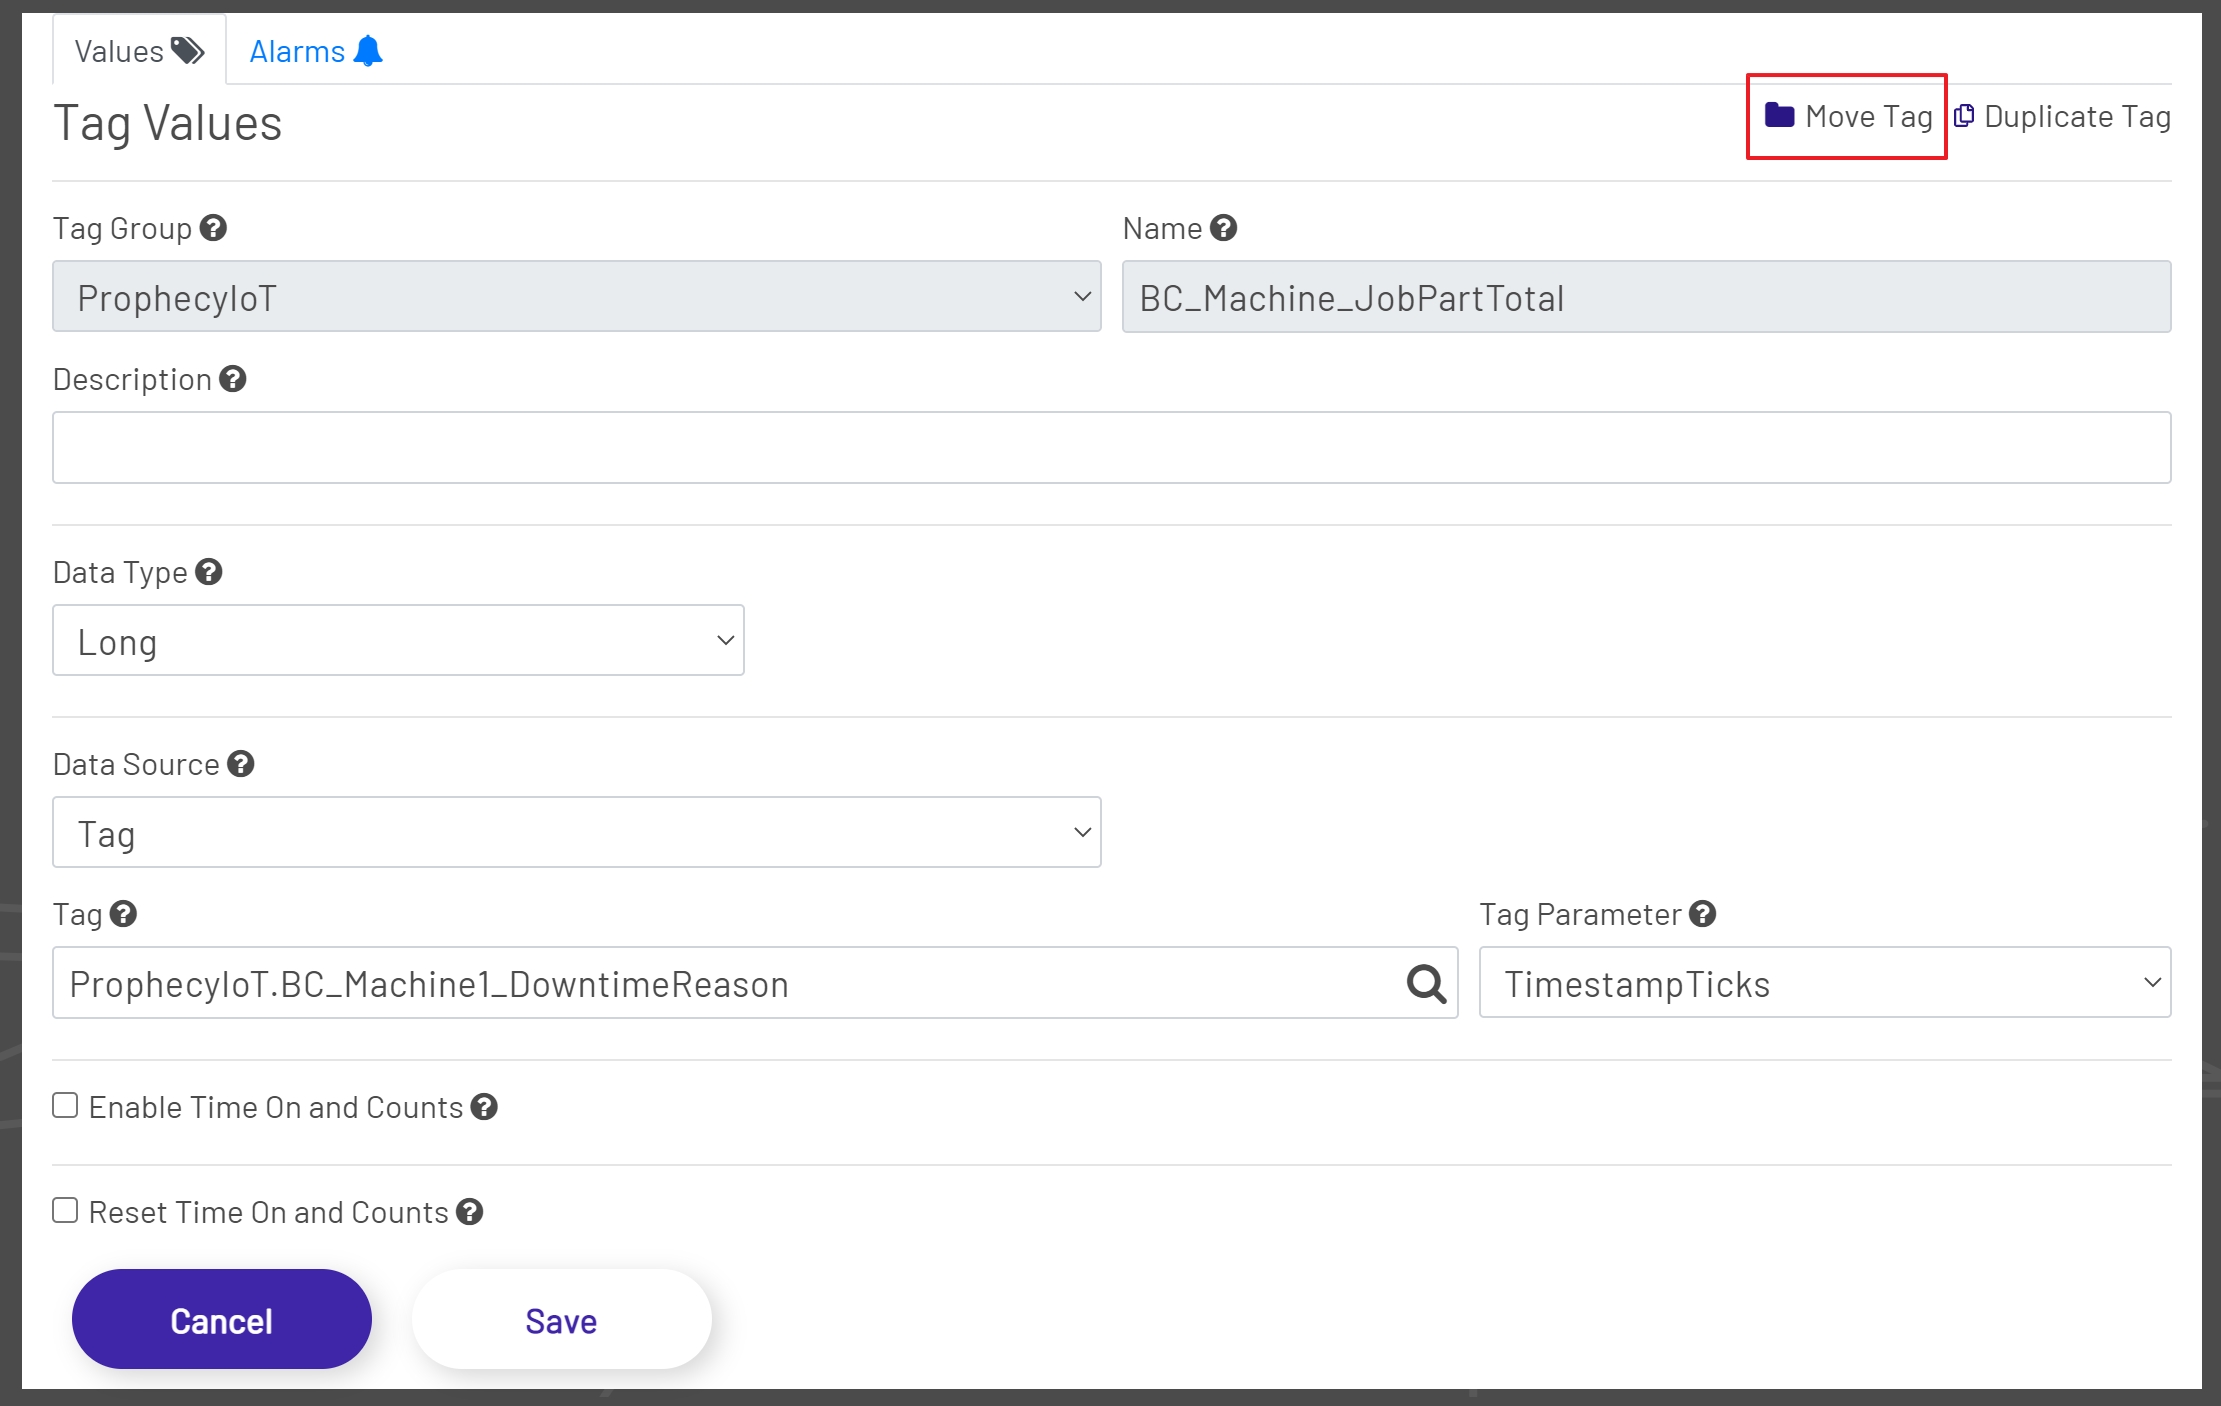
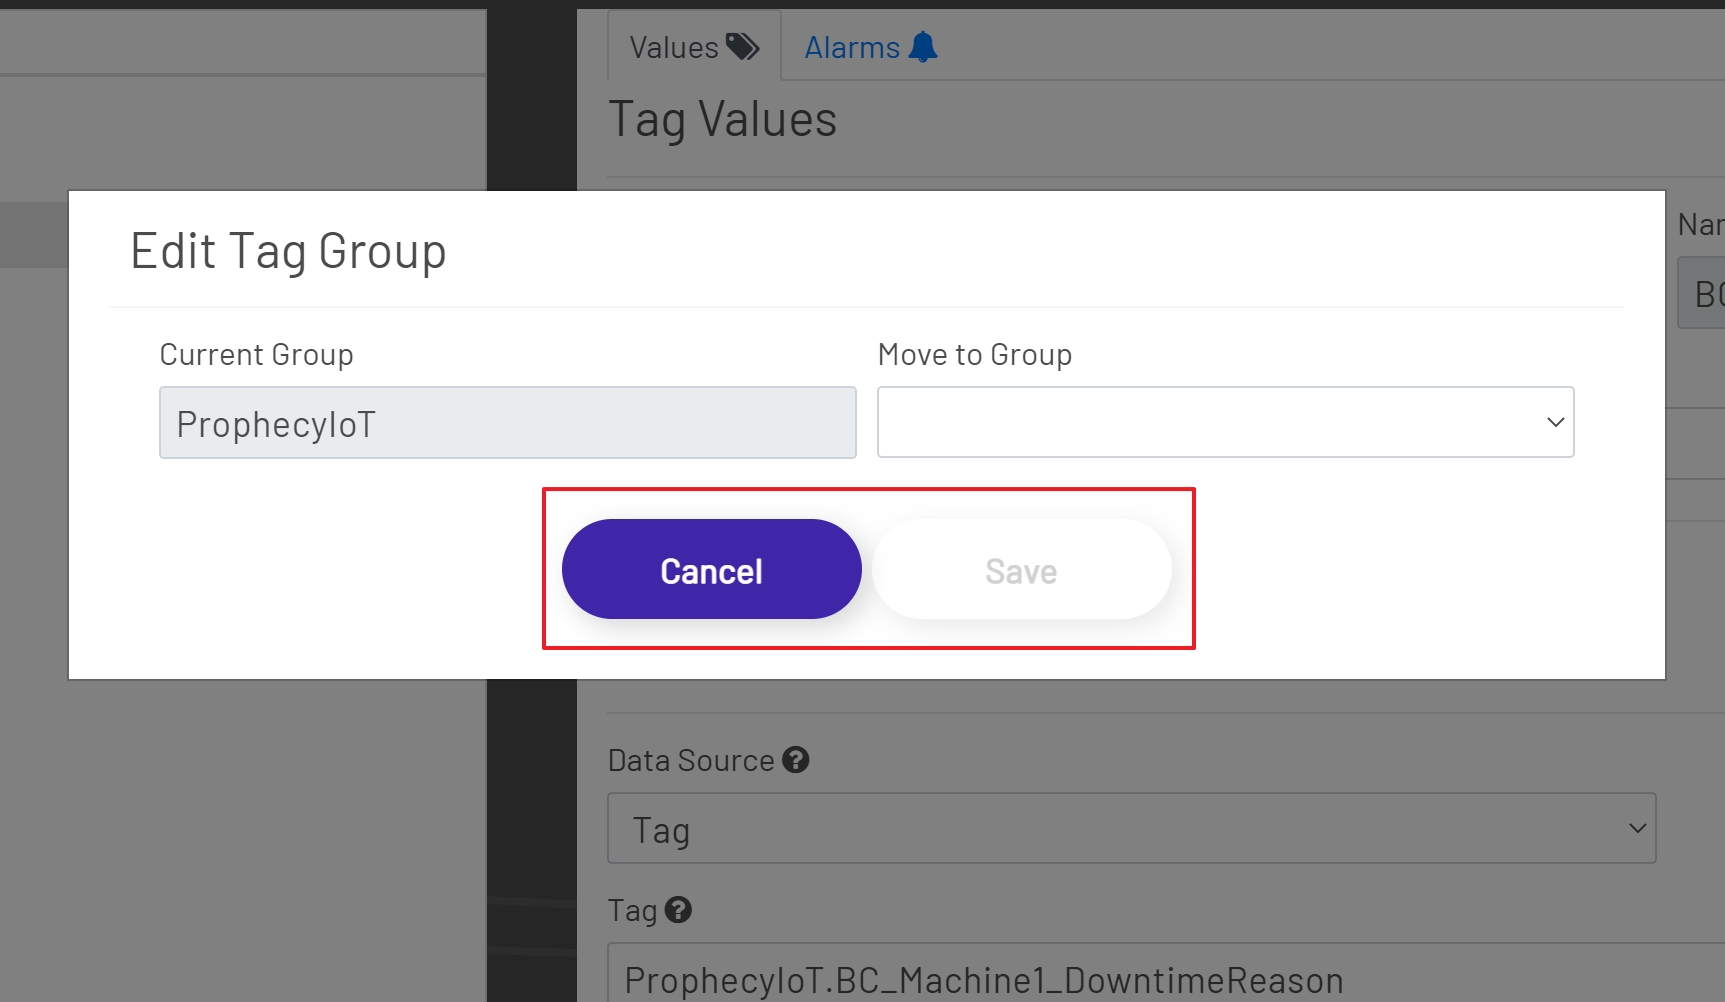
Click the Move Tag Button. After clicking the Move Tag Button a modal window will open displaying the current group and a dropdown with all available groups.

Select the desired group from the dropdown. The Save Button will remain disabled until a group selection has been made. To save the changes click the Save Button to change the group or click the Cancel Button to cancel the process. Upon a successful save the Tag Tree will be updated to display the tag in the new group.
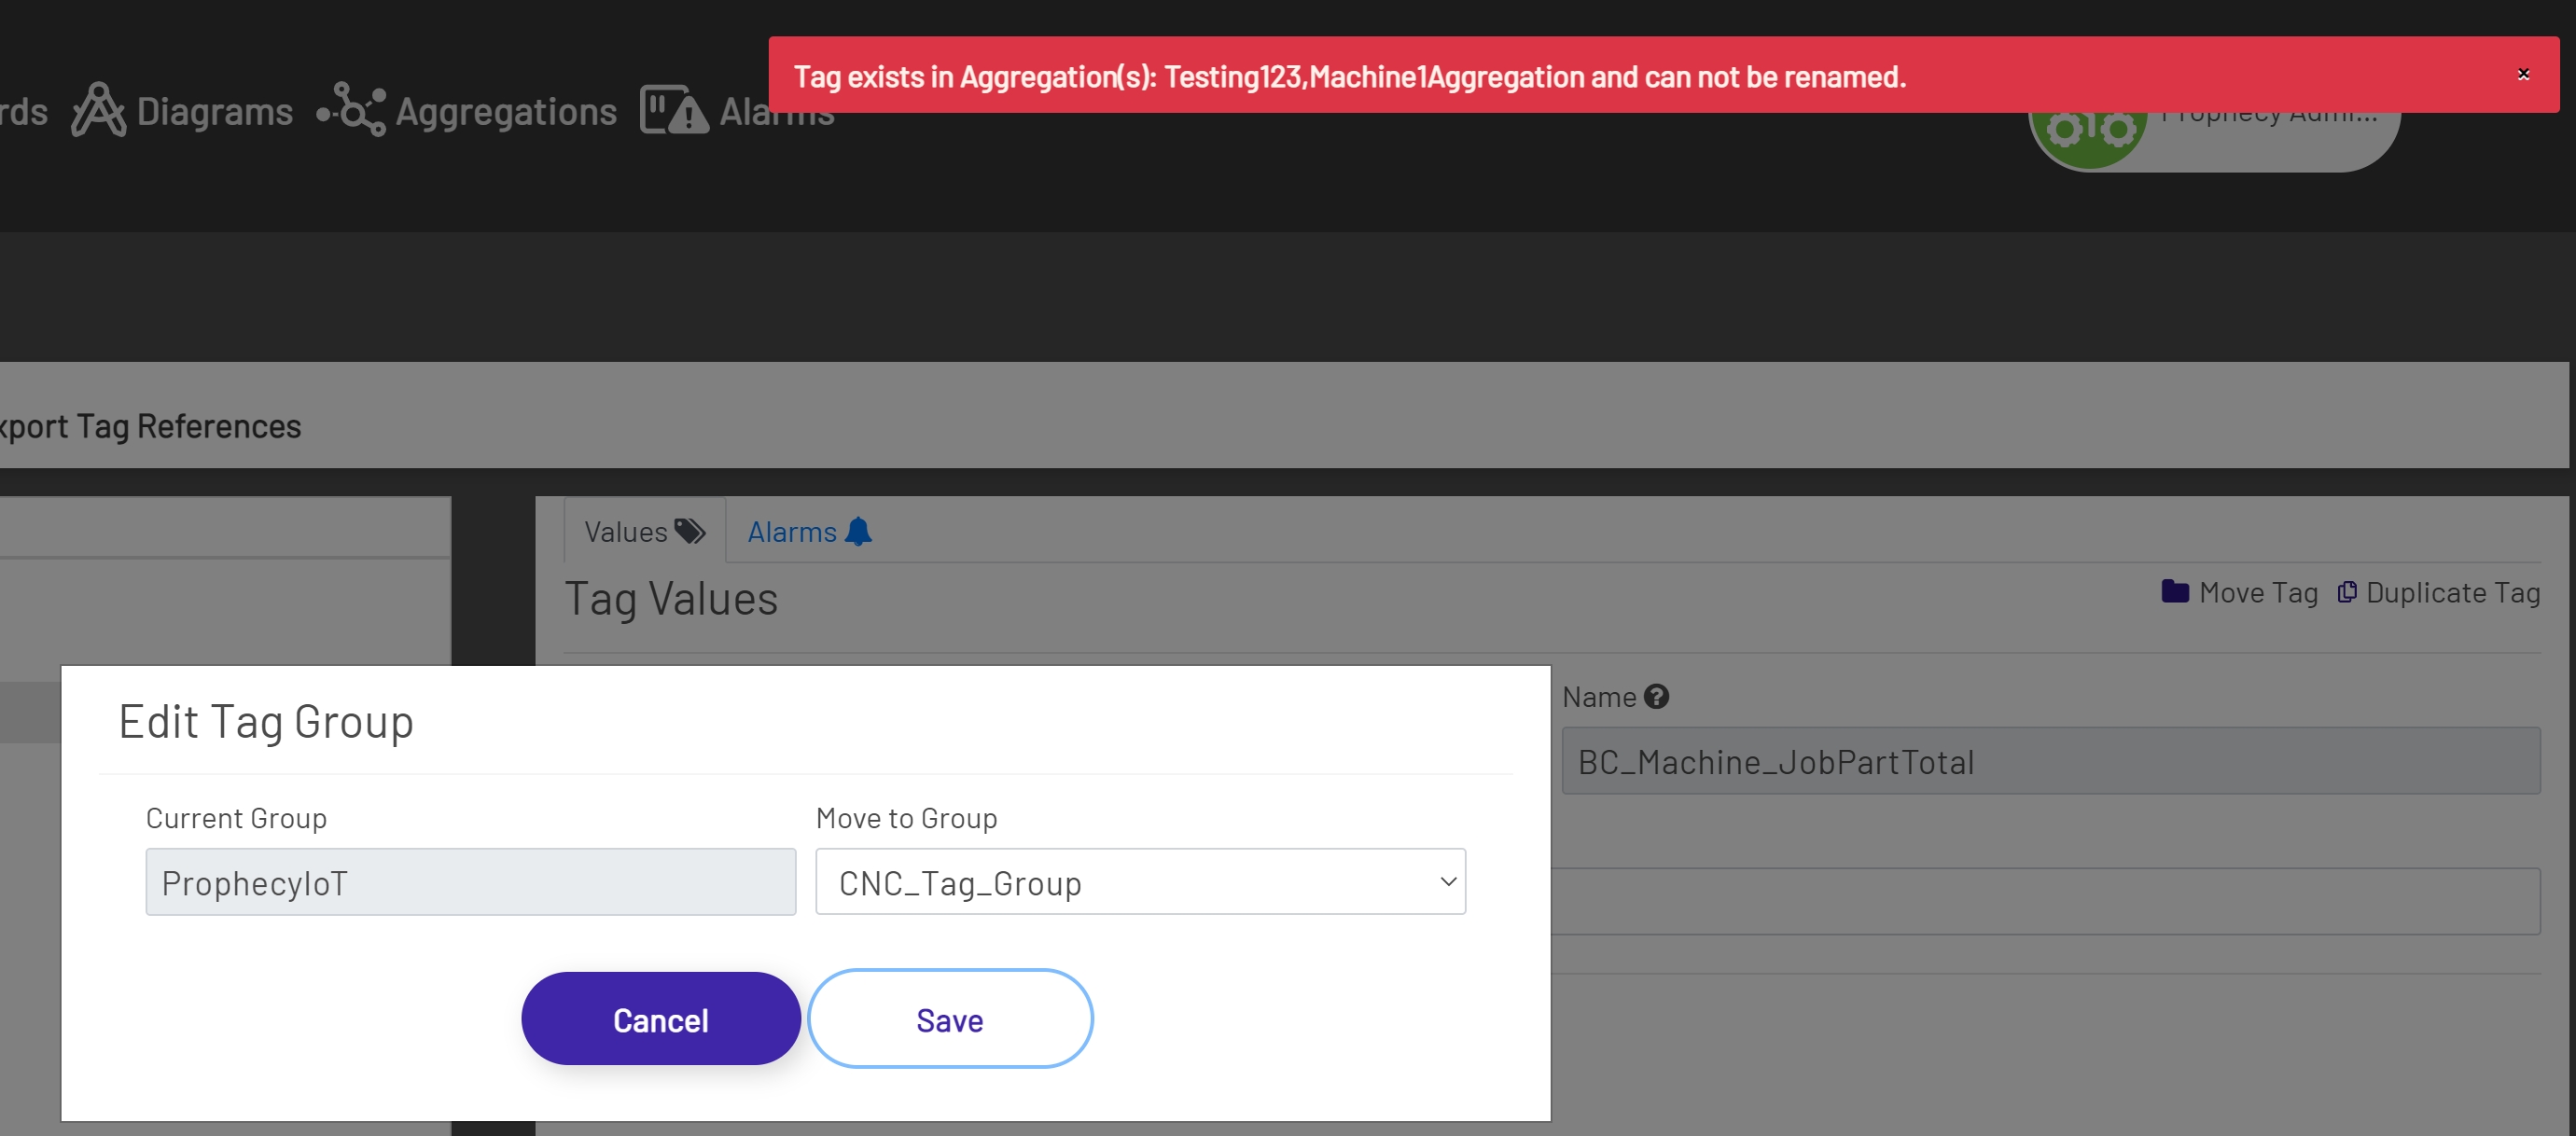
Note: If the tag that is being moved is used in an Aggregation, then the group cannot be changed. In this scenario a message will be displayed at the top of the screen listing all Aggregations the tag is used in. In this situation the Aggregations would have to be deleted and then recreated after the tag was moved.
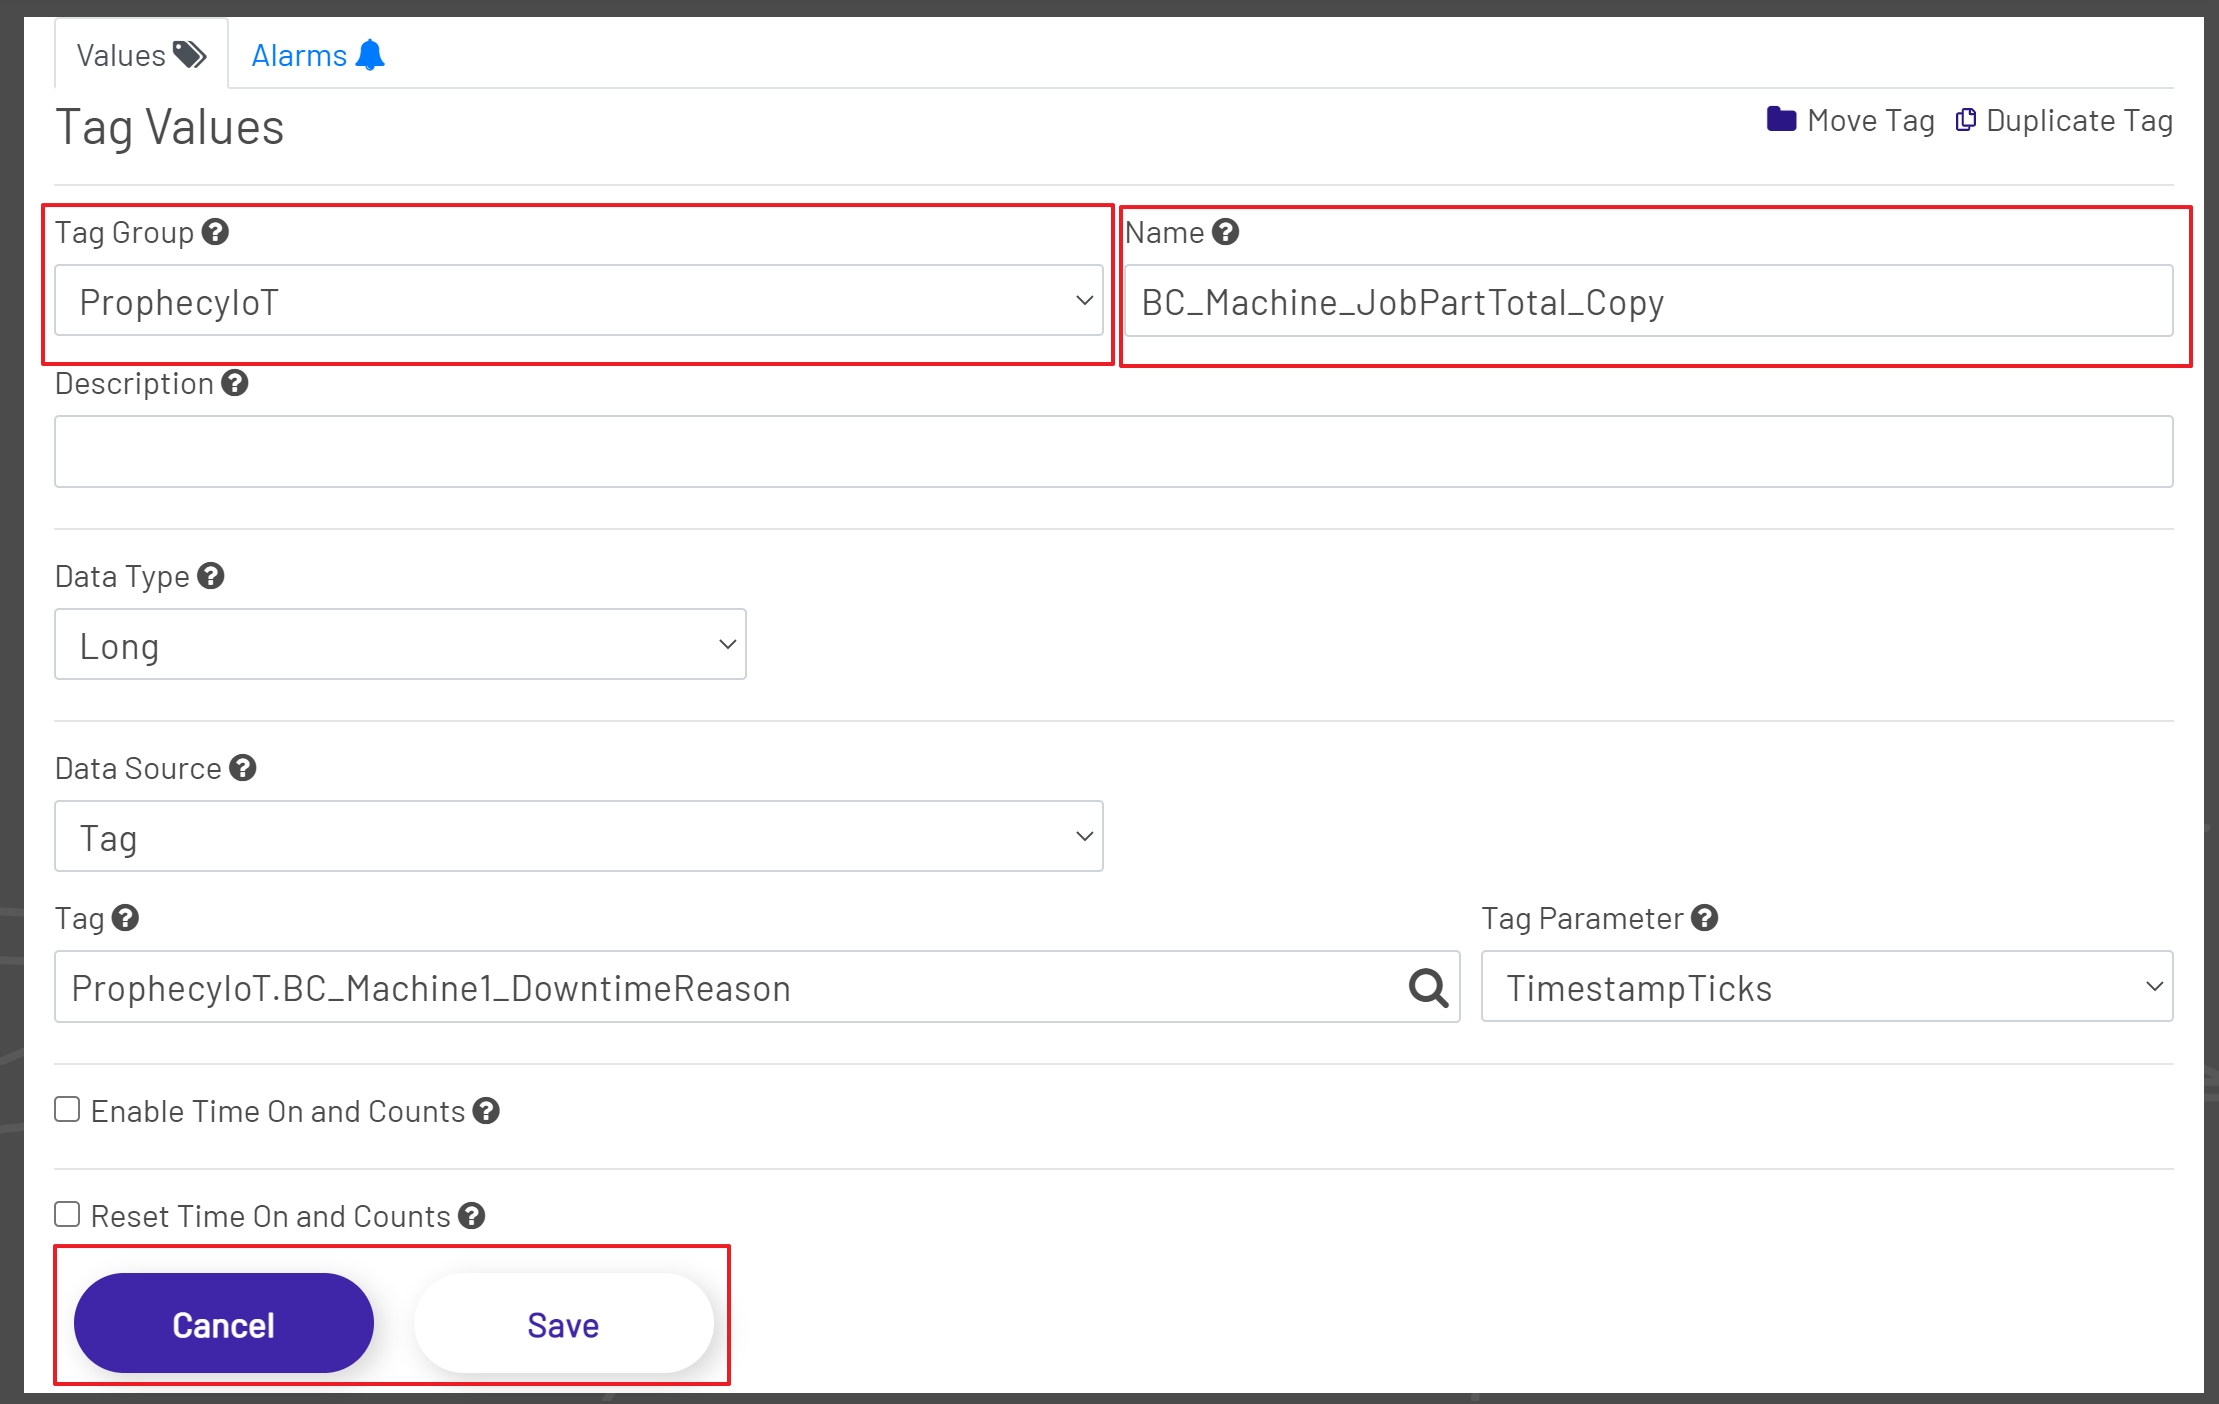
Duplicating Tags
There may be times when an existing tag needs to be copied. This is where the Duplicate Tag option is beneficial. Before a tag can be duplicated a tag must first be selected from the Tag Tree. Once the tag selection is complete the Duplicate Tag Button becomes available.
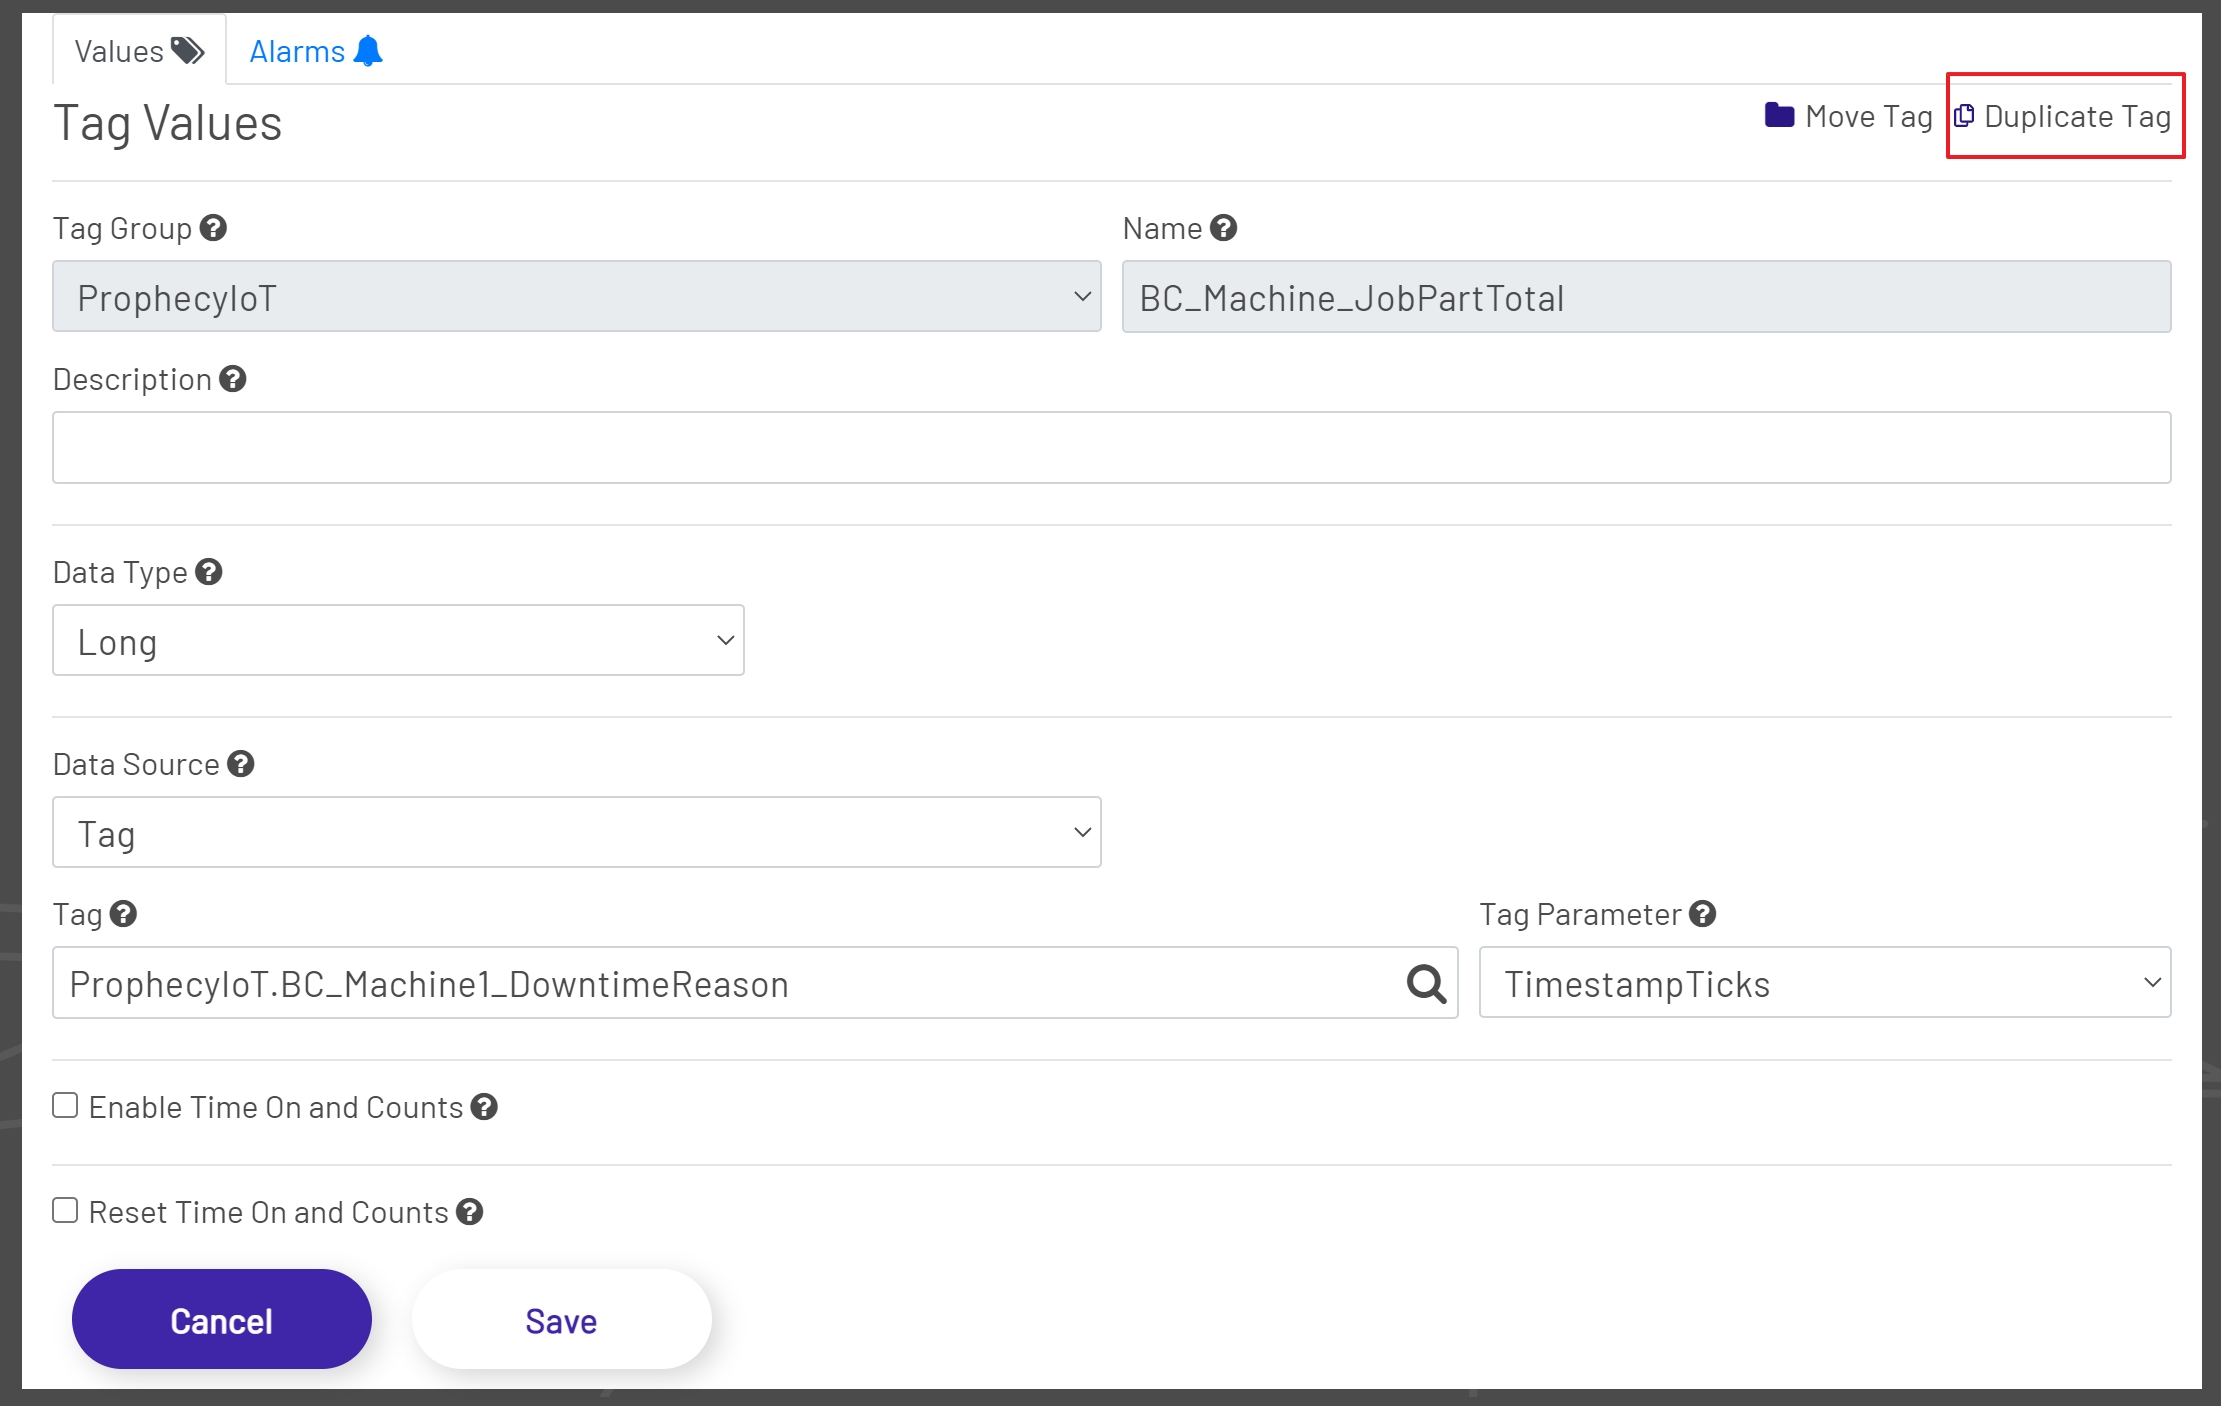
Clicking the Duplicate Tag Button will re-enable the Tag Group Dropdown, remove the Name, and will leave all fields for the previously selected tag in place. At his point the group can be changed if needed or can be left the same. The name for the tag must be entered and cannot be the name of a tag already used in the selected group. The remaining fields can be left the same or updated as needed. Once all changes have been made, click the Save Button to save the changes or click the Cancel Button to cancel the duplication process. Upon a successful save the Tag Tree will be updated to show the duplicated tag.
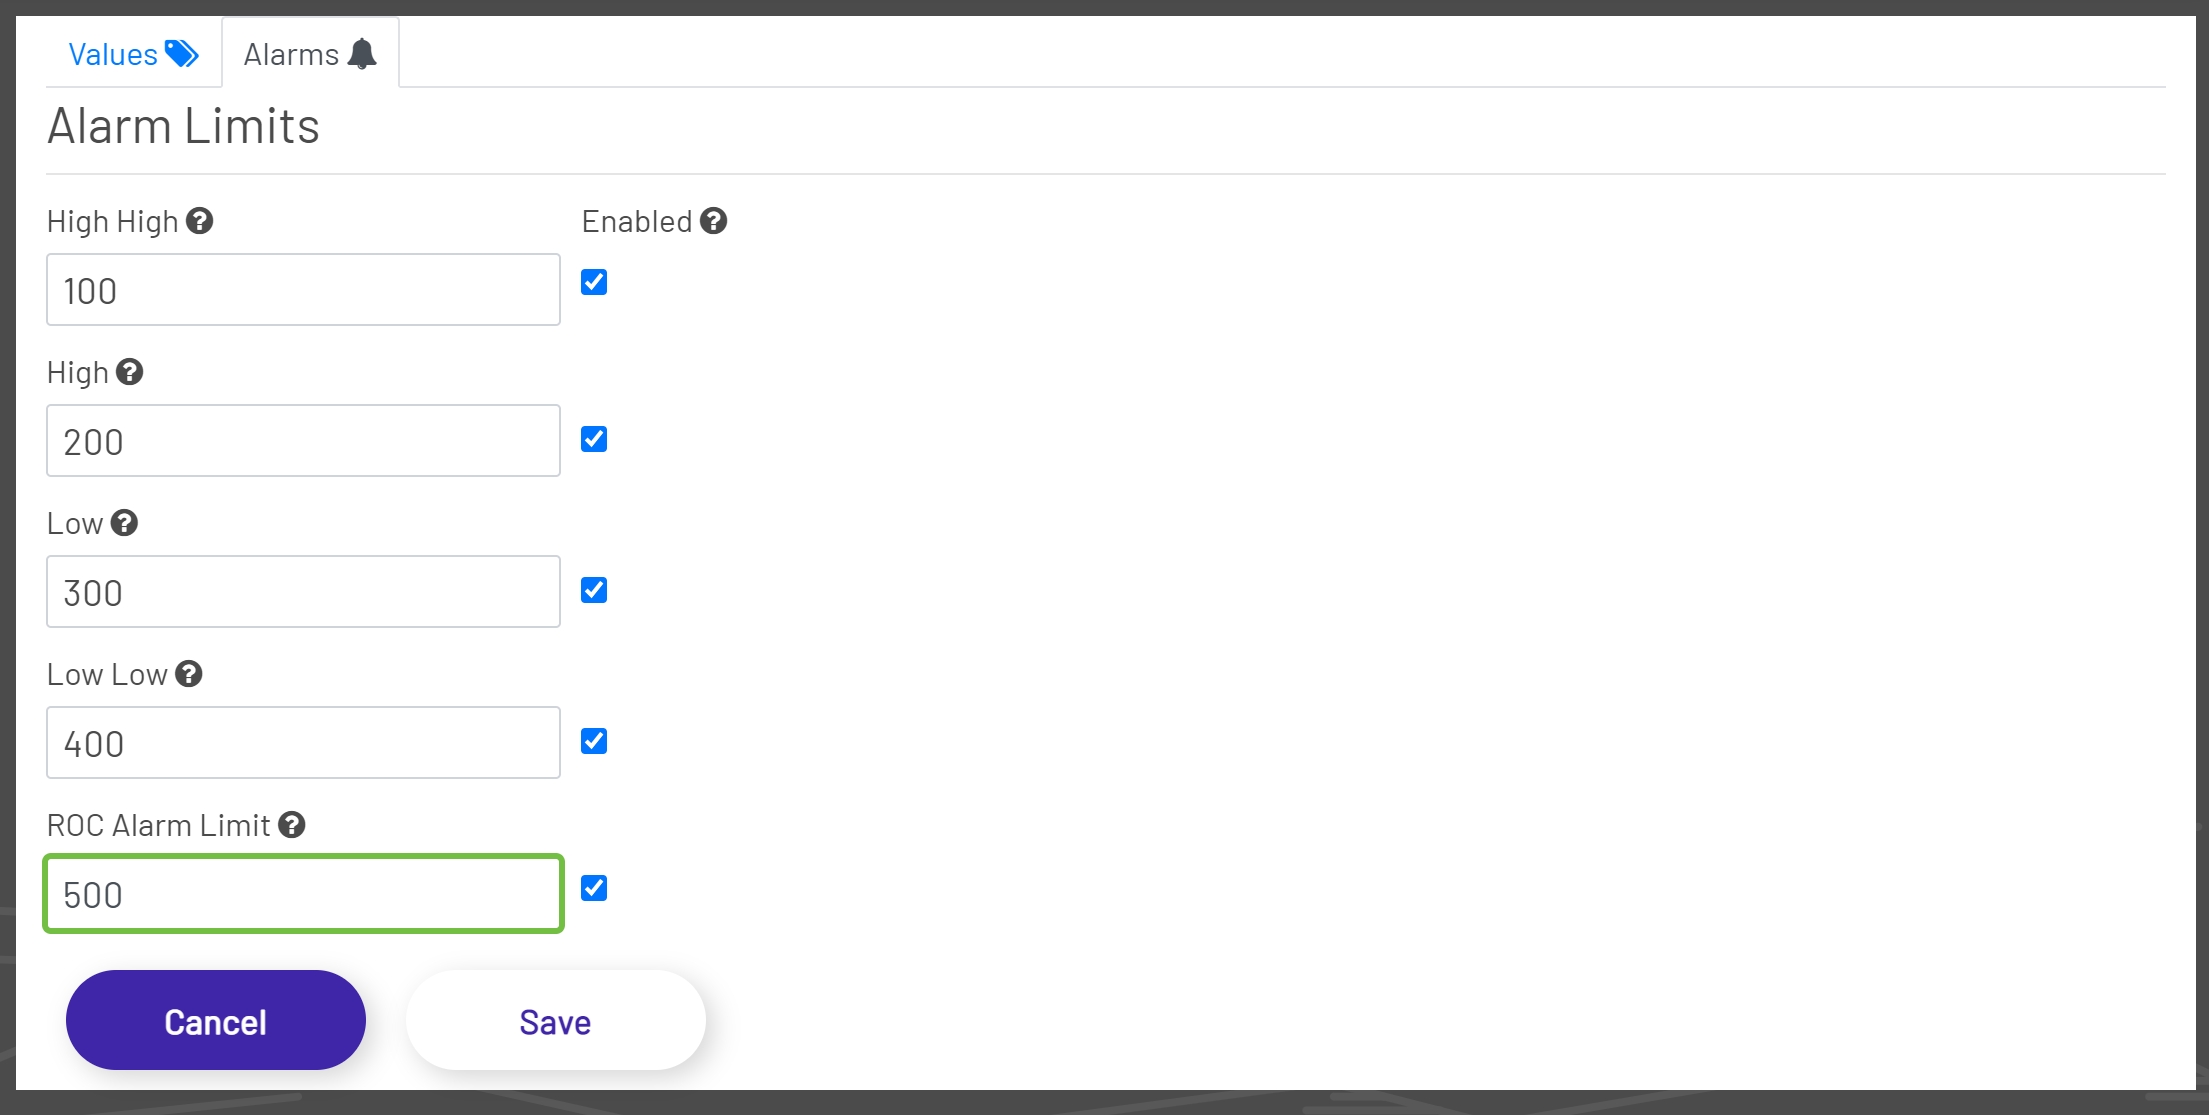
Alarms
The Alarms tab is where Alarms can be Enabled and Disabled and where alarm limits can be set. Alarm limits are used by the Data Acquisition Engine to decide when to fire an alarm, which can be monitored elsewhere in the application or as part of a Dashboard. The alarm limits are disabled by default, though editing the tag allows the user to change the limit values and enable the alarms. There are five alarms available in the ProphecyIoT application.
-
High High Alarm: The tag's High High alarm limit parameter.
-
High Alarm: The tag's High alarm limit parameter.
-
Low Alarm: The tag's Low alarm limit parameter.
-
Low Low Alarm: The tag's Low Low alarm limit parameter.
-
ROC Alarm: The tag's Rate of Change alarm limit.
Note: Alarm limits are disabled for String data types.
For assistance or questions regarding Alarms, please contact the Prophecy Consulting Group.