Material Issue and Return transactions allow operators or warehouse personnel to issue materials from inventory to jobs, as well as return materials from jobs back to inventory. This can be a convenient feature if it is preferred to have all job related activities in a single place.
To perform a Material Issue or Return, click the Material Issue\Return button on the main Shop Floor Pro page.
Note: The Material Issue and Return uses the Job Material Transactions Error Processing data collection form in CSI. Auto Posting can be turned on for this form.
Material Issue\Return
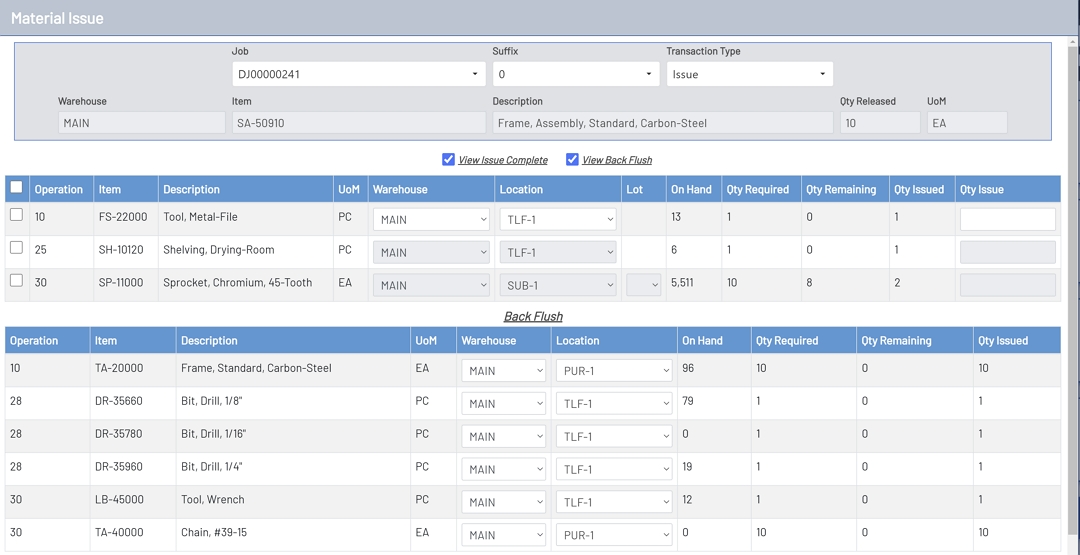
Material Issue\Return Fields
-
Job: This is a searchable drop-down field that will have all released jobs from the ERP system.
-
Suffix: This is a searchable drop-down field that contains all suffixes for the selected job. This field will be disabled until a job has been selected. If the selected job only has one suffix, then this drop-down will auto-populate with a single suffix.
-
Transaction Type: This is a drop-down field that contains the allowed transaction types. The options are Issue and Return.
-
Warehouse: This is the warehouse associated with the job. This field is read only and for informational purposes only.
-
Item: This is the item for the job. This field is read only and for informational purposes only.
-
Description: This is the item description for the job. This field is read only and for informational purposes only.
-
Qty Released: This is the released quantity for the job. This field is read only and for informational purposes only.
-
UoM: This is the unit of measure for the item associated with the job. This field is read only and for informational purposes only.
-
View Issue Complete: This checkbox allows the operator to toggle on and off materials that have been issued to a job operation. This option is unchecked by default and the Materials Grid will display items for operations that have materials that have not been issued complete.
-
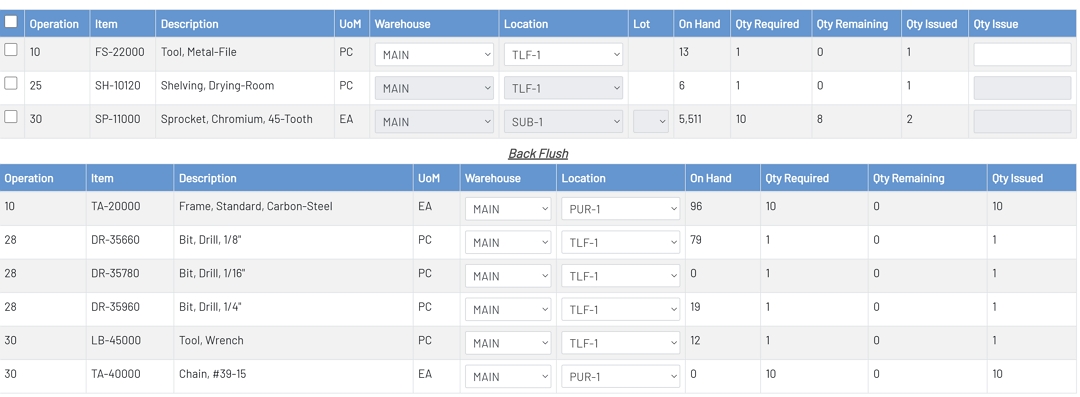
View Back Flush: This checkbox allows the operator to toggle on and off materials that have been set to back flush. Checking this box will display a separate grid for all back flush items.
Material Issue\Return

Material Issue\Return Grid Fields
-
Line Selection: This is a checkbox field that is used to select a line item for material issue.
-
Operation: This is the job operation line for the corresponding material. This field is read only and for informational purposes only.
-
Item: This is the component item associated with the job and operation. This field is read only and for informational purposes only.
-
Description: This is the description for the component item for the job and operation. This field is read only and for informational purposes only.
-
UoM: This is the unit of measure for the component item. This field is read only and for informational purposes only.
-
Warehouse: This is a drop-down for the warehouse to be used to issue material from or return material to. By default, the warehouse associated with the job is selected. This drop-down will be disabled until a line selection has been made.
-
Location: This is the location drop-down containing locations to issue material from or return material to. The location auto defaults to the rank 1 location for the item and warehouse. This drop-down will be disabled until a line selection has been made.
-
Lot: This is the lot code drop-down containing pre-existing lots for component items. A drop-down will only be displayed if the component item is a lot tracked item. This drop-down will be disabled until a line selection has been made. Populating this field is required for lot tracked items.
-
On Hand: This is the quantity on hand for the selected warehouse and location. This field is read only and for informational purposes only.
-
Qty Required: This is the quantity required for the operation and component line. This field is read only and for informational purposes only.
-
Qty Remaining: This is the quantity remaining to be issued for the operation and component line. This field is read only and for informational purposes only.
-
Qty Issued: This is the quantity that has been issued for the operation and component line. This field is read only and for informational purposes only.
-
Qty Issue: This is the quantity to be issued for the component and operation. This text box will be disabled until a line selection has been made. The issue quantity cannot exceed the quantity required, unless the Allow Over Issue option is enabled in the Shop Floor Pro Settings.
Material Issue\Return
Issuing Material
To issue materials to a job, follow the steps below:
- Select a Job from the Job drop-down.
- Select a Suffix from the Suffix drop-down.
- Select Issue from the Transaction Type drop-down.
- Select a line by checking a Line Selection checkbox or to select all lines, check the all lines checkbox at the top left of the grid.
- Select a Warehouse from the warehouse drop-down or use the default selection.
- Select a Location from the location drop-down or use the default selection.
- Select a Lot Code if the item is lot tracked.
- Enter an issue quantity for each selected line. Issue quantities must be greater than 0.
- Click the Process button at the bottom left of the screen to process the transaction.
Returning Material
To return materials to inventory from a job, follow the steps below:
- Select a Job from the Job drop-down.
- Select a Suffix from the Suffix drop-down.
- Select Return from the Transaction Type drop-down.
- Select a line by checking a Line Selection checkbox or to select all lines, check the all lines checkbox at the top left of the grid.
- Select a Warehouse from the warehouse drop-down or use the default selection.
- Select a Location from the location drop-down or use the default selection.
- Select a Lot Code if the item is lot tracked.
- Enter a return quantity for each selected line. Return quantities must be greater than 0.
- Click the Process button at the bottom left of the screen to process the transaction.