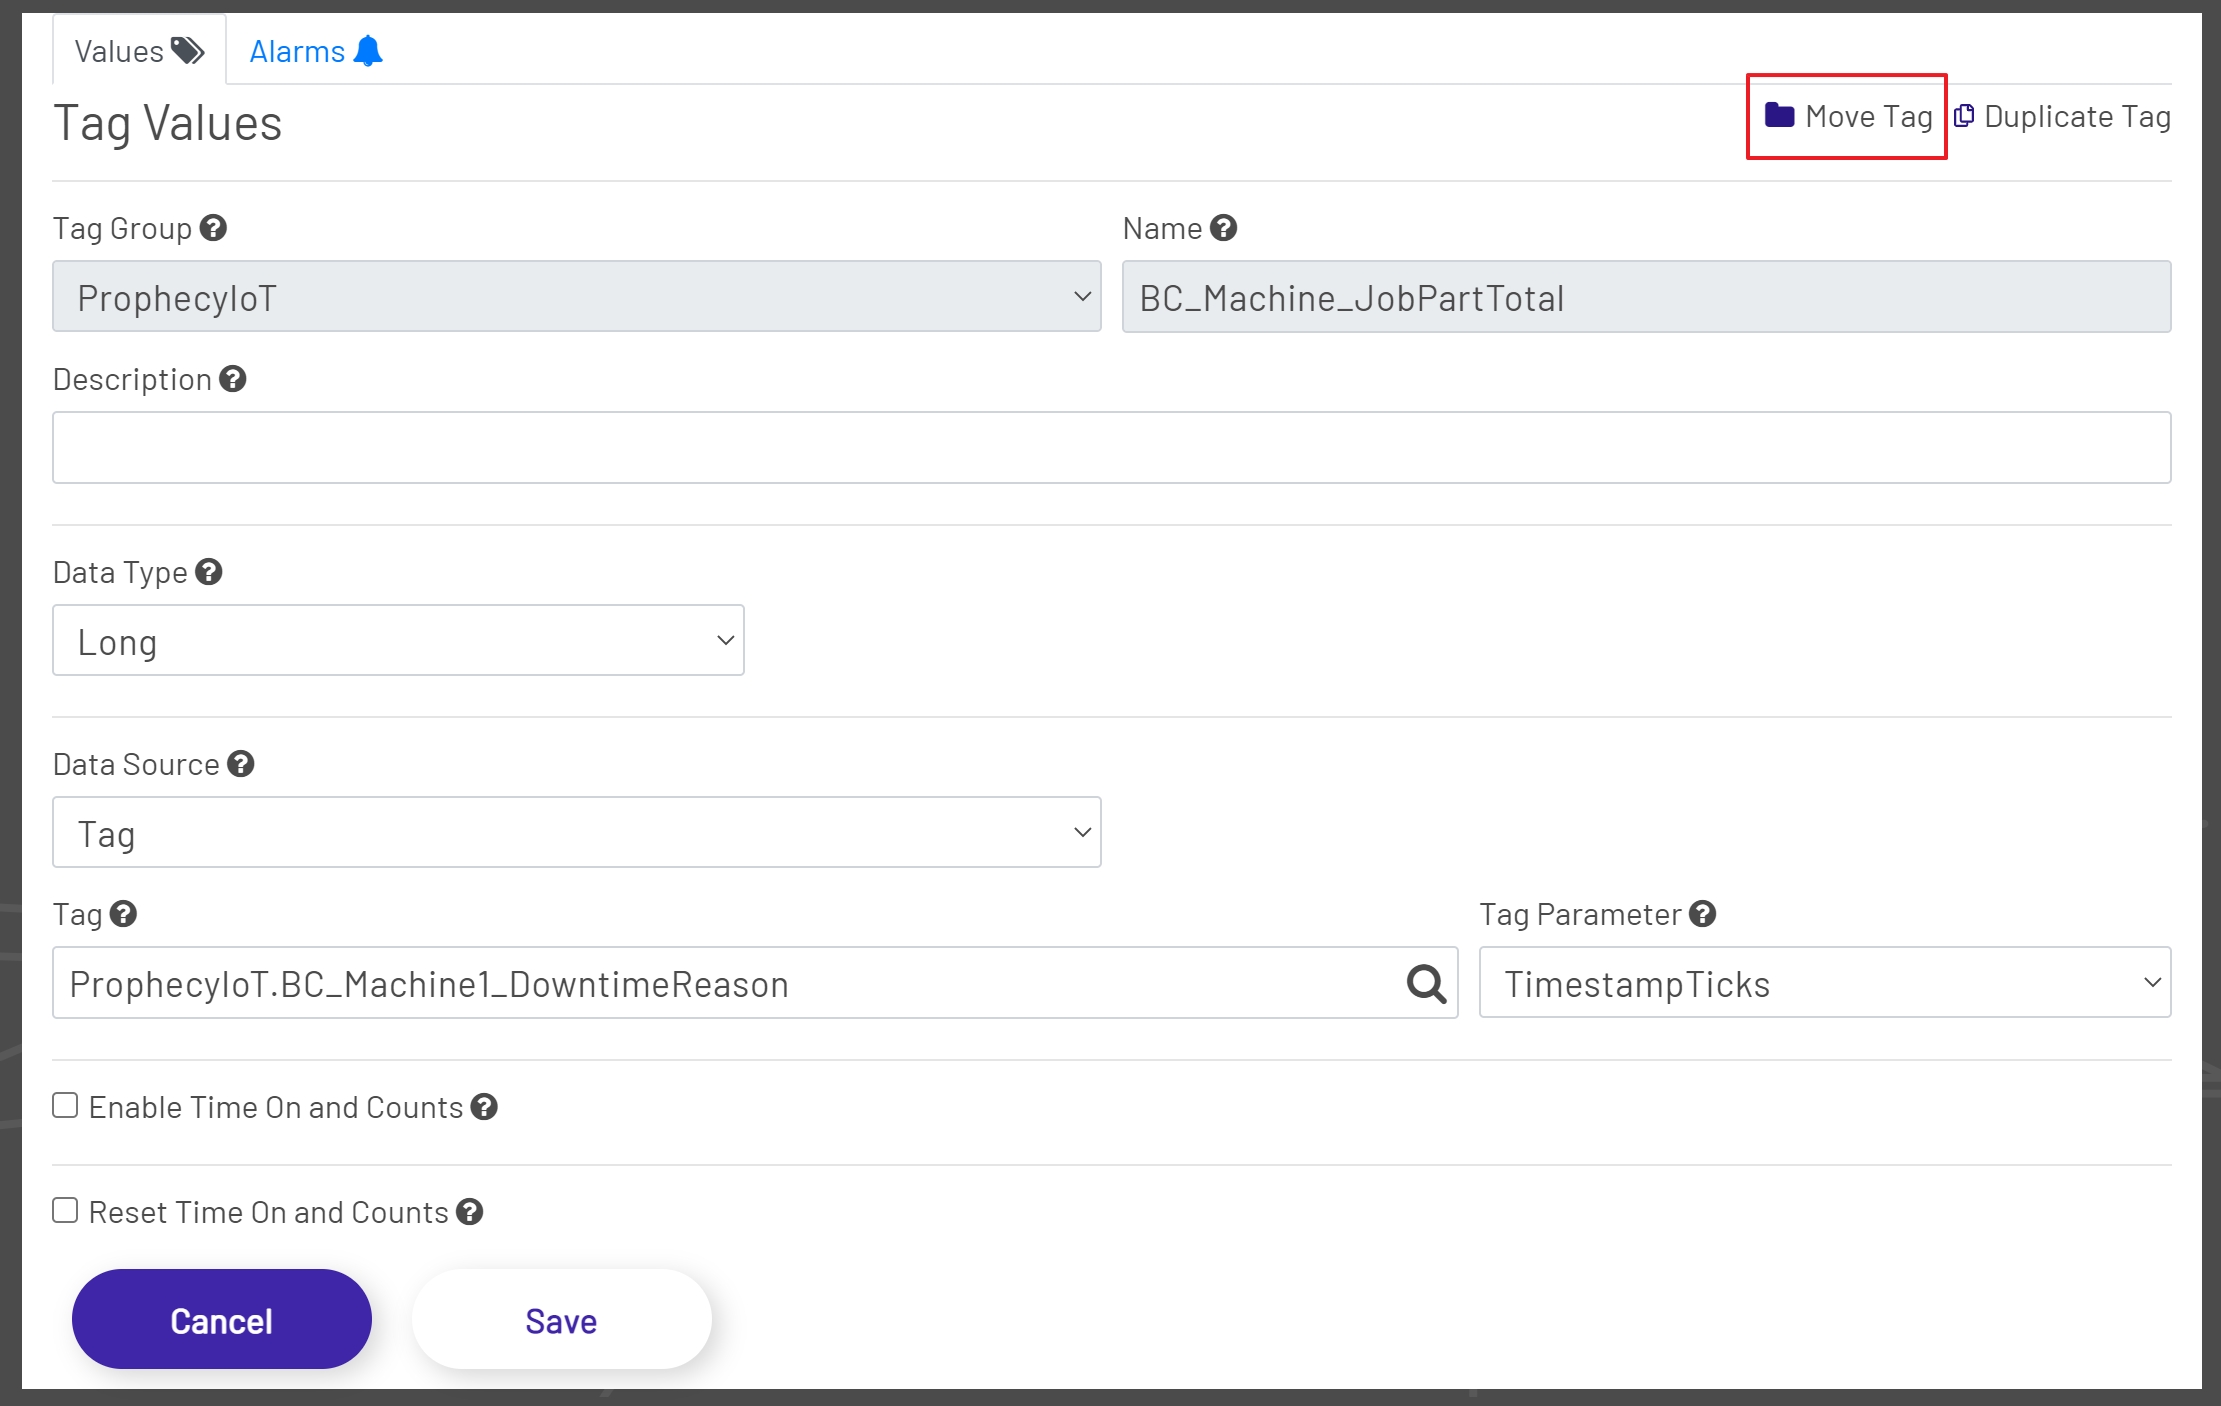
The Tag Editor is where tag properties and Alarms are set and updated. The Tag Editor consists of two main tabs. The Values tab and the Alarms tab.
Values Tab
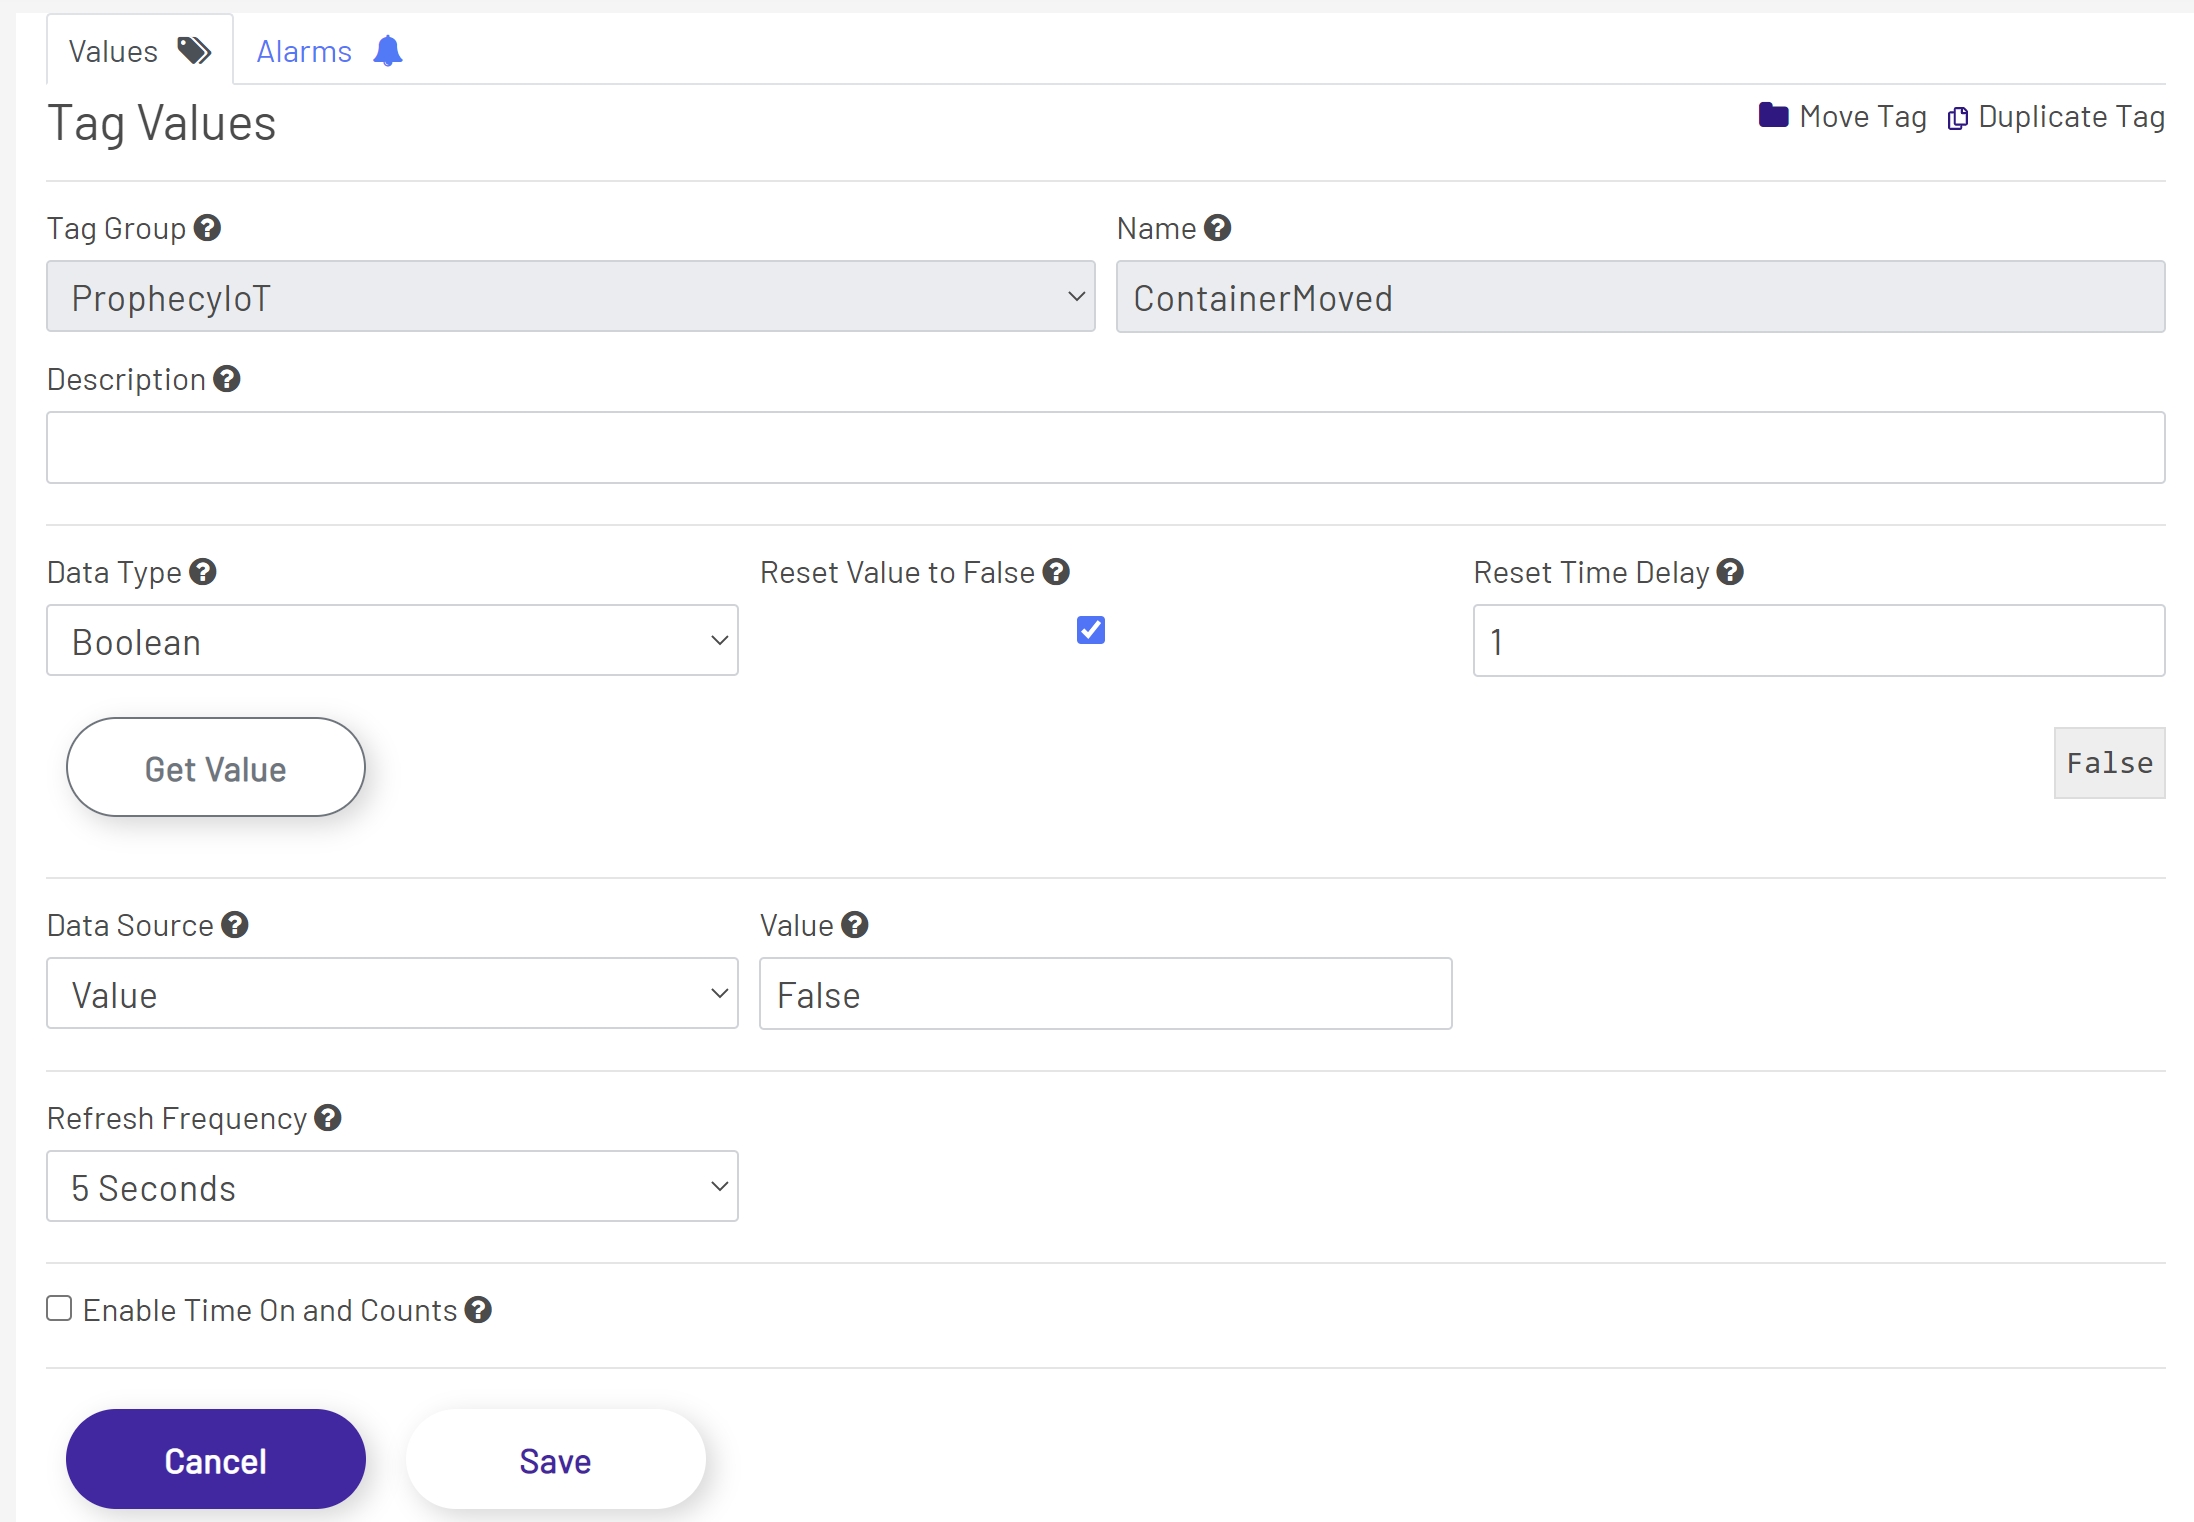
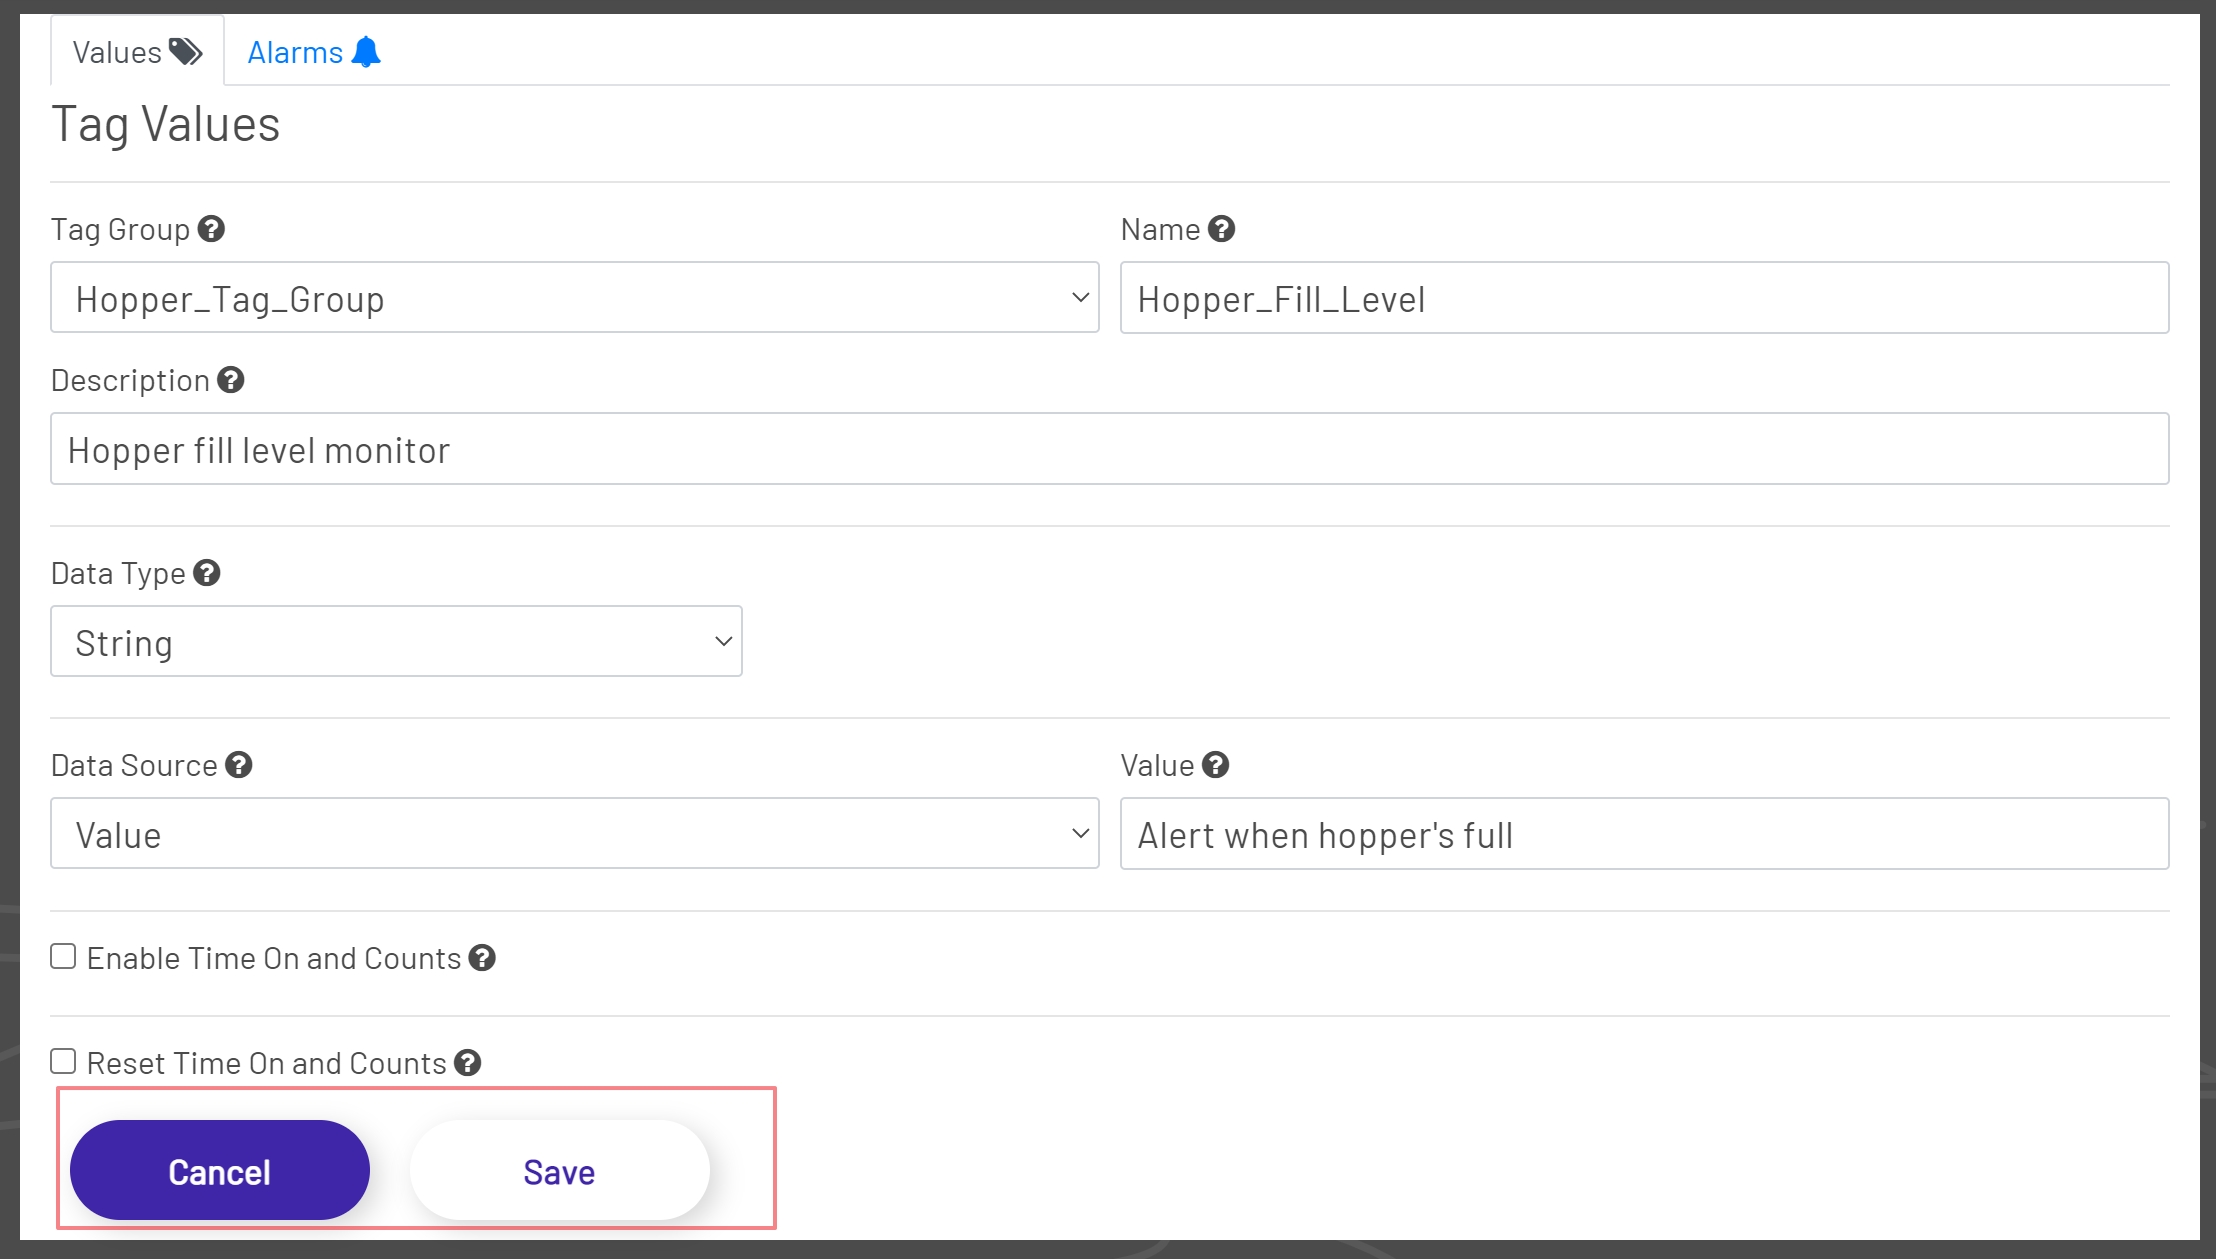
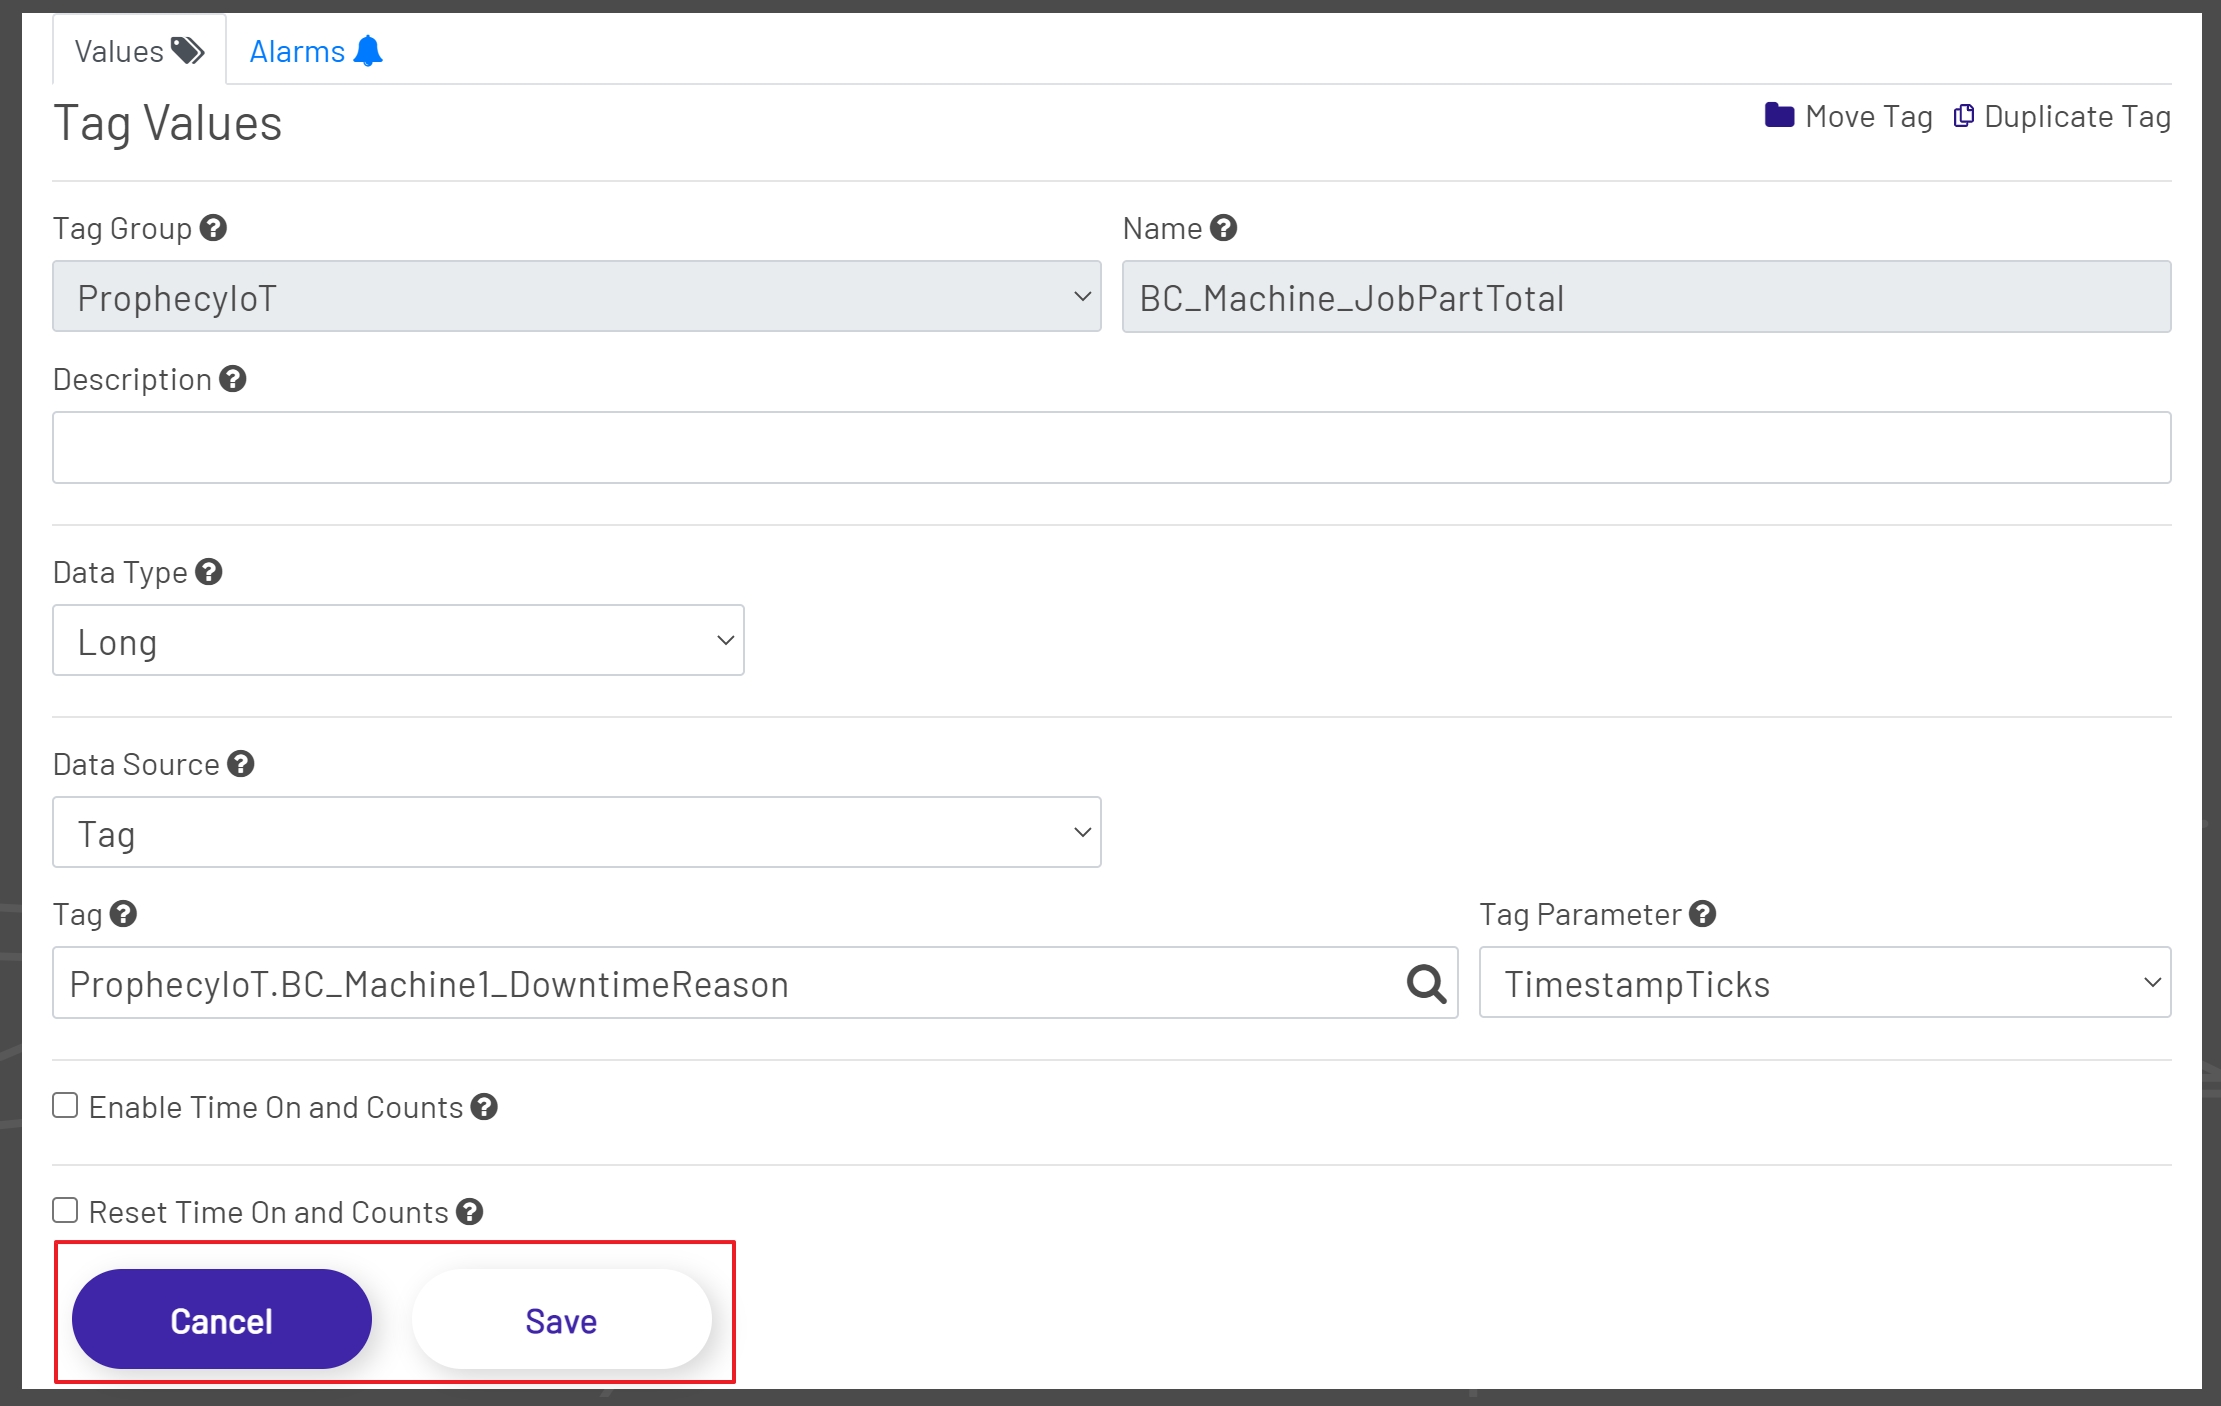
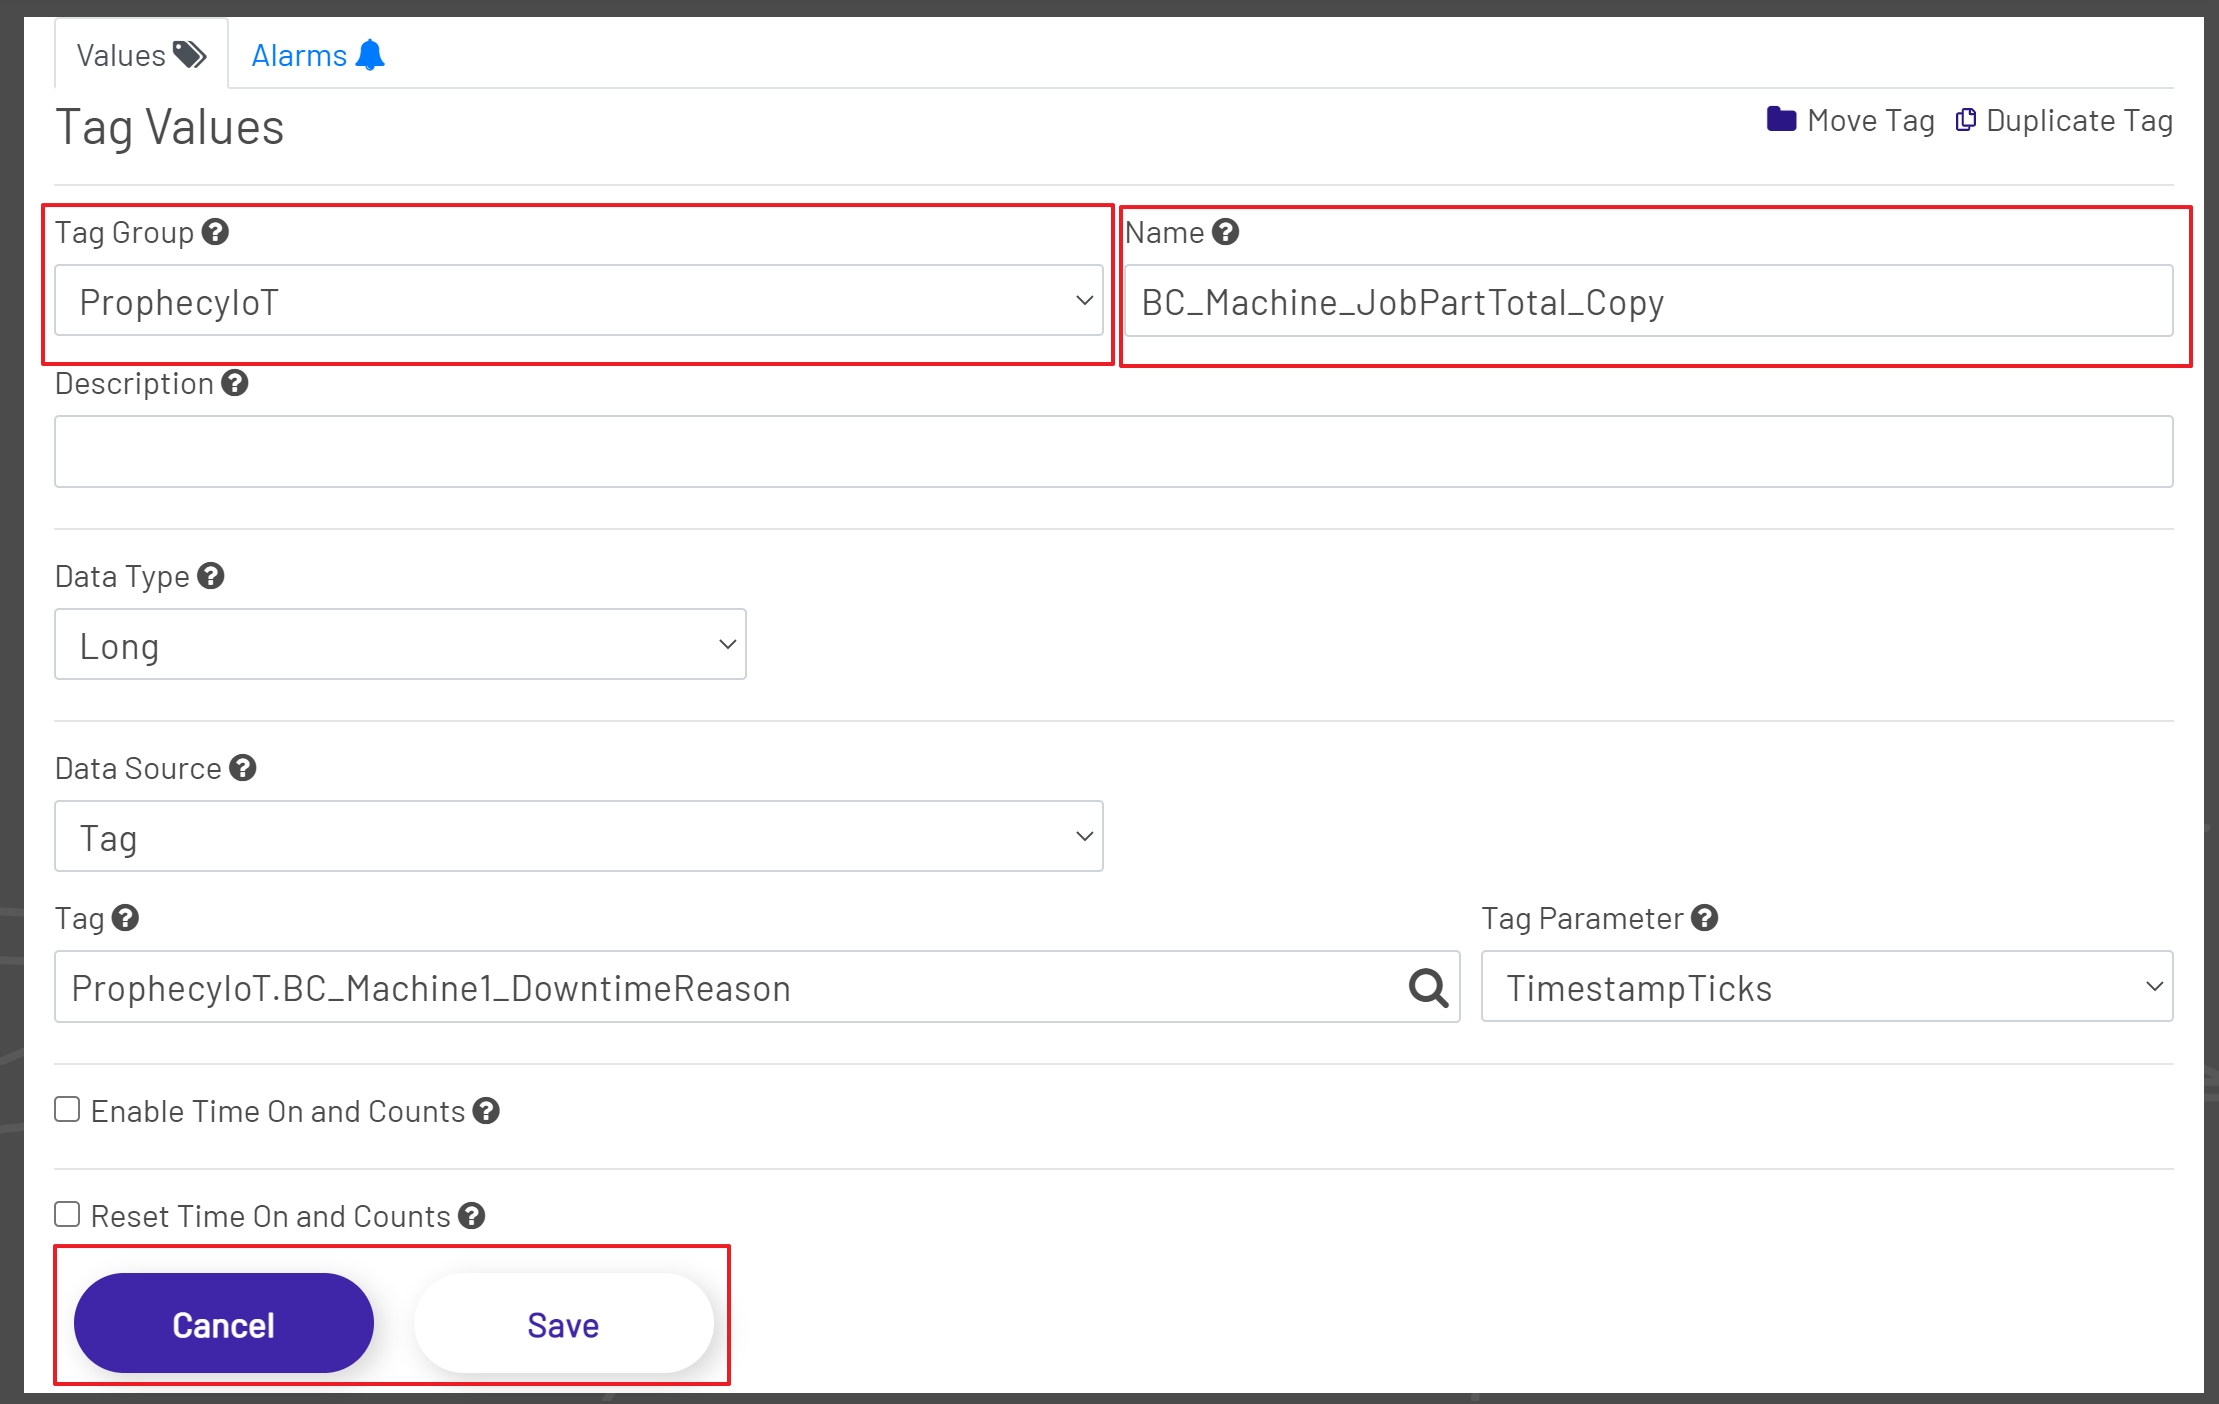
The Tag Editor Values tab contains the following editable tag properties:
-
Tag Group: This is the Tag Group that the tag will be located in. All previously created groups will be available for selection in this dropdown. This dropdown is only selectable when Adding a Tag or Duplicating a Tag. This is a required field.
-
Name: This is the Name of the tag that is being created. This field is only editable when Adding a New Tag or Duplicating a Tag. This is a required field.
-
Description: This is the Description of the tag and the text used when an alarm is first enabled.
-
Data Type: This tells the Data Acquisition Engine what type of data it should expect to collect for this tag - Integer, Float, Boolean, String, etc. This field is required.
-
Reset Value to False: When this is checked (set to true), a write of false will be sent immediately when the value transitions from false to true. This is only available for Boolean data types.
-
Reset Time Delay: This is the amount of time in seconds to delay the reset of a Boolean value when Reset Value To False is enabled. This is only available for Boolean data types and only visible when the Reset Value to False property is set to true.
-
Data Source: This will usually - though not always - be set to 'Value'. Tags whose values come from calculations or 3rd-party services may require other choices here. Your Godlan service rep can help set the correct value. A selection for this field is required.
-
Tag: This is the tag used when the Data Source is set to Tag. This field is only available when the Data Source is set to Tag. This field is required when the Data Source is set to Tag.
-
Tag Parameter: This is the tag parameter for the tag selected as the Tag Data Source. This is almost always set to Value, but there can be occasions when this needs to be set to something else. This field is only available when the Data Source is set to Tag and only after a tag has been selected. This field is required when the Data Source is set to Tag.
-
Value: This is the initial value of the tag. This field is only available when the Data Source is set to Value.
-
Enable Time On and Counts: When enabled this will keep track of how long a Boolean value is true and how many times it transitions to true.
-
Daily Reset Hour: This is the hour of day that the Time On and Counts is reset for the time and counts for the current day. This field is only available when the Enable Time On and Counts is set to true.
-
Daily Reset Minute: This is the minute of day that the Time On and Counts is reset for the time and counts for the current day. This field is only available when the Enable Time On and Counts is set to true.
-
Period 1 Minutes: This is the total time in minutes to track for Period 1 of Time On and Counts. This field is only available when the Enable Time On and Counts is set to true.
-
Period 2 Minutes: This is the total time in minutes to track for Period 2 of Time On and Counts. This field is only available when the Enable Time On and Counts is set to true.
-
Reset Time On and Counts: When enabled the Time On and Counts totals are reset when the Boolean tag defined transitions from false to true.
-
Reset Time On and Counts Tag: This is the Boolean tag that will reset the Time On and Counts totals when its value transitions from false to true. This field is required when Reset Time On and Counts is set to true and is only available when Reset Time On and Counts is set to true.
-
Reset Tag Parameter: This is the parameter for the Reset Time on and Counts Tag. This field is required when Reset Time On and Counts is set to true and is only available when Reset Time On and Counts is set to true.
Adding Tags
To add a tag, the Add Tag Button must be clicked to enable the fields in the Tag Editor. Once the fields are enabled, enter the values for all required fields and any optional fields. Once all fields have been populated, click the Save Button at the bottom of the Tag Editor to save the tag or click the Cancel Button to undo any changes. Upon a successful save the new tag will be automatically displayed in the Tag Tree.
Note: The Save Button will remain disabled until all required fields have been populated.
Editing Tags
To edit a tag, select a tag from the Tag Tree. Once a tag has been selected all current properties for that tag will be displayed in the Tag Editor. All fields except the Tag Group and Name can be edited. Change all desired tag properties and click the Save Button to save the changes or click the Cancel Button to cancel the editing process.
When editing the data type for a tag, a references check will be run for the tag being edited to help maintain data integrity. If the tag has references, a pop up window will be displayed with a warning that the tag is used in other places. It is recommended to Export References and review them before continuing. Tag data type changes will be logged and can be viewed in the Tag Modifications in the Admin section of the application.
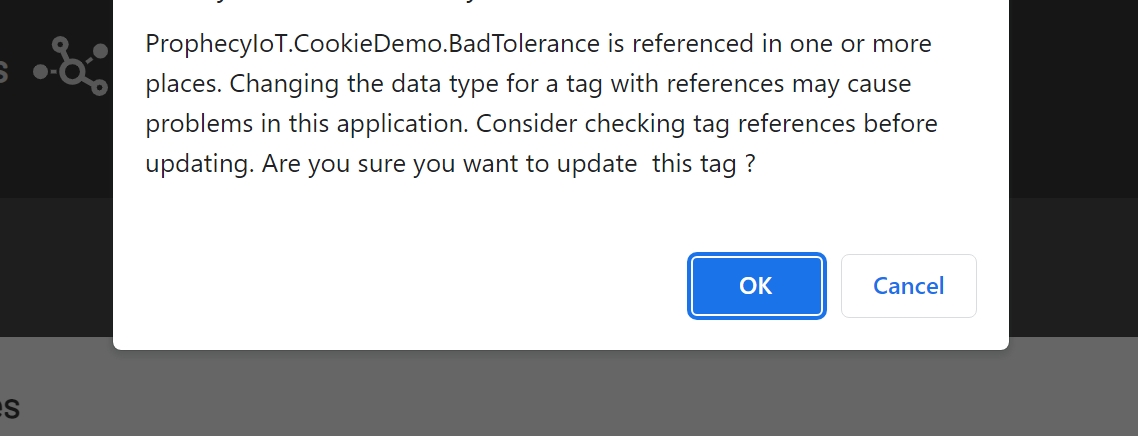
Warning: Changing a tags data type has the potential to cause problems in the Prophecy application.
Changing Tag Groups
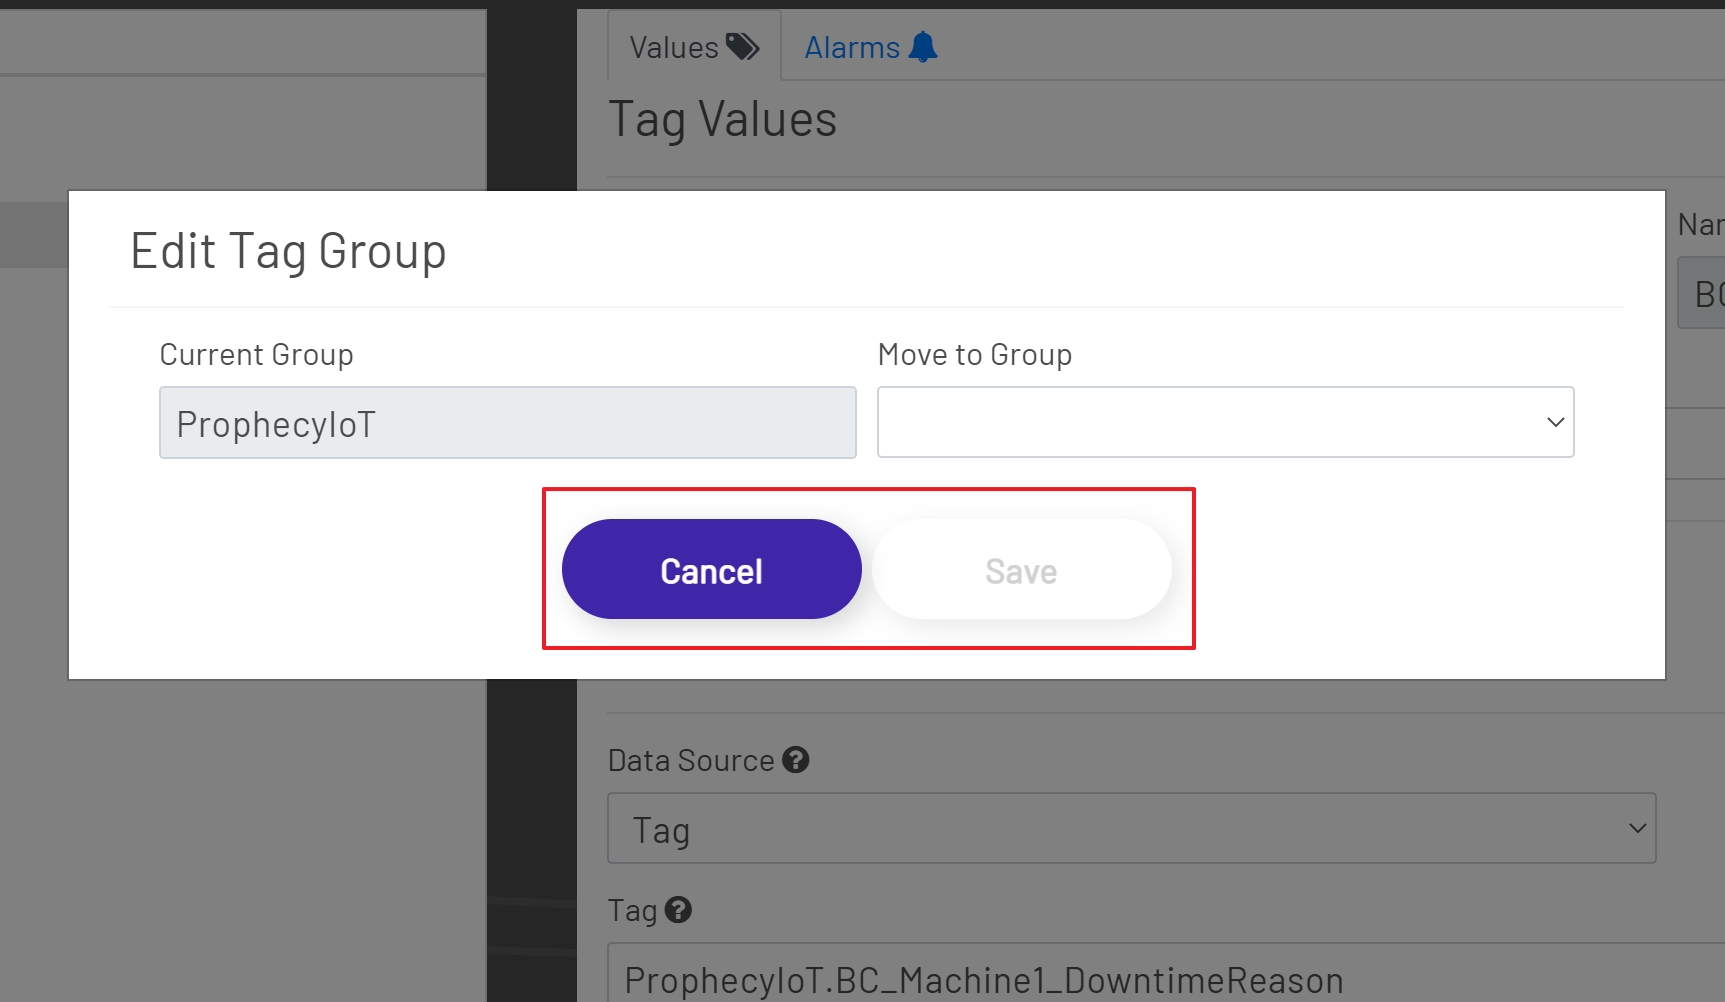
There may be times when a tag needs to be moved to another group. This is where the Move Tag option comes in useful. Before a tag group can be changed a tag must first be selected from the Tag Tree. Once the tag selection is complete the Move Tag Button becomes available.
Click the Move Tag Button. After clicking the Move Tag Button a modal window will open displaying the current group and a dropdown with all available groups.

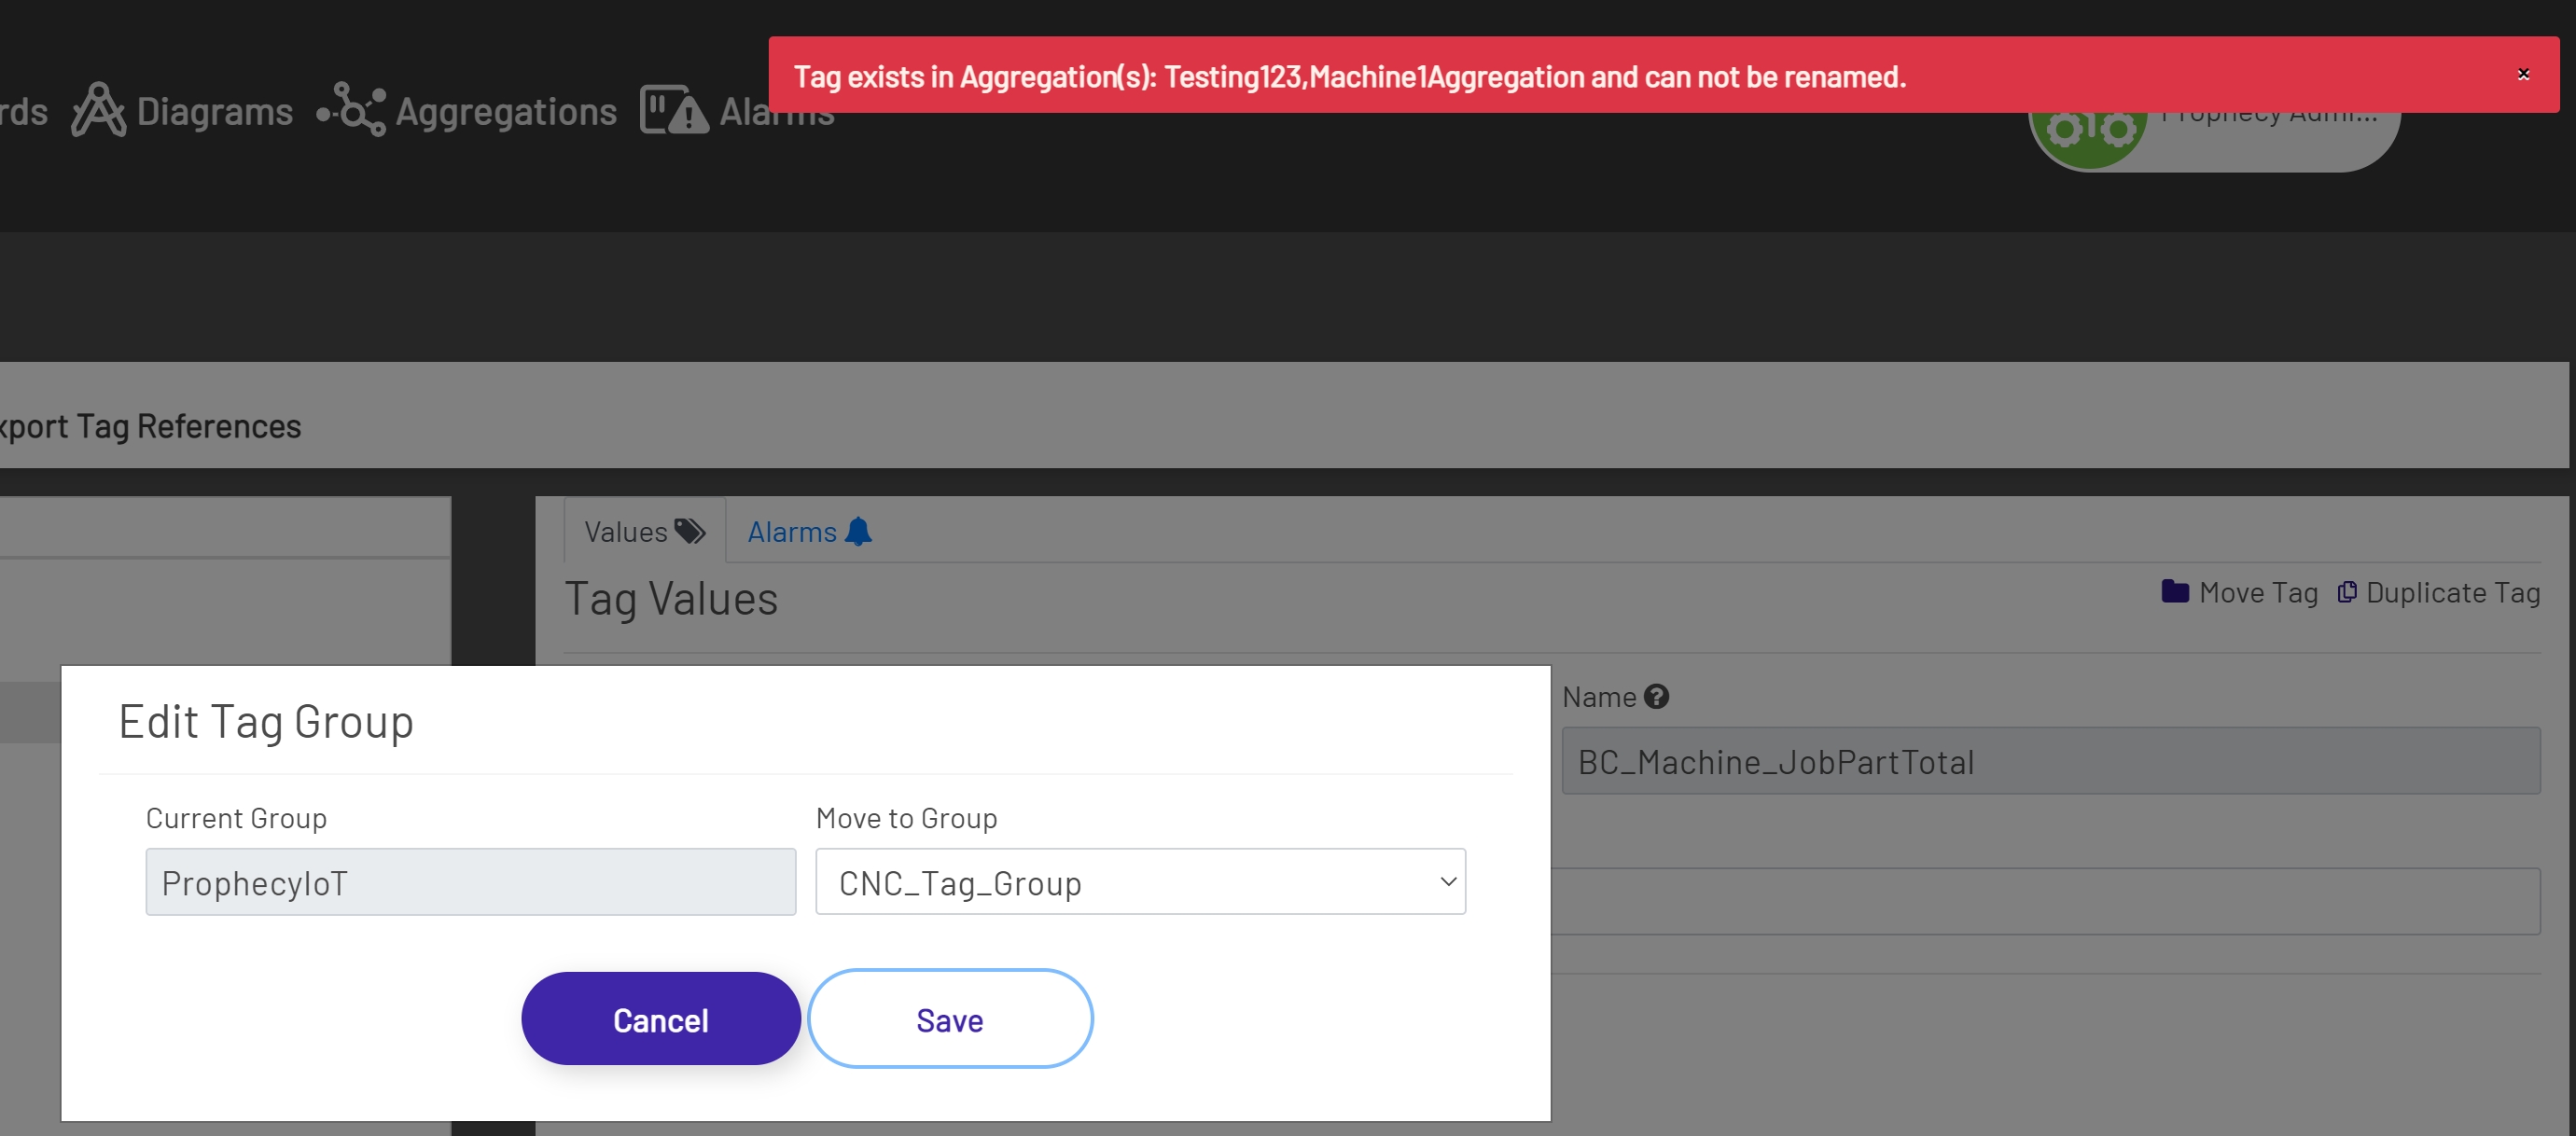
Select the desired group from the dropdown. The Save Button will remain disabled until a group selection has been made. To save the changes click the Save Button to change the group or click the Cancel Button to cancel the process. Upon a successful save the Tag Tree will be updated to display the tag in the new group.
Note: If the tag that is being moved is used in an Aggregation, then the group cannot be changed. In this scenario a message will be displayed at the top of the screen listing all Aggregations the tag is used in. In this situation the Aggregations would have to be deleted and then recreated after the tag was moved.
Duplicating Tags
There may be times when an existing tag needs to be copied. This is where the Duplicate Tag option is beneficial. Before a tag can be duplicated a tag must first be selected from the Tag Tree. Once the tag selection is complete the Duplicate Tag Button becomes available.
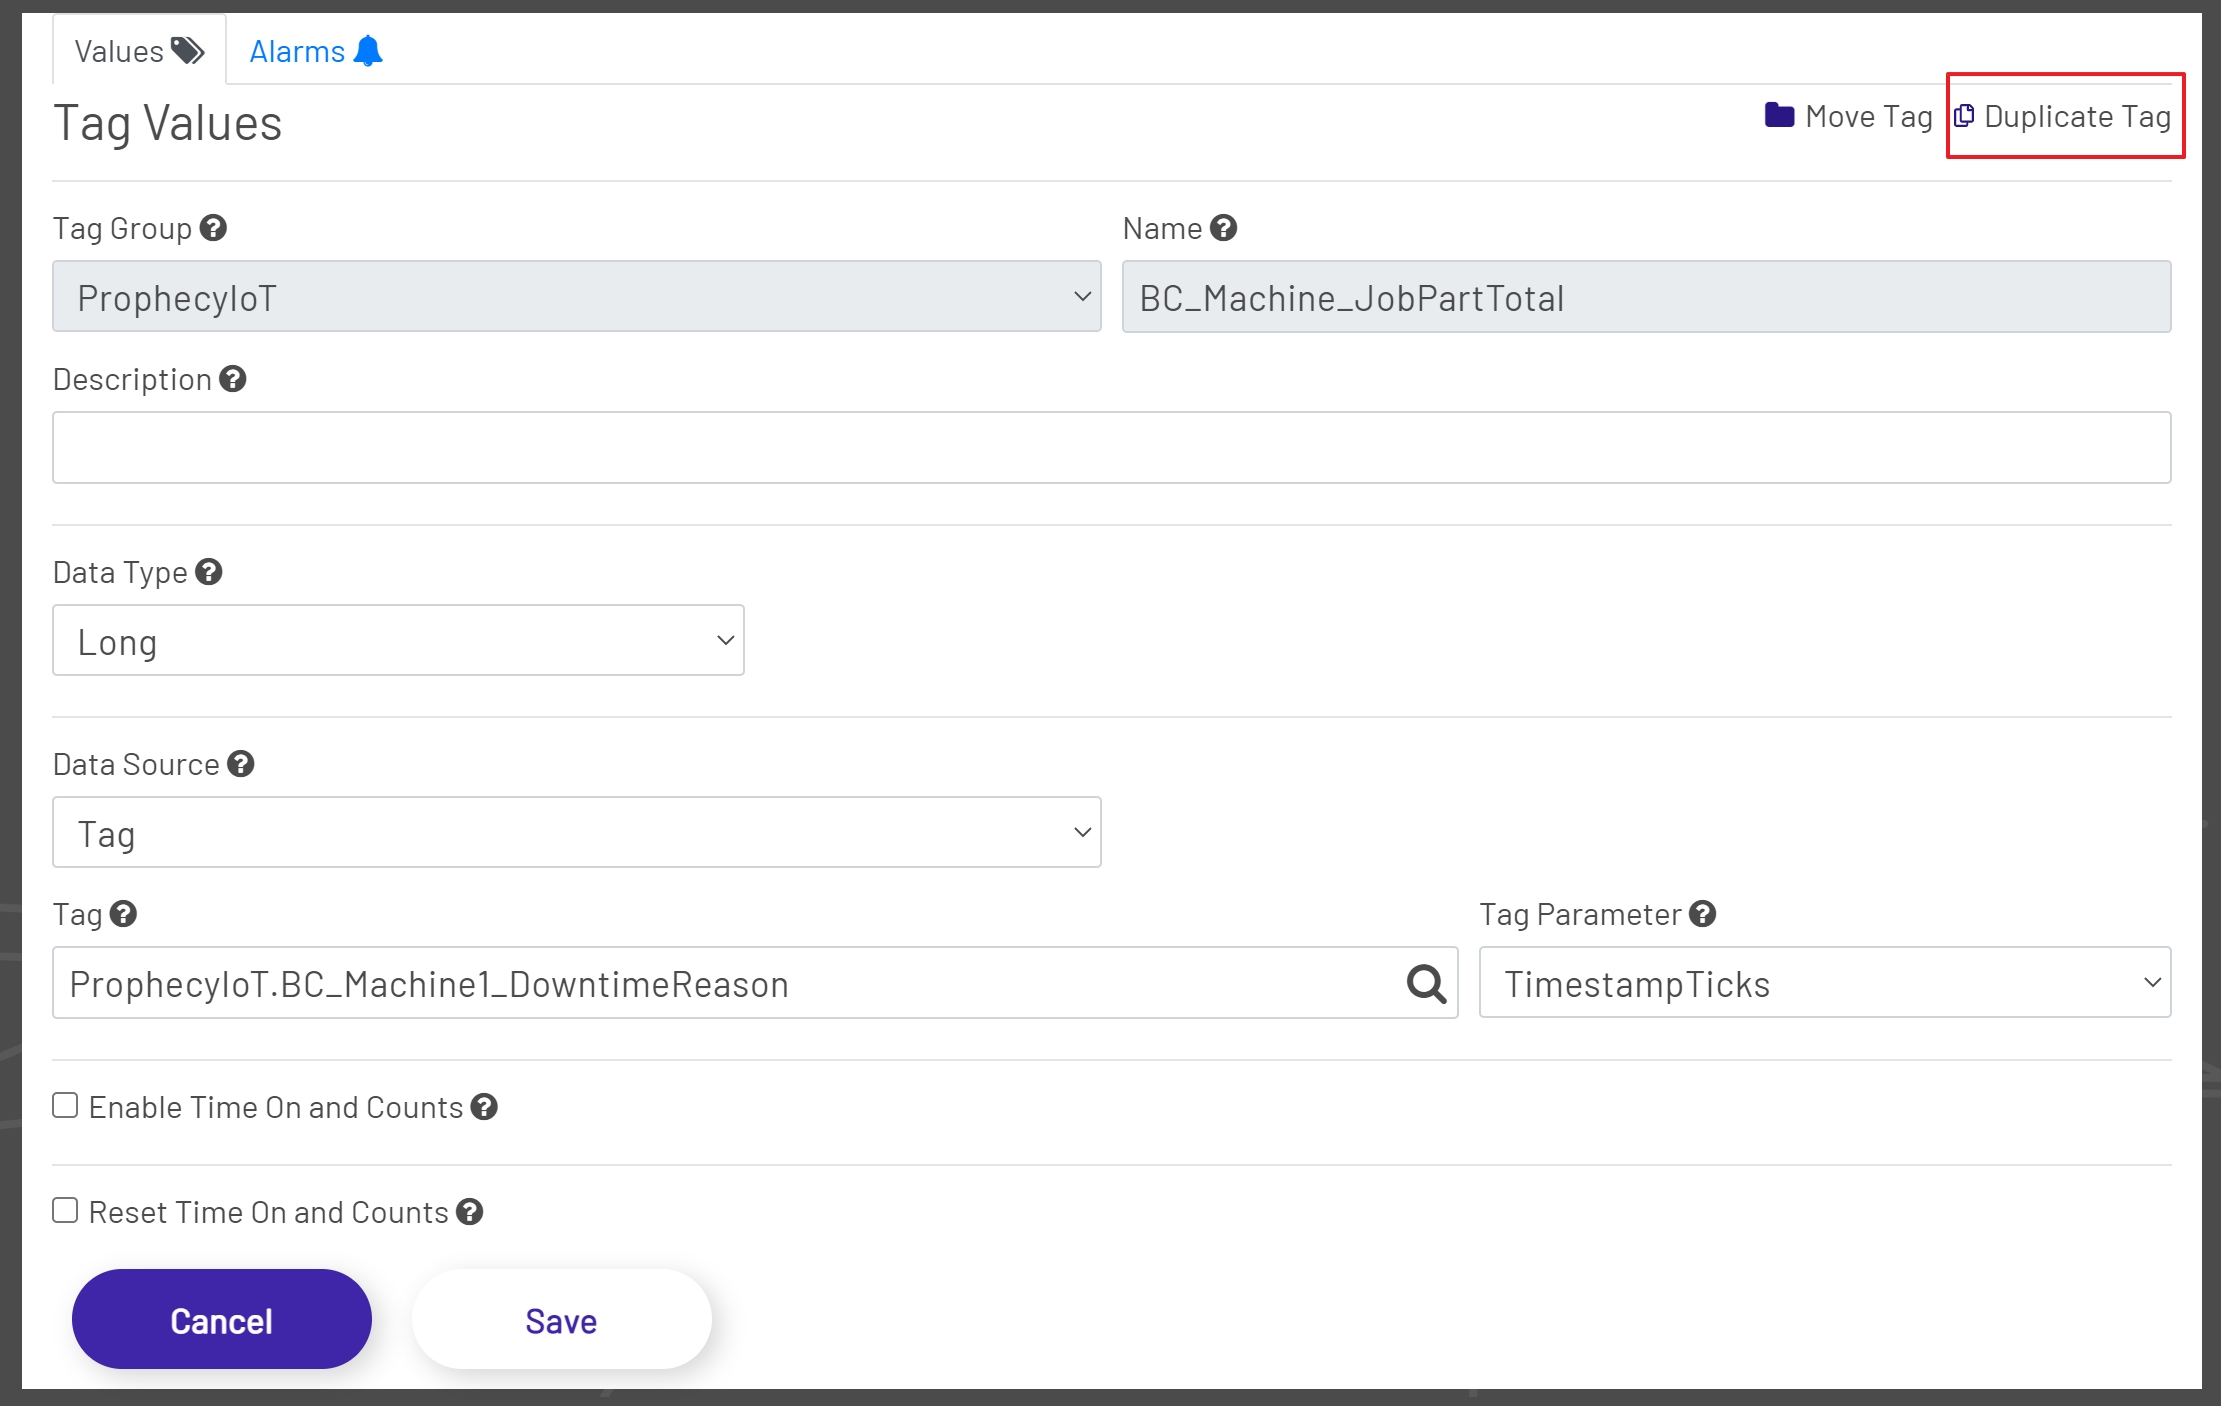
Clicking the Duplicate Tag Button will re-enable the Tag Group Dropdown, remove the Name, and will leave all fields for the previously selected tag in place. At his point the group can be changed if needed or can be left the same. The name for the tag must be entered and cannot be the name of a tag already used in the selected group. The remaining fields can be left the same or updated as needed. Once all changes have been made, click the Save Button to save the changes or click the Cancel Button to cancel the duplication process. Upon a successful save the Tag Tree will be updated to show the duplicated tag.
Alarms
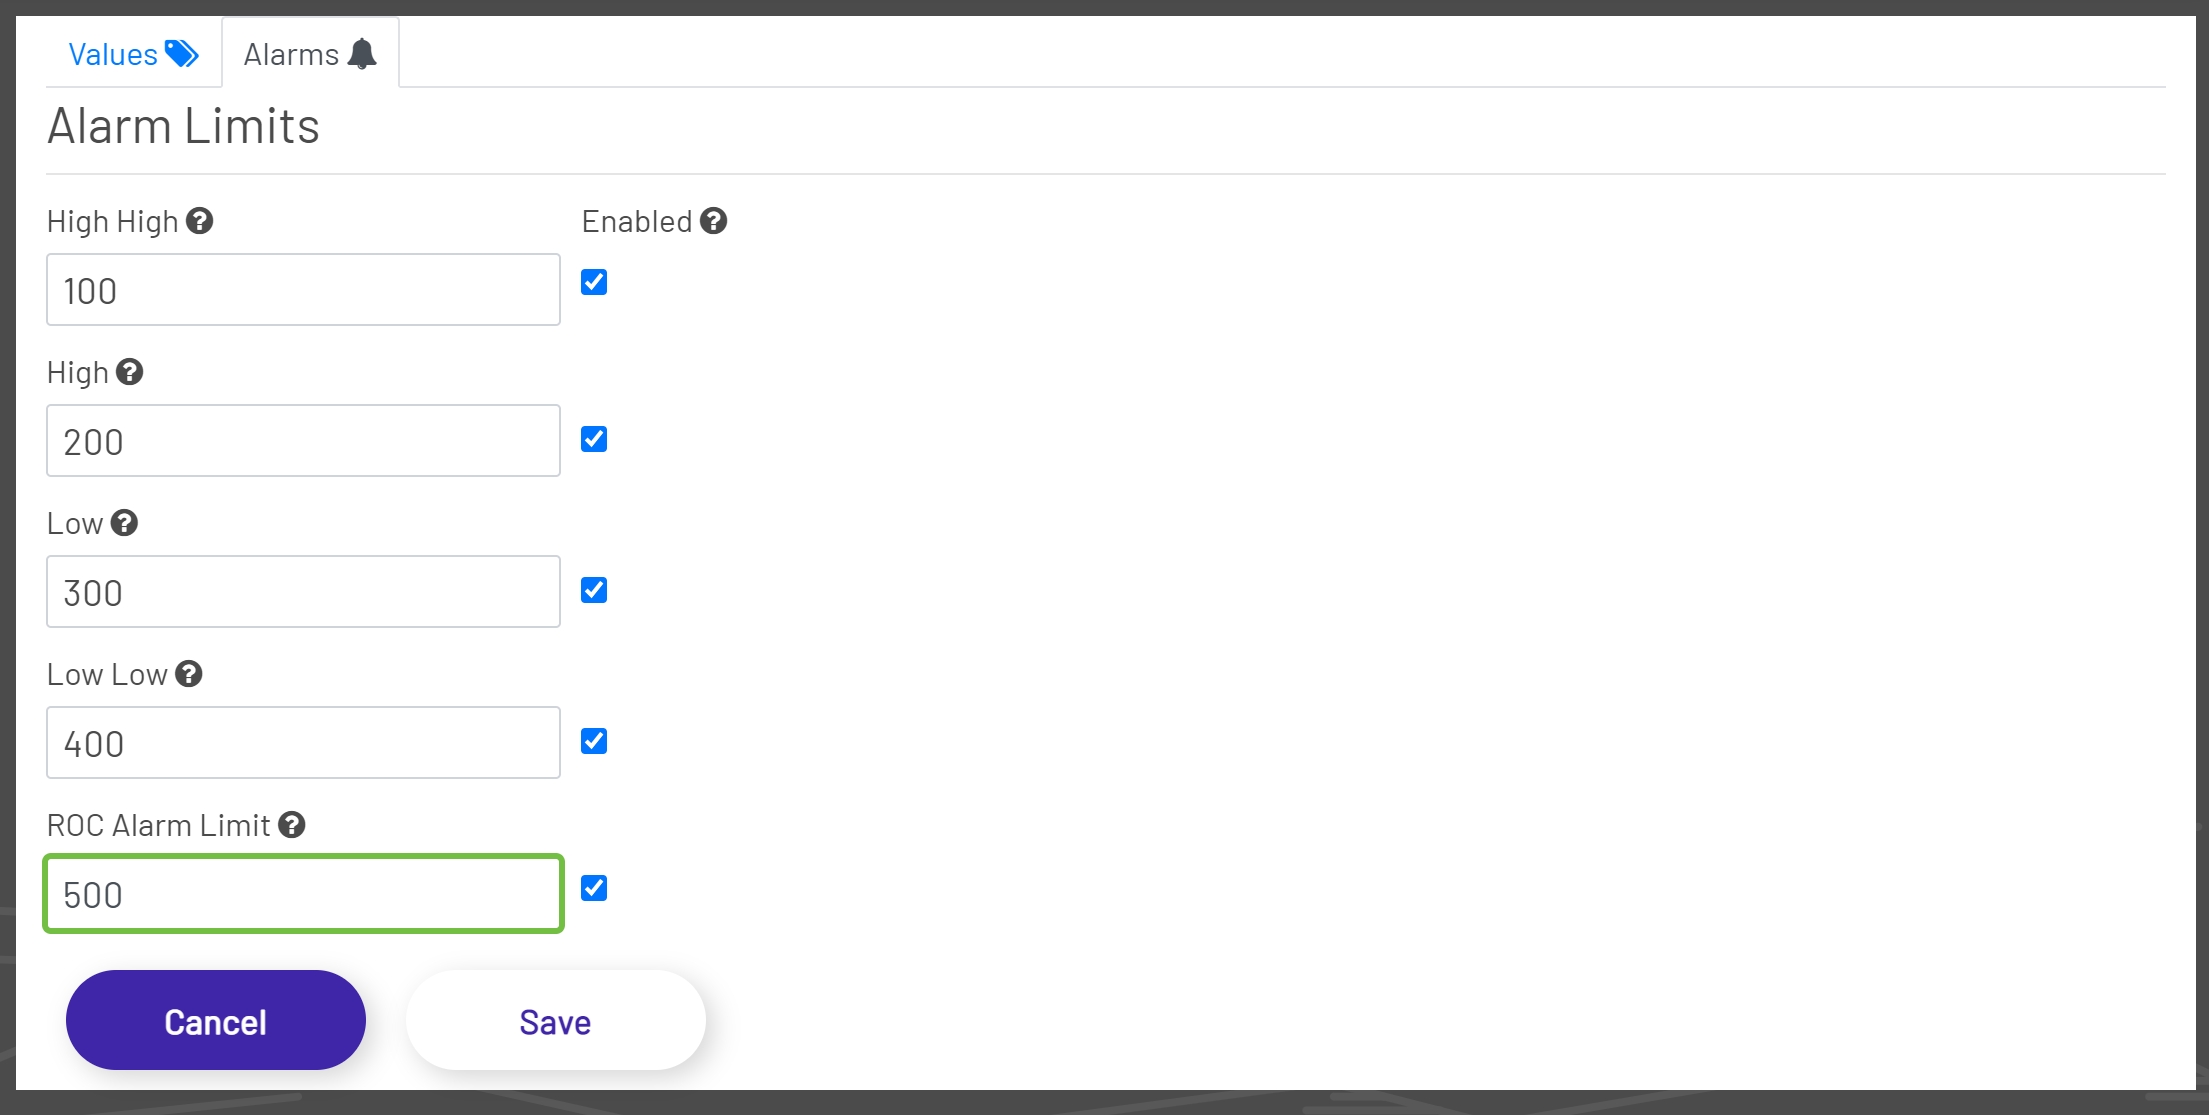
The Alarms tab is where Alarms can be Enabled and Disabled and where alarm limits can be set. Alarm limits are used by the Data Acquisition Engine to decide when to fire an alarm, which can be monitored elsewhere in the application or as part of a Dashboard. The alarm limits are disabled by default, though editing the tag allows the user to change the limit values and enable the alarms. There are five alarms available in the ProphecyIoT application.
-
High High Alarm: The tag's High High alarm limit parameter.
-
High Alarm: The tag's High alarm limit parameter.
-
Low Alarm: The tag's Low alarm limit parameter.
-
Low Low Alarm: The tag's Low Low alarm limit parameter.
-
ROC Alarm: The tag's Rate of Change alarm limit.
Note: Alarm limits are disabled for String data types.
For assistance or questions regarding Alarms, please contact the Prophecy Consulting Group.