The Prophecy Mongoose API connector allows external integrators (users who are integrating one or more 3rd-party systems) to retrieve and manipulate data from your Mongoose ERP application, such as CloudSuite Industrial (CSI), Factory Track, or any other. Also, these connections are combined with IDO Definitions to provide data access to a mongoose application within the Diagram Modeler, using Mongoose Live Data Shapes and Mongoose Buttons.
The below information is technical. Unless you have relevant experience, it will be difficult to understand, as these are the low level connections needed for Mongoose data access.
The complication of connecting to the Mongoose application is largely taken care of by Prophecy, once the connection is set up. The connector uses the REST API (or optionally the XML/SOAP API) so it will work when the Mongoose instance is SaaS hosted or on-premise.
The connection information for Mongoose (including the username and password used to access the application, the Mongoose configuration name, the URL pointing to the Mongoose web services, and whether or not to use the SOAP/XML access methods, etc.) is configured in Prophecy itself. An Admin user can set up as many of these connections as they want, and when using the API, simply pass in the name of the connection to use.
You can edit the Mongoose connections via the Admin -> Settings tab, or by directly editing the portalConfig.json file. In either case, the site must be restarted in order for the new configuration changes to be picked up by Prophecy. To restart the site, you can recycle the application pool in Internet Information Server (IIS) or restart the web server entirely.
Any number of Mongoose Connections can be configured. For example, you may need one for each "configuration" as defined in CSI, or you may want a seperate test connection so that live data isn't touched during testing/development of an IDO definition.
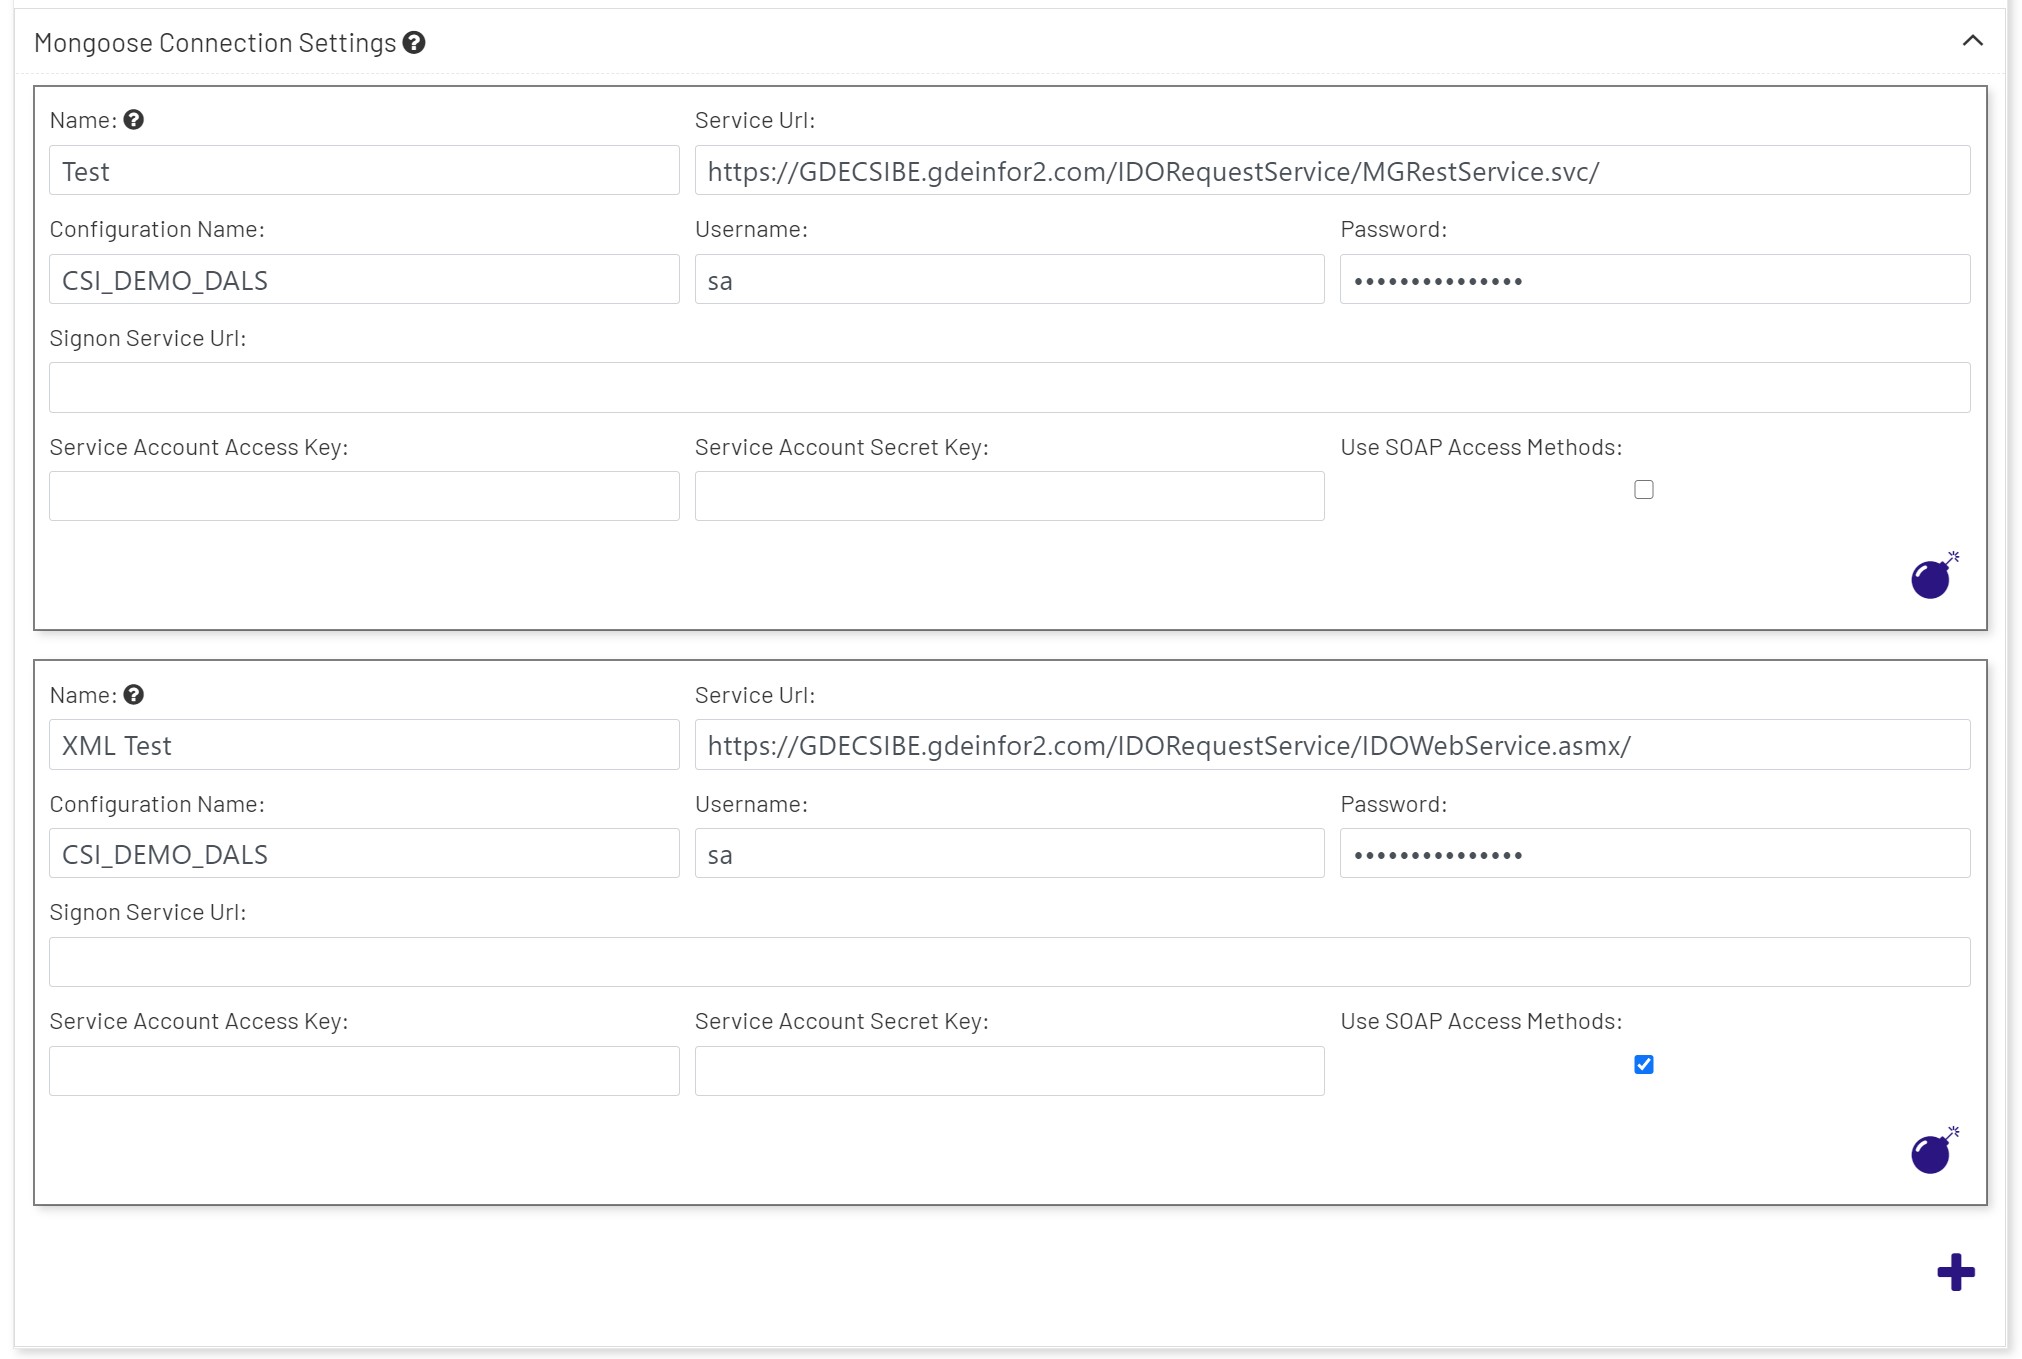
- Name: The name of the connection. This can be any alphanumeric combination of characters, but it's suggested that the name be kept clear as to what purpose, site, or configuration it describes. This connection name will be used both in external integration app development as well as in Diagram Modeler Once the name is in use, it should not be changed, because doing so will force the same change in anything that references the connection. In Diagram Modeler that may make functioning diagrams that consume the connection stop working until it is updated to match.
- Service Url: This is the complete URL to the Mongoose REST service or SOAP service. For REST connections, the URL will point to an internal or external server via URL, and usually will point to the "/IDORequestService/MGRestService.svc/" folder. For SOAP access (if the "Use SOAP Access Methods" checkbox is checked), the URL will point to "/IDORequestService/IDOWebService.asmx/" after the protocol and fully qualified domain name.
- Note: We strongly suggest using the HTTPS: protocol, as opposed to HTTP:, because the data will be encrypted during transmission. This requires your Mongoose server to be configured to handle HTTPS (SSL) requests. Please contact the Prophecy Consulting Group if you need help.
- Configuration Name: The targeted "configuration", as defined in Mongoose, for this connection.
- Username: This is the Mongoose username that will be used to access the data. Note that while this may work with a "regular" user account in Mongoose, this will still count against the user license count. In production, you will want to use the "automation user" to access the database. For CSI databases, this username is typically "SL_Internal".
- Password: This is the Mongoose username's password that will be used to access the data.
- Signon Service Url: If your version of CSI is using Ming.le(™) to authenticate, then you can specify the Ming.le sign-on service URL here.
- Service Account Access Key: If using the "Signon Service" Url, then the account access key (set up to be exclusively used for Prophecy access) should be used here.
- Service Account Secret Key: This is the secret key, or password, for the Account Access Key (if using the Signon Service Url).
- Use SOAP Access Methods: This checkbox determines what access method will be used behind the scenes to get data. It's best to use REST (unchecked) unless you have a legacy version of Mongoose that doesn't support REST, or REST hasn't been configured in Mongoose.
Once the configuration is correct and the site is restarted you should be able to define an IDO Definition and test it, and then use it in a Diagram in Prophecy. If this meets your needs for integration, then you can ignore the below, which is for full external application integration.
Connecting to Prophecy to Access Mongoose Data
To do so, the integration app will need to obtain a Prophecy Authorization token (described below). Then, that Authorization token will need to be put in the header of each HTTP request going out, as a Bearer authorization token.
Each of the topics and endpoints discussed below are included in the ProphecyMongooseAPISampleProject.zip sample project, written in C#/.Net Standard. It's highly recommended that you check out the samples in order to understand how to make the API calls.
All endpoints that have body content, return and accept json data exclusively in the body.
Authentication Server Endpoints
The Prophecy Authentication server (i.e., the Single Sign-On Service) controls all access to Prophecy, whether it's a user login or an API. It's from this server that the user will get an Authorization token to use for API calls.
OpenID Configuration
The base URL for the Prophecy Authorization varies from each installation, but it can be found in the above configuration file under "Authentication" -> "Settings" -> "Authority" -> "Value". Prepend this URL before the following two endpoints.
Since we follow OpenID standards, the user can get all OpenID endpoints from here, before any authentication occurs:
/.well-known/openid-configuration
It will also list all known scopes, roles, and other information that is "OK to share publicly" as per the standard.
Get Authorization Token
To obtain an Authorization token, send an HTTP GET request to:
/connect/token
And include these x-www-form-urlendcoded request headers in the request:
| Header | Values |
|---|---|
| cliend_id | ProphecyIntegrationAPI |
| client_secret | ProphecyIntegrationAPISecret (the default; change this to match your authorization configuration) |
| grant_type | client_credentials |
Response:
{
    "access_token": "eyJhbGciOiJSUzI1NiIsImtpZCI6IjQ1N2ZhOTA1NmMzNmNlYzViZTJlYjk2NjExOWNlOTRjIiwidHlwIjoiSldUIn0.eyJuYmYiOjE1NTgxMjk0NTAsImV4cCI6MTU1ODEzMzA1MCwiaXNzIjoiaHR0cDovL2xvY2FsaG9zdDo1MDAwIiwiYXVkIjpbImh0dHA6Ly9sb2NhbGhvc3Q6NTAwMC9yZXNvdXJjZXMiLCJQcm9wZWhjeUludGVncmF0aW9uQXBpIl0sImNsaWVudF9pZCI6IlByb3BoZWN5SW50ZWdyYXRpb25BUEkiLCJzY29wZSI6WyJQcm9wZWhjeUludGVncmF0aW9uQXBpIl19.CVeeaoo3-JngTct2twwKqgPYV5yDMm3mxHnD41-Mhdb6An38KktFWgMoYrOfdFrJJcxTO-zjfnn_49I-UpF10RGr9bGUJphFpCSAf26_x7BhMfIJqa287j1lgWRmXSvbVen2tQ7VB19ibS0-N2BtlhWVRoKOa__iCfDNB5P225j1QceL762M_dmqET0mKWfTtUM2teGCIa_kQnraBChldE2sGCjZvDkYpUaPOw39MNjev49B6aLXYdtAVEYt6P5zL3YE_NfhOFbkbm5eKIqq21d5fcXKm4b3fpVl1icdeCrzH9zN2SLzBYzycBaIj8Z0t9XE3K4-zWeK2V511egduw",
    "expires_in": 3600,
    "token_type": "Bearer"
}
The token should be set as the Bearer token for all API requests. The sample project has an example of how to use this in C# code.
- Note: The returned token above is a
JWTtoken, and it's not encrypted. In fact, you can decrypt it at will (it is tamper-proof, however, because it is digitally signed). Therefore, all communications with the Prophecy Authorization server should be using HTTPS only, so that transmission of the token is encrypted.
Now that you have the token, you can make the following Mongoose API calls at the following endpoints:
Mongoose API Endpoints
The below endpoints are for the Prophecy portal itself (not the Authorization server). It's simply the base address of how you access Prophecy in a browser.
The curly brackets below indicates that the entire string should be replaced with what the user wants, e.g., SLJobs for the {idoName} placeholder.
GetConfigurations - [HttpGet]
/GetConfigurations/{mongooseConnectionName}
- Returns all Mongoose configurations.
- BODY: empty
GetIdoProperties - [HttpGet]
/GetIdoProperties/{mongooseConnectionName}/{idoName}
- Returns all of the properties for the named IDO.
- BODY: empty
GetIdoData - [HttpGet]
/GetIdoData/{mongooseConnectionName}/{idoName}/{properties}
- Returns all properties for the named IDO.
{properties}= a comma delimited string of properties you wish to see in the results.- BODY: empty
Optional URL parameters:
| Parameter | Value |
|---|---|
| filter | a SQL formatted filter to apply to the result set. |
| orderBy | a SQL formatted field (or fields) to sort the result set. |
| rowCap | an integer value of the number of rows to return. If -1 (the default) then all rows will return. |
| distinct | return only distinct rows, for the fields (properties) specified. |
| loadType | an integer value that is used with getting "pages" of rows. 0 (default) = None, 1 = First, 2 = Next page, 3 = Previous, 4 = Last. |
InsertItems - [HttpPost]
InsertItems/{mongooseConnectionName}/{idoName}
- Inserts IDO Collection items
- BODY: Items to insert (one or many), in
jsonformat. Example:
[
    {
        "Action": 1,
        "ItemId": "PBT=[Usernames]",
        "Properties": [
            {
                "IsNull": false,
                "Modified": true,
                "Name": "Username",
                "Value": "User 1"
            },
            {
                "IsNull": false,
                "Modified": true,
                "Name": "EditLevel",
                "Value": "2"
            }
        ]
    },
    {
        "Action": 1,
        "ItemId": "PBT=[Usernames]",
        "Properties": [
            {
                "IsNull": false,
                "Modified": true,
                "Name": "Username",
                "Value": "User 2"
            },
            {
                "IsNull": false,
                "Modified": true,
                "Name": "EditLevel",
                "Value": "2"
            }
        ]
    }
]
UpdateItems - [HttpPut]
UpdateItems/{mongooseConnectionName}/{idoName}
- Updates IDO Collection items by the
_ItemIDproperty returned by Mongoose queries for each record - BODY: Items to update (one or many), in
jsonformat. Example:
[
    {
        "Action": 2,
        "ItemId": "PBT=[UserNames] UserNames.DT=[2019-05-22 14:42:39.993] UserNames.ID=[bfdce363-f088-409b-8f9a-c1d850778f9e]",
        "Properties": [
            {
                "IsNull": false,
                "Modified": true,
                "Name": "UserDesc",
                "Value": "System Administrator"
            }
        ]
    }
]
DeleteItems - [HttpDelete]
/DeleteItems/{mongooseConnectionName}/{idoName}
- Deletes IDO Collection items by the
_ItemIDproperty returned by Mongoose queries for each record - BODY: Items to delete (one or many), in
jsonformat. Example:
[
    {
        "Action": 4,
        "ItemId": "PBT=[jobmatl] jm.ID=[a03f39c6-f789-4140-95e6-1426a581130e] jm.DT=[2014-11-06 12:03:23.773]",
        "Properties": [
            {
                "IsNull": false,
                "Modified": true,
                "Name": "_ItemId",
                "Value": "null"
            }
        ]
    }
]
InvokeMethod - [HttpGet]
InvokeMethod/{mongooseConnectionName}/{idoName}/{methodName}/{parameterValues}
- Invokes the named IDO method with the supplied parameters.
{properties}= a comma delimited string of properties you wish to see in the results.- BODY: empty
FireAESEvent - [HttpGet]
FireAesEvent/{mongooseConnectionName}/{eventName}
- Invokes the named Application Event System (AES) Event
- BODY: AES parameters and values (one or many), in
jsonformat. Example:
{
   "EventName": "DivideNumbers",
   "Parameters": [
      {
         "Name": "Dec1",
         "Return": false,
         "Value": 100
      },
      {
         "Name": "Dec2",
         "Return": false,
         "Value": 4
      },
      {
         "Name": "ProductVal",
         "Return": true
      },
      {
         "Name": "Infobar",
         "Return": true
      }
   ]
}